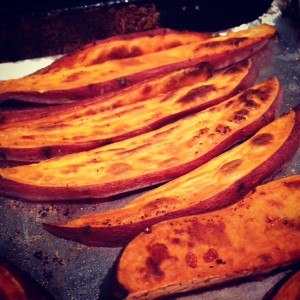
Oven Baked Yam Fries

Oven Baked Yam Fries

Believe it or not, I was a “garbage guts” when I was younger. My mother did a wonderful job of trying to get me to eat my veggies and not letting me leave the table until I’d consumed all my broccoli. But, if I had my wish I would have lived on chicken strips, fries dipped in BBQ or ranch, and any type of candy I could get my hands on. Oh, and a milkshake with LOTS of sprinkles. But no syrup drenched cherry, I did apparently have SOME culinary inclinations as a child. I think we can all agree that those are just gross!

My adult self shudders when I think of that “menu” and makes me want immediately consume a kale smoothie just in an attempt to balance out the years of chicken strip consumption! Even as adults we need a little comfort food. Pie, mashed potatoes, ice cream, onion rings, and, of course, french fries! Traditional french fries get a bad wrap for being…well…basically deep fried in oil which, let’s just call a “spud” a spud and admit that they’re is little to NO nutritional value of the potato left at that point. What if I told you that there was an alternative to “healify” fries and they were still delicious! So delicious, in fact, that I don’t even DIP MINE or miss my trusty BBQ or ranch.

Yes, my fry friends, it’s true! While you can do this with white potatoes, and add a little rosemary and garlic while you cook them, I prefer to do yam fries because I just simply like yams more. These are my go-to side dish when entertaining or just needing to add a carb to the meal. They’re delicious and super simple to make! You can also get “fancy” and experiment with different spices. Post in the comments what you’re favorite spices are!

Yam Fries

2 long skinny yams
EVOO
Smoked Paprika
Fresh Cracked Pepper

  1. Preheat oven to 400 °F (200 °C). Depending on your oven, and how crispy you liked them, you can experiment with 450°F or even 500°F. Cover a baking sheet with non-stick foil and pre-heat the baking sheet (this helps to achieve crispier fries)
  2. Wash and dry the yams, then cut them once lengthwise. Using a very sharp knife makes this easier. Place the halved yams face down on the cutting board, and cut in half again lengthwise and then slice the yams length wise in little strips to create the “fry” form.
  3. Put the cut  fries in a large bowl, drizzle with olive oil, smoked paprika and cracked pepper and toss them until all the fries are covered. You can also brush the olive oil on the fries if you prefer, using a basting brush.
  4. Lay the fries out in a single layer a baking sheet lined with non-stick foil and cook forThe SimplyRecipes.com recipe had a helpful note I’ll try next time, one of their readers recommended laying them on a wire cooling rack on top of a baking sheet, so that the oven air circulates around the sweet potato pieces and you don’t have to flip them over .
  5. Bake for 15- 20 minutes until lightly browned on one side, then flip and bake for an additional 15-20 minutes until they reach the desired browned crispness you desire. 
Padron Peppers

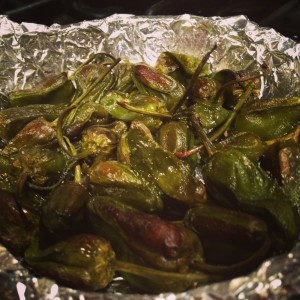
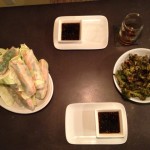
IMG_3763We fell in love with these tasty little treats on our trip to Spain last spring. Known to the locals as Pimientons de Padron, they originated in the Galicia region of Spain but can be found throughout the country and are served a part of the national tapas tradition.

These guys aren’t necessarily spicy hot, only one in ten usually pack heat, but they have a mild kick which meshes with the smokey grilled flavor and the cracked salt. Preparation is quite simple: rub with olive oil and fresh cracked sea salt then oven grilled in a cast-iron skillet. You can usually find them fresh in season from may through late september.

Padron Peppers
Prep  5 min| Cook 25 min

Ingredients:
2 tsp. Avocado or Safflower oil (these are best for high-heat cooking)
1/2 lb. pimentons de padron
Fresh cracked Sea Salt
Cast Iron Skillet & Aluminum Foil

Preparation:
Pre-heat the oven to 350. Wash and pat the peppers with a paper towel to dry them. Toss them in the oil and crack some fresh sea salt on top then place in a cast iron skillet that is covered with aluminum foil. Once the oven is pre-heated, place the skillet with the oil coated peppers and cook for 20-30 minutes, turning once or twice to make sure all the surfaces are charred. Crack more fresh sea salt over the peppers and serve!

Pair well with some delicious Sangria and tapas!

Healthy Spring Rolls with Garlic Ginger Dipping Sauce (Vegetarian Option)

Spring has sprung friends! As the weather turns from the chilly winter to crisp spring I start to crave the lighter fare: chicken salads, grilled fish and veggies, Rose and bubbly wines, strawberries and all other fresh spring/summer fruit. A few weeks ago, my mother invited me along to a cooking class from Culinary Events Northwest. The class met at the Lynnwood Albert Lee Appliance store so off we went to learn our “Wraps Around the World”. There were a few different interesting offerings, such as crepes with buckwheat flour and strawberry balsamic drizzle. But my favorite from the class was the Vietnamese Style Spring Rolls.

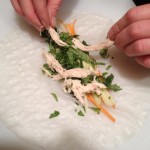
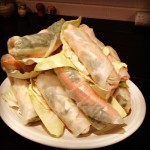
We love ordering these when we eat out but I had NEVER before thought about trying to make them myself! To celebrate the first day of spring it was time to try my hand at some homemade spring rolls for dinner! The hardest part of this project is the prep! Once you get everything washed, chopped and arranged in an assembly line it’s easy peasy and I had 12 of these bad boys made before I knew it!

The report from mister Byte of life: Success! His only regret for the meal was that he didn’t have a larger stomach. Chef, happy! Even the next morning at breakfast he was talking about how good they were and how excited he was to be hungry later so he could eat more! These little guys are great as appetizers or served with grilled or steamed veggies for dinner. They make great next day lunches or afternoon snacks. I’ve included a few other ingredient ideas below. What are some of your favorite spring roll ingredients or ones you’d like to try! Also, please feel free to post other dipping sauce recipes!

Healthy Chicken Veggie Spring Rolls
These can be vegetarian by simply omitting the chicken!
Yield you’ll have to play around with the ratios of ingredients but this is a general guideline of ratios from my assembly line. 

12  8 or 9 inch rice-paper sheets
1 c fresh mint, chopped
1 c fresh cilantro, chopped
1 c fresh basil, chopped
1 – 1 1/2 c finely chopped green cabbage
extra full cabbage leaves to separate the spring rolls on your display plate (the rice-paper wrappings will stick to each other)
1 c matchstick-sized cucumber, peeled first
1 c matchstick-sized carrots, peeled first
2 cooked chicken breasts
1 pan, diameter wide enough to soak rice-paper sheets
1 dry dish towel and either a plate or cutting board to turn rice-paper onto

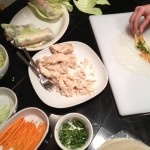
  1. Prep all herbs and veggies into separate bowls and create your assembly line. Carrots and cucumber first followed by the herbs, then your protein and cabbage at the end. Have a plate ready to place your completed spring rolls on, as well the cabbage to separate the spring rolls as the paper wrappers love to stick to each other.  (If you are making ahead and storing, you can also cover with a damp paper towel and plastic wrap, then place directly in fridge)*If you are making the sauce below, prep those veggies after chopping the spring roll ingredients then make the sauce before starting your spring roll assembly line.
  2. Fill your pan with 2-3 inches room temperature to slightly warm water and place at the beginning of your assembly line with the dry dish towel and cutting board or plate where you will be assembling your spring rolls.
  3. Soak the first rice-paper wrapper in the water until it looses it’s rigidity, about 30 seconds, but is still slightly firm. You’ll just have to try a few times and sacrifice a few rice-papers to get the hang of seeing and feeling when the rice paper is ready to be rolled. You don’t want it TOO soft or else it will easily tear. 
  4. Once the rice paper is ready to be rolled, move onto the paper towel and place another rice paper in the water. Gently dab off the water from the rice paper, it will still be damp and wet but it shouldn’t be soaked. Gently transfer to the cutting board and fill with your ingredients. Arrange a few carrots and cucumber centered in the top 1/3 of the rice paper closest to you, leaving about 3/4 – 1 inch border on each side for rolling. Place the herbs, protein and cabbage in the roll making sure to not fill TOO large to wrap. Fold the top of the rice paper closest to you over the heap of ingredients as tightly as you can without breaking the rice paper. Delicately fold in each side of the rice-paper burrito style and roll away from you to wrap up the spring roll, making sure to keep the rice-paper as taut/tight to the ingredients as you can. You might need to fold in the sides another time or two as you get to the end of the rolling process. The spring roll will seal itself against the rest of the rice-paper.* be sure to keep an eye on the sauce, stirring every few minutes to mix the ingredients together 
  5. Place on one of the large cabbage leaves on your display plate and repeat step 4 until you’re done making spring rolls.

Other roll ideas:
Marinated Baked Tofu with bean sprouts and sliced red peppers
Sashimi with pickled ginger & wasabi or wasabi dipping sauce
Asian Marinated flank steak with fresh ginger and garlic ginger dipping sauce

Garlic Ginger Dipping Sauce
Yield enough for about 6-8 spring rolls
3 cloves fresh garlic, minced (or 1 1/2 tsp jarred minced garlic)
1- 1 1/2 tbsp fresh ginger (or 1 1/2 tsp dried ginger)
1 tbsp toasted sesame oil
1/3 low sodium soy sauce
1/4  c.rice vinegar (or white wine vinegar works as well)
1/4 c. tsp crushed red pepper flakes ( unless you like it SPICY, stick to this ratio or it might overpower the rolls)
1 tbsp sugar

Combine all ingredients in small pot and cook over low heat until mixture bubbles. Can be stored in airtight container and refrigerated for up to three days after making.

Elote Restaurant (Sedona, Az)

We discovered Elote on a recent trip to Arizona. Since our scheduled flight to thaw out occurred during this years snow-pocalypse our flight was canceled! How DEVASTATING when you’re at the airport, suitcase packed with shorts and bathers while your body is clad in thermal long underwear and a ski jacket. Snow can’t hold us down so we rescheduled a flight for mid April and thankfully the snow was nowhere to be  seen as we taxied off the runway, bound for warmer weather and no work e-mail! Time to THAW OUT!

Seafood Scallop Tacos


Thanks to some last-minute planning on our wonderful hosts part, a trip to Sedona and the Grand Canyon was in order so last-minute overnight bags were packed and off we went! We stayed in Sedona and upon checking in, decided that Mexican food was the general “tasted up” status of our group so we asked the front desk concierge and immediately she said that we HAD to go to Elote. “You’ll want to get there right when they open at 5pm otherwise you’ll be in an hour plus line to get in. Regardless, I promise you it’s worth it! The food is worth waiting for!!”. She didn’t need to twist our arm any further, Elote it was! Thinking that we were going to beat a line, we tootled down and found parking and headed to the entrance that had.. gasp… a line of at LEAST 30-40 people in it! But… I… HOW!? It’s 15 to 5pm!!Thankfully they open the bar and efficiently shuffle you in to get drinks to enjoy while waiting. We started with a round of a few Margaritas and house Sangria’s (the house red Sangria was truly AMAZING!) and posted up in line. By the time we got to the front and got our name on the list, we were on the second round and headed to the side shaded patio that they have set aside for people waiting. Second round came and our table was ready!


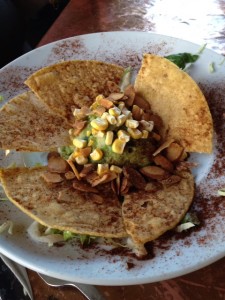
Guacamole
Guacamole


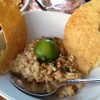
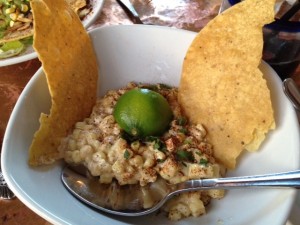
To start we ordered two table appetizers: the Guacamole and of course the namesake dish Elote, which is made of fire roasted corn and spicy mayo and garnished with lime and Cotija cheese. Both dishes were absolutely stunning!! I grew up in California with an avocado tree in my back yard so avocado and guacamole dishes are somewhat a specialty of my family, and this truly earned my seal of approval!! The Elote was SUCH a wondrfully charred and creamy dish… I regret that I have only one stomach and had actually ordered dinner. The entrée’s were equally as picturesque and tasted wonderful! The table ordered (therefore I was able to sample) the Carnitas, the Lamb Adobo AND enjoy my own absolutely delicious entrée of seafood scallop tacos. They served a black bean puree on the side and it completely changed how I will eat and cook black beans forever more!

Since it was a birthday trip, I was surprised by a trip to our table by the wonderful Chef, Jeff Smedstad, who signed my personal copy of the cookbook and took a picture at the table! This recipe for Elote, the namesake of the restaurant, was THANKFULLY included in the recipe book and we can’t WAIT to cook it up! Pictures to follow once we cook it up ourselves!


Elote

Serves 4-6

6 ears of corn, husks intact
1 c. mayonnaise
1 tbsp. Cholula hot sauce
2 tbsp. fresh lime juice
1 tsp kosher salt
1 tsp. fresh ground pepper
1 tsp sugar
1/4 c chicken stock
1/4 c cotija cheese, ground or crumbled for garnish
2 tbsp chopped cilantro for garnish
pure-ground red chile to taste for garnish
crispy tortillas for scooping

  • Over a medium-hot grill, roast the corn until the husks are well charred, about 5 minutes turning occasionally so as not to burn the side contacting the direct heat
  • Set the roasted ears aside until cool enough to handle, then shuck them and cut the kernels off the cobs
  • Mix the mayo, hot sauce, lime juice, salt and pepper, sugar and chicken stock in a saute pan over medium heat
  • Add the corn kernels and cook until corn is warmed
  • Pour into a bowl and garnish with cheese, cilantro, and ground chile
  • Enjoy immediately with crispy tortillas


Elote
Elote