Kombucha, Som, Pok Pok and a new Kitchen

Dear friends! As you can tell, I’ve been on a bit of a writing hiatus the past few… months! Works been busy, personal life has been busy, there’s been travel and apparently it’s important to sleep every now and then?! What a cramp on a busy gals schedule hey? But i’ve dearly miss and you and even though I haven’t been posting, I have still been cooking up a storm and gathering new recipes to share! We had the weekly staples- batches of kombucha,and almond butter.We traveled to visit our family and threw in a few beer soaked grilled bratwurst, paleo chocolate chip banana bread and Pecan Pies with fresh homemade crust (of course!). I can’t visit without baking a few pies! One of my favorite parts about visiting family is playing the role of both ‘imported resident chef’ and ‘kitchen instructor’. I have So much fun teaching the niece and nephews to cook! We had a ball in the kitchen and they do great!
photoBut, as I was saying. This entire summer has been booked SOLID with both work and play. And just when I thought things would calm down in the fall, our landlord decided to sell the condo after four years of renting so we had to find a new place. Luckily, we found a place that we just LOVE and we move this weekend. THIS WEEKEND! A matter of hours away! I’m so excited I can barely handle it! I can’t wait to unpack and organize the new kitchen! With the fast pace of the last 3 months, cooking as been more of a chore than it usually is. I’ve really leaned on simple recipes, the local pho restaurant, and cereal for dinner. But with a new kitchen comes new recipes and excitement to cook! Which brings me to my fall and winter sports.

I HATE to, and won’t, drive in snow and/or ice… so my fall/winter sports consist of cooking, baking, menu planning from the ridiculous amount of time I spend on Pinterest (A Byte of Life boards here), testing out my wine cellar, catching up on all the shows that everyones been raving about and listening to the rain falling outside. Oh, and pumpkins! I LOVE PUMPKIN!  I’ll eat slow roasted pumpkin right off the baking sheet! And Gingerbread. I LOVE gingerbread! But back to the point- my winter sports are gingerbread and/or pumpkin flavored, with a side of wine, and a good show in the background.

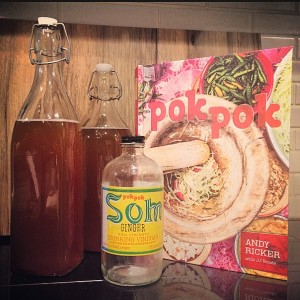
This year, I have a new hobby to add to the list. Pok Pok. If you’ve NEVER been to Pok Pok, you HAVE to go to either Portland or New York and experience their wings and one of their drinks with their drinking vinegar called som. Som is a drinking vinegar that has been an age old practice in many cultures around the world for it’s health benefits. Pok Pok has been serving their drinking vinegars since 2005, both as a cocktail mixer and diluted with soda as a soft drink. They use organic cane sugar for sweetener and let me tell you, while I’m not a soft drink person in the slightest, this stuff is downright addicting! You can purchase the Pok Pok Som online form both Pok Pok and ChefShop.com. A girlfriend and I just took an amazing cooking class at ChefShop.com so you can expect future blog post about them too!

Well, their chicken wings are known nation wide, and their cocktails are red-eye flight worthy. This, coming from a confirmed wine and anti-chicken wing girl. Let’s just keep this short and say that Pok Pok changed my life, as evidenced by the fact that after the first bite I waived down the waiter and asked if I could PLEASE purchase their cookbook but only if the amazing chicken wings were included. He handed me a copy to review. Each page coated in plastic which was an amazing idea because I was pouring over it as I was elbow deep in eating amazing chicken wings,The Pok Pok cookbook holds a special spot on my shelf , I personally confirmed that the chicken wing recipe is included, and it has been added to the list of fall and winter hobbies.

Tune in for more amazing thai inspired recipes from the Pok Pok cookbook, updates from this years International Food Bloggers conference (last years post) and to see how the Som Kombucha turns out! I had a bit of Som leftover and had a batch of kombucha ready tonight so I figured I’d do a little variation on my blueberry ginger kombucha and try some ginger som kombucha. I’ll let you know how it goes!

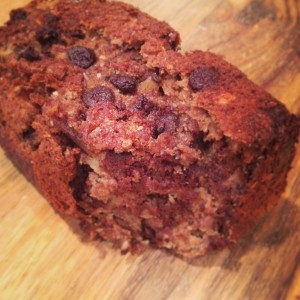
Banana Bread {Paleo, Gluten-Free, Dairy-Free, Sugar-Free}

photo 2


It feels like fall in the city. The weather had been grey and gloomy all week, which is quite a change from last weeks sunburn weather! Grey clouds always get me in a comfy cozy mood, and inspire me to drink tea and curl up with a good book and a blanket. But, what’s tea without a little tea treat, am  right?

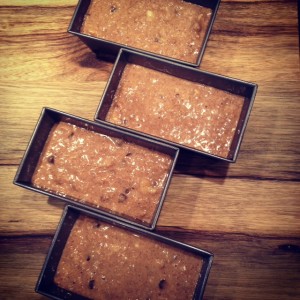
This amazing banana bread entered into my heart a few weeks ago when I had a day off and went to go visit my sister at work. She’s been on this “Paleo Kick” that I usually roll my eyes at, but I have to say this recipe immediate became a kitchen staple and has now replaced my  tried and true Banana Bread recipe that is YEARS old! It’s THAT good kids! 

Gluten-free cooking is nothing new to me. I LOVE baking with Bob’s Red Mill All-Purpose Gluten-Free Baking Flour and have made quite a few goodies with it. Most recently I made a Strawberry Basil BreadGingerbread cookiesChocolate Chip Cookies, amazing Vanilla Cupcakes, and even tried my hand at Vegan Gluten-Free Donuts! To be clear, I am NOT a big believer in following every food fad that comes along, and most definitely did NOT jump on the Paleo band wagon when it came in vogue, nor am I on that bandwagon now. This bread is quite simply one of the most delicious healthy baked goods I’ve ever had. It’s mainly bananas and eggs, a little homemade almond butter, gluten-free flour, and some apple sauce to hold it all together. That’s it! No added sugars. No two stick of butter and 5 cups of refined white flour. Just simple, regular ingredients you can pronounce and happily eat.

IMG_7780 

There are many variations you can try with this recipe and I list a few at the end of this recipe. Next time I might throw in some blueberries, or try coconut flour to make a bit more of a dessert style bread. What variations would you, or are you, going to try?

Paleo Banana Bread
Adapted from Civilized Caveman Cooking Creations Recipe 
Prep Time: 10 mins | Cook time: 30-45 minutes

Ingredients
2 1/2 cups  yellow bananas, mashed (approx. 4 bananas) 
4 eggs
1/2 cup homemade almond butter
4 tablespoons Apple sauce (original recipe called for melted grass-fed butter or coconut oil)
1/2 cup gluten-free flour
2 tsp cinnamon (original recipe called for 1 tbsp but that’s a little heavy for a summer bread)
1 teaspoon baking soda
1 teaspoon baking powder (gluten-free or homemade)
1 teaspoon vanilla
pinch of sea salt

Instructions
1. Pre-heat your oven to 350 degrees fahrenheit
2. Combine your bananas, eggs, and nut butter, and apple sauce and mix well
3. Add in in the flour, cinnamon, baking soda, baking powder, vanilla, and sea salt and mix well
4. Grease a 9×5 glass (see notes) loaf pan with a fat of your choice (I use Rice Bran oil)
5. Pour in your batter and spread it evenly throughout
6. Place in your preheated oven and bake for 55-60 minutes or until a toothpick inserted into the center comes out clean (If you use a metal pan it will probably bake in 35-40 minutes so start checking at 35 to ensure the middle stays moist)
7. Remove from oven and flip your bread out onto a cooling rack
8. Slice and serve

Variations
1. Alternate Nut Butter: You can use any almond butter you desire: coconut, sunflower seed, macadamia nut, etc
2. Alternate Flour: My sister uses coconut flour, but I bet that almond flour or macadamia nut meal could be delicious
3. Flavors: Cranberry Orange – Only use 3 tablespoons of butter. Add zest of one whole orange diced, juice of one whole orange, and 1 cup dried cranberries or fresh if you want
4. Flavors: Chocolate Blueberry – Add 1 cup of fresh blueberries and 1/2 cup of cocoa powder
5. Flavors: Pumpkin Pecan – Reduce the almond butter to 1/4 cup and add 1/2 cup of pumpkin puree and 1 cup of roughly chopped pecan pieces

If you want to make these into muffins, use the same recipe and for mini muffins bake approximately 25 mins and normal size muffins 30-35 minutes.


Taco Tuesday: Black Bean & Lime

TTTTRRAADDDIITTTIIOOONNNN!!! TRADITION!

“Traditions, traditions. Without our traditions, our lives would be as shaky as… as… as a fiddler on the roof!”(Tevye, Fiddler on the Roof)

Oh, excuse me! I was just practicing my Fiddler on the Roof singing. In case you’re inspired to watch the intro video you can check it out here: Fiddler on the roof – Tradition.

But this outburst of song was inspired by the weekly taco Tuesday tradition that we have.This post was actually last weeks Taco Tuesday adventure but I got busy and figured I better get it up before tonight’s Taco Tuesday adventure (sneak peek: fish tacos are on the menu!). Our Tuesday tradition keeps menu planning simple and I love that I can pick up the ingredients on the weekend and just grab some fresh cilantro from the market on Monday/Tuesday (or heck even Sunday if I’m lazy!) and then everything’s pretty much ready to go when we get home. Because let’s be real, by the time you get home from work and get through chores/errands/working out/traffic/family/pets… the last thing you want to do is cook up some tedious elaborate meal! Well, maybe that’s just me so those of you that are with me… read on!

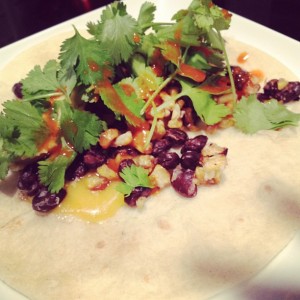
black bean and lime tacos

I am the more carnivorous eater in our house, but also dairy-free so we try to find meals that I can get excited about without featuring meat/dairy for the main protein focus. There are a few wonderful things about tacos. First, the word itself. Taco…ttaaccoooo…TACO! It’s just fun to say!  But another very wonderful feature of the taco is that it’s the everyone food. A taco can literally be made that will please anyone! From the meat and potatoes crowd to the vegan or gluten-free eaters, a taco will always have your back. They can be (deep breath) meat free, vegetarian, gluten-free, meat focused, lactose free, diary free, corn free, (air), wheat-free, egg free, nut free, tree-nut free, soy free, fish free, paleo…they can LITERALLY feed ANYONE!

Another amazing thing about tacos is that you can make them with whatever is in the fridge! They can be as simple or elaborate as you desire! Paging through our new cookbook I received as a birthday present from our recent trip to Sonoma, I was remembering the wonderful pureed black beans from Elote Cafe. They…were…delicious!!! Between that and a ridiculous excess of limes in our house (I’m not sure why… maybe it has something to do with a reverse sock monster effect? Someone PUT limes in the fridge?! We also have a glasses gnome that sneaks in an puts their sticky little paws all over our glasses! But back to the point! We had a randomly large amount of limes and decided to use them up in this tasty taco Tuesday recipe! For texture, I pureed some of the beans and left some of them whole. And… since I’m obsessed with grilled corm we also did a few ears of corn!

So sit back, relax, maybe make yourself a delicious sommer sherpa  and enjoy the tradition of taco Tuesday with us!! Stay tuned for tonight’s fish tacos recipe coming soon and let me know what your favorite taco recipes are! I’ll be featuring your suggestions in my Taco Tuesday Pintrest board!

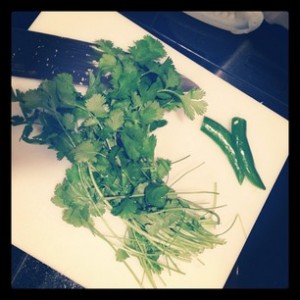
chopped cilantro and jalapeno

Black Bean & Lime Tacos w/Grilled Corn

1 can black beans
1 spoon full minced garlic and juice
Cracked Salt & Pepper to taste
Cayenne Pepper to taste
2 limes, juiced (plus any additional wedges you want for garnish)
2 Ears Corn
Flour Tortillas (or corn for a gluten-free option)

Optional garnish/additions: Cheese, sour cream, grilled southwest cabbage slaw, avocado, Cilantro, jalapeño, chopped/grilled onions, grilled mushrooms, hot sauce/salsa, Elote, red peppers, radishes, fruit salsa

  1. Soak the corn for 20 minutes then pre-heat the oven and wrap corn in foil and cook for 30 minutes. At that point I usually open up the foil and start to turn the corn every 5 minute to attain a good char. You can also use canned corn and heat on the stove if you’d like.
  2. The beans usually take 10 minutes to prepare so when you’re ready heat the beans over the stove or in the microwave with the garlic, salt/pepper, cayenne pepper and juice of two limes. Once it’s thoroughly heated transfer to a vita mix blender and blend until creamy. You can also use an emulsion blender, potato masher, or food processor.
  3. Slice the avocado and prepare the garnishes you desire
  4. Heat the tortillas over open flame on the stove (or heat in the micro between two damp paper towels or in the oven wrapped in foil).
  5. Spread out the black beans and garnish away!

Easter Brunch Cake: Spiced Carrot Cake w/ Walnut Coconut Glaze (Paleo)

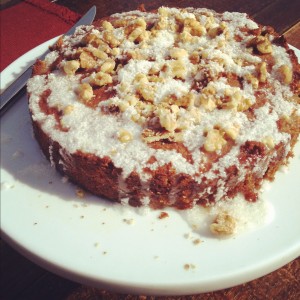
Spiced Carrot Cake w/ Walnut Coconut Glaze

Happy Easter everyone!! What better way to celebrate the Seattle sun than with a delicious cake for Easter brunch. A member of the family recently enrolled in cooking school so this was the year for me to take a back seat in the kitchen and a prime seat on the patio with a mimosa and let someone else do the work!

But, a chef can’t QUITE sit still that long so I whipped up a breakfast cake recipe, keeping in mind the diet of our Paleo host and hostess and I have to report that it turned out to be a delightful little post-brunch treat.

I was positive that our new chef would do just fine filling our stomachs with the main course so we needed a festive cake that was just a tad sweet, had a nice moist yet crunchy texture and a flavor that was both rich and light to satisfy the last few remaining bits of space in our brunch-ers stomachs. This cake did the trick! I wasn’t sure how it would turn out, since my recipes are comprised of a little of this and a handful of that but the measurements below are rough estimates.

Notes: If it feels a bit dry, add more applesauce or soy milk. A bit too wet  opt for more coconut or a dash more flour. With the glaze, keep the mindset that less water is better! It’s easier to add more water than have a half batch of glaze leftovers.

I did a bit too much and wound up with a half bowl of glaze! Above all else, pour another mimosa and have a wonderful day!!


Spiced Carrot Cake w/ Walnut Coconut Glaze (Paleo)

  • 1/2 c apple sauce
  • 1 c coconut flour
  • 1 tsp baking soda
  • 1/2 tsp cinnamon
  • 1/4 tsp salt
  • 2 large eggs
  • 3/4 c packed light-brown sugar
  • 1/3 c soy milk
  • 2 c shredded carrots
  • 1/3 c unsweetened coconut

Glaze & Topping:

  • 1/3 c unsweetened coconut
  • water (as much as needed)
  • chopped walnuts

Directions

  1. Preheat oven to 350 degrees. Spray an 8inch round cake pan with Pam or Misto with Canola oil.
  2. In a medium bowl, whisk flour, baking soda, cinnamon, and salt; set aside.
  3. In a small bowl, whisk eggs, sugar, applesauce and soy milk until smooth.
  4. Gently mix egg mixture into dry ingredients until moistened; mix in carrots. Transfer batter to prepared pan.
  5. Bake until a toothpick inserted in center comes out clean, 40 to 45 minutes (if browning too quickly, tent cake with aluminum foil). Cool in pan, 15 minutes. Turn out of pan, remove paper, and cool completely on a rack, right side up.
  6. Transfer to cake pedestal, and sprinkle with crumbled walnuts
  7. Make glaze and drizzle over the top of the cake and walnuts or dust with confectioners’ sugar.

Weekend Breakfast: Potato Pancakes, Poached Eggs & Avocado Sauce

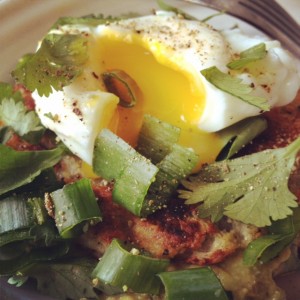
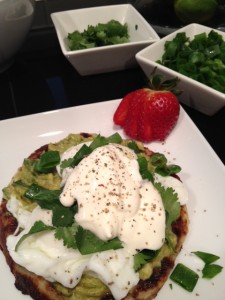
Potato Pancakes, Poached Egg, Avocado Sauce

Recipes for me serve as general guidelines for inspiration, so this meal is the result of a recipe for avocado sauce and a fridge of leftover ingredients from cilantro lime marinated chicken skewers and homemade potato skins.

It was super easy to make and, as I’ve mentioned in other posts, I LOVE cooking weekend breakfast and brunch! Today’s religious experience was so simple and flavorful! It even got the complement comment  “this is SO good! I feel like I’m on vacation! “… Now that makes a chef happy!

The crispy texture of the pancake mixed with the creamy avocado sauce and the runny egg is just to die for! The lime in the avocado sauce and the spices made for a very refreshing meal. I couldn’t believe how the flavors  and textures mixed. Don’t get me wrong, I knew it would be good but I was actually surprised at how incredibly delicious it was! I regret that I have only one stomach! You can play around with different spices and ingredients, and you might get extra points if you find a way to mix in some tequila! 🙂 Breakfast drink anyone!?

Potato Pancakes, Poached Eggs & Avocado Sauce
a rough step by step guide

Potato Pancake & Poached Eggs Ingredients
Potato
Milk (you can use regular or an alternative)
Cheddar Cheese, grated (regular and/or alternative)
Eggs
Fresh Salt & Cracked Pepper
Cilantro (to garnish, if desired)
Green Onions (to garnish, if desired)
Sour Cream (to garnish, if desired)

Avocado Sauce Ingredients
Avocado
1 lime
Fresh Salt & Cracked Pepper
Cayenne Pepper
Cumin
Garlic, minced
Cilantro

  1. Heat pan for potato pancakes. I swear by my Calphalon Crepe Pan! It heats evenly and the non-stick makes for quick and easy clean up!
  2. Mash together the potato, milk, salt & pepper to taste. Make sure to get it as smooth as you can without any potato lumps. While the potato pan is still heating, chop the green onion, cilantro and grate the cheese.
  3. To make the avocado sauce, mix together all listed ingredients to taste until smooth. Be mindful on the cumin, it’s a strong flavor and can easily overpower the flavors if you’re not careful!
  4. The potato pan should be hot by now, scoop in the potato and carefully flatten and shape into a circle. Cook until crispy on one side and flip. Add the cheese and allow it to melt. Once the cheese is fully melted, move to plate and smear avocado sauce on the top.
  5. Once you flip the pancakes, start the water for the eggs boiling and poach the eggs for 3 minutes. Have a small ramekin handy to drain the water from the eggs. I LOVE the CorningWare Ramekins, they’re so stylish and the perfect size for poached eggs. After 3 minutes, don’t let the eggs overcook, remove the egg with a slotted spoon and rest the spoon over the ramekin to allow the last drops of water to fall. If you don’t do this, the water will soak into the pancake and make it soggy.
  6. Place the poached egg on top of the avocado adorned pancake, and garnish with cilantro, green onion, sour cream, and spices as desired. You can add a little salsa if you wish, I wanted to bring out the flavor of the avocado sauce so we didn’t use it for this breakfast.


Weekend Breakfast: Eggplant and Scrambled Eggs

I love weekends! What’s better than waking up and realizing that the first of two day’s you’ve been looking forward to all week are finally here!

One of the best parts of the weekend, in our house, is weekend breakfast! During the week, breakfast is a chore and provides quite a bit of entertainment while I bang around opening cabinets and drawers in the attempt to find a suitable meal that can be made quickly or eaten on the go.

But Weekends…walking into the kitchen, opening the fridge and creating some delicious weekend masterpiece is nearly a religious experience for me! Today, however, there was little inspiration flowing so I gave creative powers the day off and opted for my simple “go-to” stand by’s of eggplant and and scrambled eggs.

Not only is this meal gluten-free, dairy-free, paleo, low fat but it’s also incredibly simple and quite delicious!

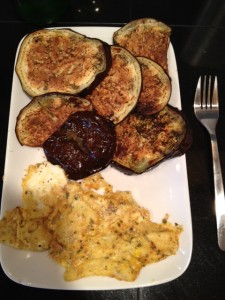
Eggplant & Scrambled Eggs

  • Pre-heat oven to 450
  • Slice eggplant and lay on baking sheet covered with a sheet of Reynolds Wrap Non-stick aluminum foil 
  • Misto Spray olive oil  on the top of the eggplant and season with fresh cracked pepper
  • Cook for 15-17 minutes, or until eggplant is as cooked/crispy as you like
  • When there is about 5 minutes left on the oven timer, scramble one egg with garlic, cayenne pepper, fresh cracked pepper, dried parsley and cook.
  • Enjoy!!

Today I also tried something that we picked up last week and I haven’t yet tried, Reynolds Wrap Non-stick aluminum foil (also available through My Amazon.com Store). We make broiled veggies 3-5 times a week and no matter how much olive oil I lather on the veggies or Misto spray on foil the eggplant ALWAYS sticks! It drives me nuts and has caused a few choice words to escape on various occasions! So, last week we picked up a roll of the alleged “non-stick” foil and today was the day! I was skeptical as I pulled it out of the drawer mentally recounting the countless fights with the baking sheet and foil as it they tried to hold onto my precious eggplant with their sticky powers.

I am quite happy to report that I’m a believer! Foil CAN be non-stick! Ring the bells, sound the horns! That foil worked wonders and I actually liked that it wasn’t quite flawless, as you can see in the photo the end cut of the eggplant stuck to the sheet a bit. Full dramatically narrated product review posted here. This is now a STAPLE of my modest little kitchen! With the tiny space that we have, every utensil, pot, pan and gadget must earn it’s spot!


And on a completely non-related side note… have you ever tried to spell  “utensil” and gotten it right the first time!? I’ll shamelessly admit that it took me a few tries… what a strange word!


Broiled Eggplant