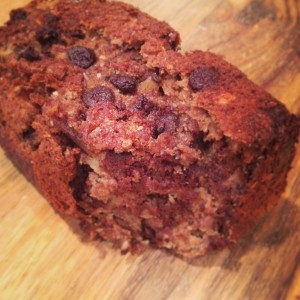
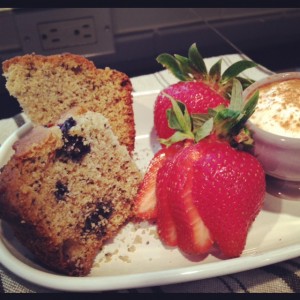
Banana Bread {Paleo, Gluten-Free, Dairy-Free, Sugar-Free}

photo 2


It feels like fall in the city. The weather had been grey and gloomy all week, which is quite a change from last weeks sunburn weather! Grey clouds always get me in a comfy cozy mood, and inspire me to drink tea and curl up with a good book and a blanket. But, what’s tea without a little tea treat, am  right?

This amazing banana bread entered into my heart a few weeks ago when I had a day off and went to go visit my sister at work. She’s been on this “Paleo Kick” that I usually roll my eyes at, but I have to say this recipe immediate became a kitchen staple and has now replaced my  tried and true Banana Bread recipe that is YEARS old! It’s THAT good kids! 

Gluten-free cooking is nothing new to me. I LOVE baking with Bob’s Red Mill All-Purpose Gluten-Free Baking Flour and have made quite a few goodies with it. Most recently I made a Strawberry Basil BreadGingerbread cookiesChocolate Chip Cookies, amazing Vanilla Cupcakes, and even tried my hand at Vegan Gluten-Free Donuts! To be clear, I am NOT a big believer in following every food fad that comes along, and most definitely did NOT jump on the Paleo band wagon when it came in vogue, nor am I on that bandwagon now. This bread is quite simply one of the most delicious healthy baked goods I’ve ever had. It’s mainly bananas and eggs, a little homemade almond butter, gluten-free flour, and some apple sauce to hold it all together. That’s it! No added sugars. No two stick of butter and 5 cups of refined white flour. Just simple, regular ingredients you can pronounce and happily eat.

IMG_7780 

There are many variations you can try with this recipe and I list a few at the end of this recipe. Next time I might throw in some blueberries, or try coconut flour to make a bit more of a dessert style bread. What variations would you, or are you, going to try?

Paleo Banana Bread
Adapted from Civilized Caveman Cooking Creations Recipe 
Prep Time: 10 mins | Cook time: 30-45 minutes

Ingredients
2 1/2 cups  yellow bananas, mashed (approx. 4 bananas) 
4 eggs
1/2 cup homemade almond butter
4 tablespoons Apple sauce (original recipe called for melted grass-fed butter or coconut oil)
1/2 cup gluten-free flour
2 tsp cinnamon (original recipe called for 1 tbsp but that’s a little heavy for a summer bread)
1 teaspoon baking soda
1 teaspoon baking powder (gluten-free or homemade)
1 teaspoon vanilla
pinch of sea salt

Instructions
1. Pre-heat your oven to 350 degrees fahrenheit
2. Combine your bananas, eggs, and nut butter, and apple sauce and mix well
3. Add in in the flour, cinnamon, baking soda, baking powder, vanilla, and sea salt and mix well
4. Grease a 9×5 glass (see notes) loaf pan with a fat of your choice (I use Rice Bran oil)
5. Pour in your batter and spread it evenly throughout
6. Place in your preheated oven and bake for 55-60 minutes or until a toothpick inserted into the center comes out clean (If you use a metal pan it will probably bake in 35-40 minutes so start checking at 35 to ensure the middle stays moist)
7. Remove from oven and flip your bread out onto a cooling rack
8. Slice and serve

Variations
1. Alternate Nut Butter: You can use any almond butter you desire: coconut, sunflower seed, macadamia nut, etc
2. Alternate Flour: My sister uses coconut flour, but I bet that almond flour or macadamia nut meal could be delicious
3. Flavors: Cranberry Orange – Only use 3 tablespoons of butter. Add zest of one whole orange diced, juice of one whole orange, and 1 cup dried cranberries or fresh if you want
4. Flavors: Chocolate Blueberry – Add 1 cup of fresh blueberries and 1/2 cup of cocoa powder
5. Flavors: Pumpkin Pecan – Reduce the almond butter to 1/4 cup and add 1/2 cup of pumpkin puree and 1 cup of roughly chopped pecan pieces

If you want to make these into muffins, use the same recipe and for mini muffins bake approximately 25 mins and normal size muffins 30-35 minutes.
 

Blueberry Ginger Kombucha

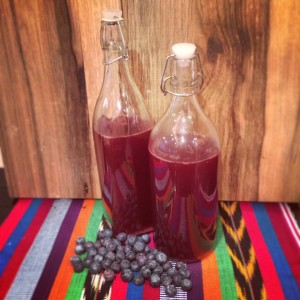
photoContrary to what you might think, making your own Kombucha is NOT that hard. It’s actually QUITE easy. You simply brew some tea, add organic sugar, let it cool to room temperature and then pour into a jug with your SCOBY and let it chill for a week or two. Viola, homemade Kombucha! I’ve been making my own kombucha for almost two years now and decided that it was time to start experimenting with some flavoring. Regular brewed kombucha is completely drinkable, but it’s just that… drinkable. Not super exciting. So, it was time to add some excitement to my kombucha making routine! Watch out kids, magic is about to happen!

Remembering back to when I first started drinking kombucha I LOVED the Gingerberry flavor from Synergy Organic. Off to the inter-webs I flew and found some great tips from a website called Cultures for health. Their  Kombucha FAQ listed some delicious recipes, pointers on second fermentation and flavoring, and many other kombucha resources as well as a place to purchase your SCOBY. Well, I blueberry juice and gingered up and have been trying my hand at a few batches of homemade gingerberry kombucha. The second fermentation process is a great way to add some flavor to your brewed kombucha. “A byproduct of fermentation is that the sugar is turned into carbon dioxide giving the kombucha the fizzy texture it is often known for.” ( Quote from the  Kombucha FAQ ). I have two glass bottles that I use for my second fermentation. There is no rhyme or reason to these bottles, or pro/con of using one over the other can I can tell so far. One is the KORKEN bottle from Ikea. It’s $3.99 and is a nice round shape that should fit in the door of most refrigerators. The other is the square glass bottle from Cost Plus which is $5.99 and is a bit taller yet equally as useful. Bottle shape and size is really up to your personal preference. Just make sure it’s a glass bottle and that it has the sling top, which allows the bottle to burp (lovely description, I know!) and release the carbon dioxide as it ferments. If you don’t have a bottle that burps, you’ll have a bottle that bursts. I for one don’t need to come home to glass and kombucha scented kitchen. You can find some GREAT tips on second fermentation from Cultures for Health: Flavoring and Bottling Kombucha. They’re a GREAT resource that I’ve used many times along my Kombucha journeys. I am also lucky enough to have my very own kombucha guru on speed dial who can answer my “am I going to die if I drink this” and “should it look like that” questions. That is one of the MAJOR benefits of having friends that are also obsessed with making their own kombucha and I highly  recommend having a few on retainer! The “if flavoring with…use…” below is from the Cultures for Health website and remember, the flavor will develop during the second fermentation period so go easy on flavoring the first time you make it and adjust on the second batch. If flavoring with…use…

  • Fresh, frozen, or dried fruit…start with 10% to 30% fruit and 70% to 90% Kombucha.  Fresh fruit yields the best flavor.
  • Juice… start with 10-20% juice and 80-90% Kombucha.
  • Herbs… the variety and strength of herbs varies so greatly, experiment and come up with the best ratios and combinations for your taste preferences.
  • Flavor extracts such as almond extract or vanilla extract… start with 1/4 teaspoon extract per cup of kombucha and adjust to taste.

I’ve only used fruit juice and various types of ginger so far, so please comment and let me know what flavors you try!!! Blueberry Ginger Kombucha  1/2 c 100% blueberry juice 1 tsp chopped ginger 7 c  Homemade Kombucha 2 sling top glass bottles Mix half the blueberry juice and ginger in  each of the glass bottles and shake to mix. Add 3 1/2 cups of the homemade kombucha to each bottle, making sure that you leave room in the bottle between the kombucha and the opening. Leave on the counter for 2-14 days. Once you achieve the desired flavor and carbonation, re-bottle and keep in refrigerator to consume at your leisure.

Vegan Blueberry Lemon Poppy Seed Bread

It’s 3:15 am… a time of… well not really day OR night… it’s a time no person should ever experience let alone when they’re SO worn out and sleepy all they want to do is go back to sleep. I’ve you’ve been following A Byte of Life, you’ll have read the post on Spain (also found here) which was a MOST incredible trip! We were seriously debating how long we could just fall off the grid and NOT come home! But alas, common sense or something to that nature won and we got on the multiple planes home. Oh hey jet lag, how are you? Are YOU the reason I’m up at 3:15am!?

Turning to my tried and true comfort, I started googling for recipes. If I can’t sleep I may as well bake right!? My love for lemon poppy-seed is almost as strong as my love for a good bottle of red wine, and thankfully, the mister LOVES a good lemon poppy-seed ANYTHING! The request was made and I had a mission ahead of me: your mission, should you choose to accept it, is to create a delicious lemon poppy-seed baked good that’s not super sweet and melts in your mouth Well, now that’s a fun challenge!

Lemon Blueberry Poppyseed Bread

Vegan Blueberry Lemon Poppy Seed Bread
—-
1/4C canola oil
1/4 C  honey
1/4C applesauce
1/4 C soy milk
zest & juice of 1 lemon
—-
2 C Bob’s Red Mill Gluten-Free flour
3/4 tsp baking soda
1/2 tsp salt
2 tbs poppy seeds
1 C fresh blueberries (put in freezer for about 30 minutes before using)
—-
Pre-heat oven to 375
Combine the oil, applesauce, soy milk, honey , lemon juice and zest in a bowl
Sift together the flour, baking soda and salt. Add the poppy seeds and mix to combine.
Add to the wet ingredients and incorporate
Fold in frozen blueberries. Note that the batter will be thick
Place into a greased loaf pan, sprinkle raw sugar on top
Bake at 375 for 35 minutes(turning once half way through cooking)

Tasting notes:
It’s not your typical fluffy, white flour, white sugar lemon loaf you’d get at Starbucks. This is a more rustic bread and it was quite good! The gluten-free flour lends to a bit more of a mealy texture. Next time I’d add a bit more lemon juice. It’s not a sweet bread at all, so you’d need a lemoncello glaze, or blueberry jam/lemon curd/clotted cream to make it more pastry-ish.

All in all, it’s a good solid rustic breakfast bread…and…I better go taste another slice before posting this review 🙂