From the Take Out Menu: Interview with Buried Carrots

Karen Milling of Buried Carrots

Buried Carrots
“Colorful writing, delicious food”

It’s always so fun to do a little “take out” and explore what others in the food blogging community are posting and eating. One of my favorite blogs to look at is Buried Carrots. We’re not vegetarians but we try to minimize our meat, and Karen is so wonderful at illustrating the delicious meat-free food options that abound!

I love Karen’s writing and photographs! They’re so inviting, comfortable, and inspiriting. Her writing style makes me feel like were curled up at a coffee shop chatting the day away. Her food photography always makes me hungry. Stopping by her blog always brightens my day! She eats well, lives well and inspires others to do the same! With great pleasure and joy, I give you….KAREN!!!!


My Bio:
I’m a freelance Photographer and Writer with a passion for vegetarian and vegan cooking. Currently my work can be viewed online at my three blogs: Buried Carrots is devoted to colorful writing and delicious vegetarian and vegan food; Composing Kitchen focuses on my efforts, together with my partner, to follow our passions and design our lives; and Karen Milling Photography features my work as a portrait, headshot, wedding and food photographer.

Connect:


And for our interview…

What inspired you to start blogging?
I don’t really make New Year’s resolutions in the classic sense, but when each new year rolls around, I take some time to evaluate where I am in my life: what I’m happy with and what things I’d like to change. I try to set the tone for the coming year. (As a side note, I do the same thing on my birthday every year.) When I started my blog in January of 2011, my intention for the year was productivity. I wanted to try new things, to grow as a writer and photographer. I wanted to increase my self-confidence, be courageous and take risks. I already loved cooking and taking photos, but I had not been writing for a long time and wanted to start again. Creating Buried Carrots was a great way to bring all those things together.

This year my intention is expansion. I’m working very hard on growing my photography business as well as continuing to improve my skills and techniques. I’ve worked with several portrait and headshot clients and I shot my first wedding. I’ve got a long way to go, but I’m building confidence and opportunity at every turn.

The Tagline
My original tagline was: “Uncovering the very best vegetarian and vegan food.” However, most of the feedback I received about the blog was that the food and photos were good, but the writing was great. So, in an effort to build on that strength, I changed the tagline to “Colorful writing, delicious food.”

My partner Carla says I have a gift for creating what she calls a “hook,” where I bring stories back around to whatever theme or image I began with. When I lived in Seattle I performed with Jet City Improv for a while. We often talked about reincorporation, in which an idea presented early on in an improvised scene is reincorporated later. It makes the audience feel so connected to what is going on because they are familiar with it. What perhaps didn’t stand out the first time around becomes delightful when recognized a second time. It works in writing too and in music, for that matter.

One last thing I’ll say about writing is that having a great editor is essential for me. I have the good fortune of having married a technical writer and editor (now composer and sound designer). She taught me to start by saying what I want to say when writing, and worry about the grammar and artfulness of it later. It is freeing to let go of trying to write the “perfect” thing and just write what I’m thinking and feeling without judgment. Then, with the help of an editor, I can go back and make things sound and look better. I would advise anyone struggling with writing to find someone they trust to read their work and give them advice and edits.

Have you always been vegan and vegetarian? What inspired this?
I have been a vegetarian since my 20s, so for about 15+ years. I never really liked meat as a child and gravitated toward chicken and turkey rather than red meat when I had a choice. Once I was older and able to cook for myself, I became a vegetarian, or “vegetarian lite.” I became the kind of vegetarian who still ate a BLT from time to time. But gradually as I learned more about food, cooking and nutrition, meat faded from my diet completely.

Ididn’t become a vegetarian for animal rights reasons, but I would say that now I feel quite strongly that animals shouldn’t be eaten or abused for their products. The eggs I eat come from the community garden where the chickens eat well, have plenty of space, and are well cared for (loved, that is). I try to buy the most responsibly produced diary products available: organic, from pasture-raised animals not treated with hormones. I don’t eat a lot of dairy, but I loooooooooove some cheese, so I do my best to make compassionate choices.

What would you say to those that are looking at becoming either vegan or vegetarian?
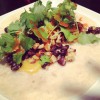
It doesn’t mean that you’ll eat salad all the time. The most frequent question I get from people curious about being vegetarian is, “What do you eat?” (Always asked with some level of exasperation.) And the answer is, everything — except meat. For example, right now, the leftovers in my fridge consist of polenta with grilled veggies, tomato sauce, and vegetarian sausage; a rice salad with peanuts, sesame seeds, chopped fresh vegetables and pineapple in a gingery soy dressing; quinoa and sweet potato chili; and white chocolate cherry scones. All vegetarian. The options are endless, wonderful, healthful and filling. Spending some time online or looking through some vegetarian cookbooks is a great way to get started, and a great way to get excited.

All of them are so fun to read and the pictures are lovely, but do you have a favorite of your blog posts?
I’m pretty fond of the first Valentine’s Day post I wrote about our cat Clementine. It’s a little clinical, but also lovely in its way. She has this extraordinary sweetness about her coupled with a sort of perpetual bewilderment that just melts your heart.

Do you do all of your own food photography? (How did you get started in photography?)
I do. I’ve always enjoyed photography. When I was a child and my mom got a new camera, I was the recipient of her old one and started taking pictures. I did take one semester of photography in college, but basically I’m self-taught. These days, the Internet is a great place to learn, and taking photos for the blog means I’m constantly honing my skills by practicing and practicing.


What superpower do you have? Party tricks count!
Napping. I know it doesn’t accomplish much for the good of humankind, but I love to nap, and I’m REALLY good at it.

Items could you not live without OR  What are 5 items you never leave home without are…

  • My iPhone. I hate to say it, but it’s true. It means I have a camera and editing tool with me all the time. It means that I can be creative at any given moment. With an iPhone, I don’t get lazy about making and editing photos — I have no excuse not to be creative with such a powerful tool in the palm of my hand. I take photos every day to keep that part of my mind sharp. I’m always composing photos, thinking about photos.
  • Lip Balm. I live in New Mexico, what can I say?
  • Water Bottle. See above. Between the altitude and the dry dry dryness, it’s essential.
  • My running shoes. Running is my way of meditating. Physical and mental stresses just melt away when I run. I feel stronger and more clear-minded after running.
  • A pen and paper (also read: my iPhone). I’m a list maker. I make lists of ideas and goals, lists of things I need to do, lists of places I want to go. Sometimes I’ll get just a snippet of a blog post in my mind. I write it down and refer back to it later.

Favorite food to eat? 

  • Roasted green chile. In New Mexico we’re good at putting chile on almost anything. I love the sweet, smoky, spicy flavor of roasted green chile. In the late summer and early fall, truckloads of New Mexico chiles are roasted on the side of the road. It’s the most incredible fragrance I’ve experienced. The flavor matches that.
  • Coffee. I have to stick to decaf so I don’t ruin my superpower, but I love a good cup of coffee. I don’t get fancy that often with lattes or cappuccinos, but I love a dark, robust flavorful Americano.
  • Chocolate. Need I say more?
  • Strawberries. Strawberries are, hands down, my favorite fruit. I have them in a smoothie almost every day of the week.
  • Goat Cheese. I love it in salads, I love it on slices of crusty rustic bread, I love it paired with sweet things like figs, I love it.

To cook? 

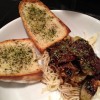
  • Pizza. We’ve been on a mission over the last few years to perfect our pizza cooking — both in the oven and on the grill. We’re constantly striving for the perfectly thin, balanced, crispy/chewy pizza crust. And we love getting creative with sauces and toppings. Pizza can be so sophisticated one day and so comforting the next.
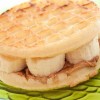
  • Breakfast. Sometimes it’s pancakes or French toast. Sometimes it’s eggs. But we pretty regularly make breakfast together or for each other, and I love the time we spend doing it.
  • Ice cream and Sorbet. I recently got an ice cream maker and have really been enjoying creating some interesting sorbet and ice cream flavors.
  • Bread. In the fall and winter months I really like making breads. I enjoy the slow process and the warm comforting smell of freshly baked bread.
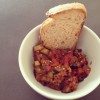
  • Soups and stews. These are the staples in our busy lives. Rarely is there a week without an interesting flavorful soup or stew ready to eat.

Someone’s having a rough day…what would you say?

I keep a fortune from a fortune cookie taped to my computer screen. It says, “Nothing is impossible to a willing heart.”

You get to choose your attitude. You may not always be happy with your situation and you may not always be able to change your situation right away, but you get to control how you react to it. You get to choose what kind of person you want to be and what kind of moment/day/life you’re going to have. So try to choose joy and compassion and love — for others, but just as importantly for yourself.


Ratatouille

Antigüedades Bar (Sevilla, Spain)

The obsession with Ratatouille started on our recent trip to Seville, Spain. We decided to meander the alleys and streets for the 30 minute walk from our flat to the city center . Bar Antigüedades caught my eye as an adorable little café from the exterior (of course…look at the photos!) and reading the menu board when we passed I made the mental note to come back for lunch. We did, and loved the Ratatouille SOOO much that we returned for dinner and had the exact same meal! It was so warm, hearty, tasty, flavorful and just… well… cozy! We ordered a bowl and cleaned and had I not ordered an actual meal I would have ordered another Ratatouille! As it was I had to refrain from licking the bowl since 1. it’s rude to do in public 2. we were sitting outside and I couldn’t sneak it 3. I’d be pegged as a ridiculous American for SURE! Three sadly legitimate reasons why I had to refrain from one last taste of the very miniscule remains of wonderful veggies. I vowed to make it once we got home.

Sevilla...where it all began
Sevilla…where it all began

Of course, in order to make the dish I first had to find 15 recipes, make an entire Pintrest board devoted to my found ratatouille recipes (yes I’m that ridiculous organized..or maybe obsessive?). Of course I had to print out each recipe, lay them side by side, and pour over each minute difference and detail deciding which was the perfect recipe. Which was possibly closest to recreating the most incredibly wonderful cozy meal. My perfection was finally challenged by my need to make a grocery shopping trip and get ON with the actual MAKING of the dish so I picked one to use as a guideline because, and yes I’m a total girl, the picture looked the yummiest.  The recipe that I landed on was posted on the blog A Lady in France.

A brief history of Ratatoulie. It is usually served as a side dish but can also be a main, which is how we eat it with some crusty potato bread. For protein, I usually poach an egg or sprinkle some cheese on the top.

The hardest part of this meal is letting it cook those last 30 minutes without devouring it from the pan! The house starts to smell of wonderful cooked vegetables and herbs.

Ratatouille Prep
Ratatouille Prep

Tips:

  • The Pan: be sure to use a large deep pan so that the heat and evenly distribute and cook
  • Saute each round of veggies VERY well! Once you add the tomato it’s really just melding of the flavors and not really “cooking”
  • Don’t go light on the canned tomatoes! This is what makes or breaks the consistency of the Ratatouille. If it seems like the stew is a bit dry add another can of tomates or a 25 oz jar of basil marinera sauce. You’ll realize the consistency within 5-8 minutes and you really need to add within the 5-8 minutes so the consistency and the flavors are able to meld correctly.
  • Cook all the veggies without a lid until you add the tomatoes. The veggies really need to breathe and have the heat to saute up.
  • Liquid: keep stirring to move the liquid around and assure that it’s not too liquidy. If it feels like it’s becoming more soupy than thicker stewey, turn the heat up  and if it’s sticking to the pan turn the head down a bit.
Ratatouille
Ratatouille

Cucina de Kate Ratatouille

½ large onion
2 tsp (heaping) minced garlic
drizzle of olive oil (to cook the onions/garlic)
1 red pepper, chopped
1 good sized eggplant, cut up in to chunks
4 small zucchini, cut up into chunks
1 ½ tbsp. herbs de province
few fresh basil leaf’s
1 ½ c. diced canned tomatoes (I sometimes add a 25oz jar of 365 tomato basil marinera sauce)

Instructions

  1. Heat oil in your large pan while you chop the onions and garlic. Cook until translucent.
  2. Chop and add peppers. When they start to look a little cooked, chop and add the eggplant in medium chunks. I like them a bit larger so they retain some form as opposed to getting a bit more mushy when they’re smaller.
  3. Keep stirring the veggies in the pan until they eggplant starts to look a little cooked, then chop up and add the zucchini. Again, I liked keeping my chunks a bit larger to add to the stew-type texture and avoid a must consistency.
  4. Once the zucchini starts to look like it’s a little cooked, add the herbs and chopped basil and assure it’s all mixed together well. Then add the tomatoes. At this point you’ll have to keep an eye and stir frequently but you can multi-task and just remember to stir every few minutes.
  5. Keep stirring and cook for another 30 minutes (or so) until all the vegies are tender…and of course taste along the way!

Serve with a protein (egg or meat) and some rustic bread (or omit if you’re gluten-free)


Ratatouille for Dinner
Ratatouille with Rustic Bread


Dinner Table of Ratatouille with Rust Bread and Menage a Trios Red
Ratatouille with Rust Bread for Dinner
Ratatouille with Rust Bread for


Provençal ratatouille

Golden Vanilla Cupcakes (Gluten-Free, Vegan)

Gluten & Dairy Free Vanilla Cupcakes

Birthdays are wonderful and they are especially for someone who LOVES to bake! Bakers invent holidays just for the opportunity to whip up some delicious treat! Growing up I was given the nickname “Martha Stewart” because I was the chick who showed up for every holiday with the corresponding cookie/treat. Gingerbread for Christmas, heart-shaped shortbread with pink and red frosting at for Valentines Day, Shamrock cookies and green frosting for St. Patty’s, Easter treats, May Day cookies, July 4th something-or-rather,  Halloween trick or treat bags… Thanksgiving…Birthday’s Cupcakes…Picnic Pies and never white frosting after Labor Day!

Well, that was “back in the day” (am I even old enough to say that!?) before food allergies became so prevalent. Now, a baker must be VERY aware of those that might not be able to join in the sugary delicious consumption of a well-baked treat. Well, those bakers that want friends do!

It was a co-workers birthday a few weeks back and I immediately went into “Martha Mode”… “IF cupcakes just happened to show up on your desk what flavor would they be?” I inquired. “Not made by me” was the response…every bakers dream or dread! That is either the field of dreams to explore or a stress sentence of deciding what kind of baked good says what about you. Quickly I got over my female phobias (it’s true… women DO think of things like this!) and decided that I’d just make cupcakes that I’d be happy to take home if no one ate them.

 Gluten & Dairy Free Vanilla Cupcakes Texture
Gluten & Dairy Free Vanilla Cupcakes Texture

Being mindful of both a gluten AND a dairy intolerance I quickly realized that I didn’t have a go-to cupcake recipe to suffice. So I did what any good, sound, logical baking blogger did and headed to Google! This recipe is from Vegan Cupcakes Take Over the World  and they were a HIT!!!! Not just… hey this doesn’t taste like a rotten breaded sardine but actually got compliments of “These are AMAZING!” Even the birthday boy was skeptical when I told him they were gluten-free (omitted the dairy free part…have to ease them into the idea you know) said they were, and I do directly quote, “DELICIOUS! I was worried when you said gluten-free but those are REALLY GOOOOOOOD!

I LIVE BY Bob’s Red Mill Gluten-Free Flour for my gluten-free recipes so with that, ladies and gentlemen, I give you the ultimate go-to birthday baked good! It’s chewy and moist with the correct density and texture of a “real” cupcake while incorporating various intolerance’s. It’s pretty much amazing! I also love the other book from these authors and have it on the cookbook shelf, Vegan Cookies Invade Your Cookie Jar.

Culinate, who also posted this recipe suggested  Vegan Fluffy Buttercream Frosting or Not-Too-Sweet Blueberry Mousse for a topping but since I was short on time I just picked up a ready-made can from the grocery store and let people frost themselves. Okay…short on time AND lazy.

Golden Vanilla Cupcakes

Yield: 12 cupcakes
Ingredients
1 c. Soy Milk
1 tsp. apple cider vinegar
1 1/4 c. Bob’s Red Mill Gluten-Free Flour
2 tbsp. cornstarch
3/4 tsp. baking powder
1/2 tsp. baking soda
1/2 tsp salt
1/3 c. canola oil
3/4 c. sugar
2 1/4 tsp vanilla extract

Directions

  1.  Preheat oven to 350 degrees. Line muffin pan with cupcake liners.
  2. Whisk the soy milk and vinegar in a measuring cup and set aside for a 4-5 minutes to get good and curdled.
  3. Beat together the soy milk mixture, oil, sugar, vanilla, and vanilla in a large bowl.
  4. Sift in the flour, cornstarch, baking powder, baking soda, and salt, and mix until no large lumps remain.
  5. Fill cupcake liners two-thirds of the way and bake for 20 to 22 minutes.
  6. Transfer to a cooling rack, and let cool completely before frosting.


Cooking Cupcakes

Taco Tuesday: Black Bean & Lime

TTTTRRAADDDIITTTIIOOONNNN!!! TRADITION!

“Traditions, traditions. Without our traditions, our lives would be as shaky as… as… as a fiddler on the roof!”(Tevye, Fiddler on the Roof)

Oh, excuse me! I was just practicing my Fiddler on the Roof singing. In case you’re inspired to watch the intro video you can check it out here: Fiddler on the roof – Tradition.

But this outburst of song was inspired by the weekly taco Tuesday tradition that we have.This post was actually last weeks Taco Tuesday adventure but I got busy and figured I better get it up before tonight’s Taco Tuesday adventure (sneak peek: fish tacos are on the menu!). Our Tuesday tradition keeps menu planning simple and I love that I can pick up the ingredients on the weekend and just grab some fresh cilantro from the market on Monday/Tuesday (or heck even Sunday if I’m lazy!) and then everything’s pretty much ready to go when we get home. Because let’s be real, by the time you get home from work and get through chores/errands/working out/traffic/family/pets… the last thing you want to do is cook up some tedious elaborate meal! Well, maybe that’s just me so those of you that are with me… read on!

black bean and lime tacos

I am the more carnivorous eater in our house, but also dairy-free so we try to find meals that I can get excited about without featuring meat/dairy for the main protein focus. There are a few wonderful things about tacos. First, the word itself. Taco…ttaaccoooo…TACO! It’s just fun to say!  But another very wonderful feature of the taco is that it’s the everyone food. A taco can literally be made that will please anyone! From the meat and potatoes crowd to the vegan or gluten-free eaters, a taco will always have your back. They can be (deep breath) meat free, vegetarian, gluten-free, meat focused, lactose free, diary free, corn free, (air), wheat-free, egg free, nut free, tree-nut free, soy free, fish free, paleo…they can LITERALLY feed ANYONE!

Another amazing thing about tacos is that you can make them with whatever is in the fridge! They can be as simple or elaborate as you desire! Paging through our new cookbook I received as a birthday present from our recent trip to Sonoma, I was remembering the wonderful pureed black beans from Elote Cafe. They…were…delicious!!! Between that and a ridiculous excess of limes in our house (I’m not sure why… maybe it has something to do with a reverse sock monster effect? Someone PUT limes in the fridge?! We also have a glasses gnome that sneaks in an puts their sticky little paws all over our glasses! But back to the point! We had a randomly large amount of limes and decided to use them up in this tasty taco Tuesday recipe! For texture, I pureed some of the beans and left some of them whole. And… since I’m obsessed with grilled corm we also did a few ears of corn!

So sit back, relax, maybe make yourself a delicious sommer sherpa  and enjoy the tradition of taco Tuesday with us!! Stay tuned for tonight’s fish tacos recipe coming soon and let me know what your favorite taco recipes are! I’ll be featuring your suggestions in my Taco Tuesday Pintrest board!

chopped cilantro and jalapeno

Black Bean & Lime Tacos w/Grilled Corn

1 can black beans
1 spoon full minced garlic and juice
Cracked Salt & Pepper to taste
Cayenne Pepper to taste
2 limes, juiced (plus any additional wedges you want for garnish)
2 Ears Corn
Flour Tortillas (or corn for a gluten-free option)

Optional garnish/additions: Cheese, sour cream, grilled southwest cabbage slaw, avocado, Cilantro, jalapeño, chopped/grilled onions, grilled mushrooms, hot sauce/salsa, Elote, red peppers, radishes, fruit salsa

  1. Soak the corn for 20 minutes then pre-heat the oven and wrap corn in foil and cook for 30 minutes. At that point I usually open up the foil and start to turn the corn every 5 minute to attain a good char. You can also use canned corn and heat on the stove if you’d like.
  2. The beans usually take 10 minutes to prepare so when you’re ready heat the beans over the stove or in the microwave with the garlic, salt/pepper, cayenne pepper and juice of two limes. Once it’s thoroughly heated transfer to a vita mix blender and blend until creamy. You can also use an emulsion blender, potato masher, or food processor.
  3. Slice the avocado and prepare the garnishes you desire
  4. Heat the tortillas over open flame on the stove (or heat in the micro between two damp paper towels or in the oven wrapped in foil).
  5. Spread out the black beans and garnish away!

Quick Healthy Breakfast

Breakfast is one of my favorite meals. I LOVE everything breakfast related…scones, muffins, breads, eggs, savory roasted veggies!  There’s something so relaxing about a good cup of coffee to get your day started that can only be enriched by a delicious breakfast to accompany it! You might find it odd, then, that breakfast is one of the most stressful times of day for me during the week.

Living in Seattle I’ve grown accustomed to seeing grey drizzle outside which makes it THAT much harder to crawl out of a warm bed. Once I do finally drag my lazy butt out of bed the last thing that I want to do is race the clock to get out the door and off to start my day. The typical morning looks something like: WakeupgetreadygetbreakfastCOFFEEneedfood! This leaves me a ball of stress when it comes to breakfast during the week. I’m guessing I’m not the only one who needs some good, healthy and QUICK breakfast options! Well rest assured I’ve got your back!!!

Quick Breakfast Sandwiches from Macheesmo (Photo from Macheesmo.com)

I used to love grabbing one of the English muffin breakfast sandwiches from Starbucks because they were quick and mostly healthy. Until I realized one morning as I unwrapped that wonderful warm bag and got the first whiff of my toasted breakfast sandwich as I sunk my hungry little face into the sandwich…I have EVERY ONE of these ingredients at home! Why did I just pay $3 for something that I could have literally made so easily before walking out of the house. Getting on the budgeting bandwagon I decided that with some planning ahead I could have a delicious breakfast at home while staying budget and health conscious! It just takes a little planning ahead!


Egg McMuffin Pan
Egg McMuffin Pan

Off to the recipe boards I went googling, blog scouring, pintrest-ing away and here is a little showcase of the handiwork. Above you’ll see the English muffin breakfast sandwich from Macheesmo and I LOVE that he illustrates how you can make them ahead and freeze them! Such a time saver!!  You can find the recipe here: Quick Breakfast Sandwiches from Macheesmo.

One of the best things I found to equip my kitchen for mornings was a little Egg plan! It was the PERFECT size for an English muffin breakfast sandwich! Simply heat the pan, scramble an egg and let it cook while toasting your muffin and continuing to get ready! SO EASY! One tip for the pan is that it can be a little larger than some English muffins so the egg will hang over the side of the bread a little which I actually don’t mind. Oh, and I’d only use one egg… two can get a little… souffle over the pan-ish! 🙂

My Pintrest Boards (if you need a little more inspiration):

Update: I JUST found 365 days of breakfast and I LOVE it!! LOVELY breakfast food photography that could make you hungry even after a Thanksgiving feast! I LOVE scrolling through their photos and getting some inspiration for breakfast meals!

And since we ALL love food pictures, here are a few other ideas for quick breakfasts:

Make your own fruit on the bottom yogurt cups
Make your own fruit on the bottom yogurt cup
Make Ahead Oatmeal in Jars
Apple Bran Muffins
Apple Bran Muffins
Baked Eggs Napoleon
Baked Eggs Napoleon
Breakfast Banana Split with Yogurt and Jam
Waffle Nut Butter Banana Sandwich
Quinoa Breakfast Bake

Cheese is Back in my Life, Thank you Galaxy

Galaxy Rice Shreds: Cheddar

Now, cheese may seem like a small matter to those of you who can eat it or have completely cut it out of your life. But to someone who made peace with saying goodbye YEARS ago, thinking that I would never again taste the  sweet taste of a cheesy panini, nachos, grilled cheese, cheese pizza, sliced cheese with wine… okay I think you get the picture by now…it’s a gaping hole in my culinary consumption.

Well, that was pre “Galaxy”! I can’t tell you how excited I was to be able to eat some form of “cheese” again! We happened upon the Galaxy Food’s rice based shreds on a recent trip to Whole Foods a few weeks back when it was on sale. I love trying new things almost as much as I love a good sale, but still have the tarnished taste of some “alternative food” taste tests gone wrong so I was a bit apprehensive about venturing into the world of “cheese alternatives”.

But, looking at the nutrition info I was quite surprised! Take a look :

Galaxy Shreds: Mozzarella Flavor

Serving Size 1/3 c.
70 calories (35 from fat)
4g Fat (1 gram saturated, 0g Trans)
6g Protein
0 mg Cholesterol
370mg Sodium
3g Carbs

Look at that protein content in ONE serving! That’s the thing that I miss about cheese, it’s a quick and easy non-meat protein. I feel like an entirely new playground of culinary fun has opened up to me again! It also delivers 30% of your daily calcium, which is important for building strong bones and something that those of us that are dairy-free or vegan to keep an eye on since it’s usually found in dairy-based products.

The day after we bought it to try I literally woke up and the first words out of my mouth were… CHEESE!! There was a bee-line to the kitchen and I was eating it right out of the package! Now this is coming from the girl who doesn’t like eating first thing in the morning! (Which has inspired a “Breakfast” series I’m working on… stay tuned!)  I looked like the little kid who got caught with one hand half in the cookie jar and the other already delivering a handful of cookies to my mouth!

The taste is actually quite good, the melting leaves a BIT to be desired on the cheddar, it didn’t melt very well on nachos but when I tried the mozzarella shreds on top of my spaghetti squash for lunch last week it melted PERFECTLY! It also melted wonderfully on the stuffed tomatoes from dinner last night! I’ll have to try melting the Cheddar a few more ways to see how it does.  “oh darn”… more cheesy cooking!!

I have only tried the shreds so far, but they have a whole line of vegan, rice and soy cheese as well as cream cheese alternatives, Parmesan crumbles, and “cheese” slices. You can see the line up of their products here: Galaxy Foods.

Vegan Coffee Cake

Vegan coffee cake

Recipe from: thecleaneatingmama.com

ingredients

  • For the crumb topping:
  • 1/3 cup melted non-dairy butter, such as Earth Balance
  • 1/2 cup turbinado sugar or brown sugar
  • 1 cup spelt flour
  • 1 1/2 teaspoon cinnamon
  • For the cake:
  • 1 1/2 cup spelt flour
  • 3/4 cup natural cane sugar, organic if possible
  • 2 1/2 teaspoon baking powder
  • 1/2 teasp salt
  • 1 flax egg (1 tablespoon flax meal + 3 tablespoons water)
  • 1/2 cup non-dairy milk of your choice
  • 1/8 cup apple sauce
  • 1 tablespoon pure vanilla extract

directions

  1. Preheat oven to 325 degrees.
  2. Prepare the crumb topping – melt butter, set aside to cool. In a medium bowl combine sugar, flour and cinnamon. Then add butter and mix until ingredients are fully wet. You will have globs of sugar mixture
  3. Prepare the cake – Combine flax and water first. Then in a medium bowl combine milk, apple sauce, vanilla and flax egg. Mix well. Then add dry ingredients. Mix until all flour has been combined, but be careful not to over mix.
  4. Pour batter into a 9 x 9 baking dish that has been lightly sprayed with cooking spray. Now evenly add your crumble to the top of the cake batter.
  5. Bake for 40 minutes. Check with a toothpick to make sure cake has fully cooked.

Gluten Free Gingerbread Cookies

Disclaimer: This is a recipe for GLUTEN-FREE gingerbread. If you’re looking for regular gluten-FILLED gingerbread, you can find the recipe HERE.

Starting before Thanksgiving, there is a certain craving that I start to notice. It’s not just for the warmth of a cup of tea, or the delicious flavors of roasted turkey and holiday meals. No, it’s much MUCH more than that… I get the urge to bake EVERYTHING in my recipe books!  Channeling the reverse of Santa who consumes the baked goods, I try to make enough cookies, cakes and treats to feed everyone who might get within 10 feet of my door! Unless you adore baked goods being forced upon you at every turn, it’s best to avoid me for the holiday season!

While I do a lot of baking for others, which includes cooking with those luxuries I can’t enjoy like whole milk and butter, there are a few treats that I make in abundance purely to keep around the house. Gingerbread  cookies are my ALL TIME favorite! How can one go wrong with the delicious rich spices, the crunch of the crispy edges and the soft wonderful center… the complimentary royal icing that adorns the top of that lovely treat and even more, the sprinkles or toppings that are hand-picked to decorate the surface of such a treat. Okay okay, I’m getting a little too into the description of the cookie but does that explain how much I adore them!

I love gingerbread and use ANY excuse to throw a party (yes, it’s actually true!) so it goes without saying that I host a gingerbread decorating party each year. This year, there were actually quite a few gluten-free guests in attendance and I decided that it would be a good exercise to be a bit more mindful with minimizing gluten in my own diet. So, off on the adventure I was to make a gluten-free gingerbread cookie! COOKIES FOR ALL!!! For the cookie part, I complied the recipe from a few different ones that I found and  kinda pulled a “wing-it” with this one. They turned out GREAT! I love Bob’s Red Mill gluten-free flour, even the non-glutards (don’t get offended… I’m a lactard) couldn’t tell the difference and enjoyed them!!


Gluten-Free Gingerbread Cookies

Ingredients

5 Cups Bob’s Redmill Gluten-Free flour
2 T. baking powder
2 t. baking soda
2 t. cinnamon
1 t. ground ginger
1 t. salt
1/2 t. ground nutmeg
1/2 t. ground cloves
1 1/2 cups brown sugar
1/2 cup applesauce
1/3 cup oil
1/3 cup molasses T. vanilla

In a small bowl, stir together gluten-free flour, baking powder, baking soda, cinnamon, ginger, salt, nutmeg, and cloves, and set aside.
In a medium bowl, place the remaining ingredients, and stir to combine.
Add the dry ingredients to the wet ingredients and stir well to combine.
Cover the bowl, place it in the refrigerator, and chill the dough for 1 hour or more.
Using a little safflower oil, lightly oil (or mist with oil) two non-stick cookie sheets and set aside.
Sprinkle a little gluten-free flour over a work surface.
Divide the chilled dough into quarters, work with only one-quarter of the dough at a time, and keep the remaining dough covered and chilled until needed.
Working in batches, roll out the quarter of dough to 1/4-inch thickness, and cut into desired shapes with cookie cutters.
Carefully transfer the cut cookies to the prepared cookie sheet.
Bake them at 350 degrees for 6 minutes (the cookies will feel slightly soft to the touch).
Allow them to cool on the cookie sheets for 3 minutes before transferring them to a rack to cool completely.
Repeat the rolling and cutting-out procedure for the remaining cookie dough.
Store the cookies in an airtight container.

Good House Keeping Royal Frosting
2 cup(s) confectioners’ sugar
2 tablespoon(s) meringue powder
3 tablespoon(s) water, plus additional as needed
Assorted food colorings (optional)
Directions
In bowl, with mixer at low-speed, beat confectioners’ sugar, meringue powder, and water until blended. Scrape side of bowl with rubber spatula. Increase speed to medium; beat until soft peaks form, about 10 minutes. Icing should be stiff enough to hold its shape when piped. Thin with more water, if needed.
Tint icing with food colorings as desired; keep surface covered with plastic wrap to prevent drying out.


Vegan Coffee Cake


The crumble topping was good, not too sweet and had a balanced cinnamon spice-ness. The cake was pretty simple. I like a more fluffy cake, but in it’s defense, this one did have a ‘melt in your mouth’ quality to it. Overall, it’d say its a solid cake, but it’s not necessarily the most amazing one ever. I’ll be experimenting with different recipes to find the ultimate and will keep you all posted!!


Vegan Coffee Cake
(Adapted from Usually Vegan)

Ingredients
Topping
1 cup whole wheat flour
1/3 cup brown sugar
1 tsp cinnamon
1/4 tsp nutmeg
1/4 c.+ tbps canola oil


Cake
3/4 cup soy-dairy milk
1 tsp apple cider vinegar
1/3 cup (half sugar, half honey)
1/2 cup canola oil
1 tsp vanilla
1 1/4 whole wheat flour
2 tsp baking powder
1/2 tsp salt


Directions

  • Preheat oven to 375°F
  • Grease an 8 in. pan,
  • In a mug, mix  milk for the cake and the vinegar; set aside to curdle (trust me… you’ll know when it’s curdled)
  • Mix dry ingredients for topping well in a bowl. Slowly drizzle in canola oil by the tablespoon, using your fingers to swish around the mixture until crumbs form. Alternate drizzling and mixing until all the oil is used and large crumbs have formed.
  • Mix cake ingredients together. For this recipe, I just threw it all in a bowl and I”m wondering if maybe that lent a hand to the non-fluffy nature of the cake. next time I’ll try mixing the wet ingredients together, including the curdled milk, and separately mix the dry ingredients then combine.
  • Pour the cake batter into the prepared pan. Sprinkle crumbles on top.
  • Bake for 35 to 40 min. or until a knife inserted through the center comes out clean
  • We were supposed to let it cook for an hour before eating it, but let’s be real, who can wait an hour when the house smells like coffee cake!

Roasted Fennel Pasta with Tomato Dressing

I don’t make New Year’s resolutions, because if I did then my number one AND two would have been broken for the past few YEARS: cook through my recipes and cook with more diverse foods! Thanks to Presidents Day, a little holiday afforded me the time and the inspiration to try TWO new recipes! Something possessed me to pick up fennel at the market this week and while I can’t remember actually consciously eating fennel up to now something in me decided that we needed to cook it!

Keeping with the homemade and new recipes theme, I found a delicious tomato dressing/compote recipe  Martha Stewart.com (link below) and what was it drizzled over? That’s right…fennel. It was a sign from the cooking gods! Below I’ve worked in both recipes into the overall preparation of the meal but will have links to the specific recipes below.  The recipe below served 3 people healthy portions but there was only leftover pasta. If you want leftovers to enjoy I suggest doubling the fennel and sauce portion of the meal.

This meal is Meat-free, dairy-free (if you omit the Parmesan like I do) AND Vegan; if you use gluten-free bread & pasta it’s also a gluten-free option as well! Look at the endless possibilities!


Ingredients

Pasta

  • 1/2 package pasta of your choice ( I used Angel Hair)

Garlic Bread

  • Whatever rustic loaf you like
  • Optional- Parmesan or Dairy Free Cheese for the garlic bread.We love the grated blend  Parmesan from DeLaurenti that we pick up fresh from Pike Place

Roasted Fennel

  • 3 fennel bulbs (choose with thick base), stalks cut off, bulbs sliced
  • EVOO (extra virgin olive oil)

Tomato Dressing:

  • EVOO (extra virgin olive oil)
  • 10 ounces (1-pint container) grape or cherry tomatoes
  • minced garlic (to taste in all recipes, I don’t measure much!)
  • 2/3 cup dry red wine
  • 1/4 cup balsamic vinegar
  • 1 tablespoon sugar
  • 1/4 teaspoon salt
  • 1 teaspoon red-wine vinegar

  1. Pre-heat oven to 400°F.
  2. Chop top of fennel stock off, wash bulb and cut as shown below. (Note, the lovely photography is from the Simply Recipes site, I didn’t remember to take a photo of this step). You can wash your tomatoes at this time also if you’d like.
  3. Lay out baking sheet with aluminum foil over it. Toss the fennel in olive oil. This time I used a bowl to coat, which resulted in a bit too much olive oil on the fennel, next time I suggest laying out on a baking sheet and brushing with an OXO Basting Brush.
  4. Crack fresh pepper over fennel and drizzle with balsamic vinegar.
  5. Roast for 30-40 minutes, until fennel is caramelized.
  6. Prep the garlic bread on aluminum foil so it’s ready to put in the oven! I use my handy dandy Misto Sprayer and spray some EVOO over the bread, drizzle with minced garlic, fresh cracked pepper, and dried parsley. If you’re doing cheese (Being lactose intolerant I don’t use the cheese but it’s still quite delicious!)  add the cheese on the top.
  7. When fennel has about 25 minutes left start the water to  boil the water for the spaghetti. Add the spaghetti when the water boils and cook to your desired tenderness.
  8. In a medium pan, drizzle olive oil for the tomato dressing over medium heat. Add the tomatoes when the pan is hot. Make sure you keep swirling the pan around so that all the skins have a chance to cook.
  9. Add the garlic, red wine, and balsamic vinegar to the dressing pan, mixing well. Simmer until the liquid reduces and tomatoes start to get soft (about 5 minutes). At this step I cut the tomatoes in half with my spatula to allow the juices to mix.
  10. Stir in sugar, salt, and red-wine vinegar, and cook for 1 minute.
  11. When there is 10 minutes left on the fennel timer, stick the bread in the oven to toast and the cheese has melted.
  12. Serve and enjoy a culinary masterpiece!!

My overall review:  I think this is one of the best meals I’ve ever made!! The savory grilled and caramelized flavor complimented the liquorice taste of the fennel blended, which perfectly with the tomato balsamic sauce and the texture of the pasta. Add some grilled potato garlic bread and it was simple divine!!!

Recipes this meal was inspired from:
Roasted Fennel Recipe

Warm Tomato Dressing