Seasonal Kale Radicchio Salad w/ Poppyseed Dressing

IMG_9897I met this delicious seasonal dish at a baby shower a few weeks ago. Let’s set the stage here; I’m not usually super amazing thrilled baby showers attendee. But, one of my very good girlfriends recently had her first shower and there was a sacred promise that there would be no games, which is a huge plus for encouraging attendance. Little did I know that I would be greeted upon entry with a glass of La Marca Processco (which is my favorite) and ushered into a room of absolutely fantastic gals. With a glass of bubbly in my hand and a smile on my face I was shown to the food table. This, my fine friends, was both a visual and tasty delight! There were numerous quiche options, fresh shrimp with cocktail sauce, three types of homemade mini cupcakes and an absolutely amazing kale radicchio salad which I shamelessly had thirds of.

The bubbly was also flowing, but, that has no correlation to the ‘yum’ factor of this salad. Not only was it visually delightful, but it was so delicious that I had to remind myself I was in public and shoving salad into my mouth as quickly as I could was not socially appropriate. It was tangy, creamy, crunchy, herbaceous, earthy and downright amazing. Three bites in I was begging for the recipe. It was a simple and side dish that is easily transported for events and was SUPER tasty. Had I hit the side-dish mecca? Quite possibly my friends, quite possibly.

salad2For halloween our office did a “Crocktober” and one look at the food sign up sheet had my insides yelling for something even remotely healthy! Someone’s got to make a non-crockpot dish to balance this whole situation out right!? So, when asked to sign up for a dish to share I decided that there needed to be a little balance to the baked goods, 3 types of mac n cheese (including one that boasted being ‘texas style’ which apparently meant extra cheese and cream), pork, meatballs, cookies, brownies and otherwise carbacious cheese covered feast that was about to ensue. This festive gathering needing kale, lots of kale. Good, wholesome tasty kale. There was no other thought in my mind than to debut the kale radicchio salad recipe. If we’re being completely honest, I made this salad for a few reasons; one of preservation so I knew there would be something I would eat there, and I also really needed some motivation to blog this recipe (that a few people have specifically asked for in the past week) and try my hand at homemade poppyseed dressing. Unless I had a deadline of hungry mouths tomorrow and feeling the moral obligation to balance out the cholesterol and sugar levels of the office party, this recipe could have been put off for months.

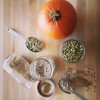
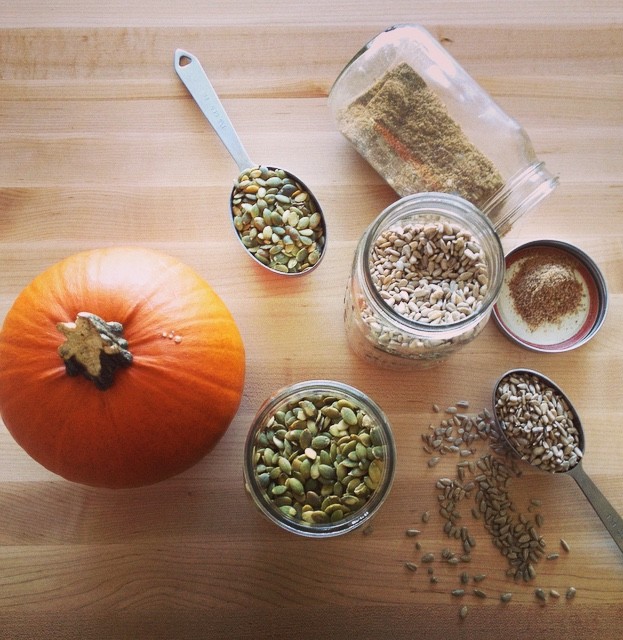
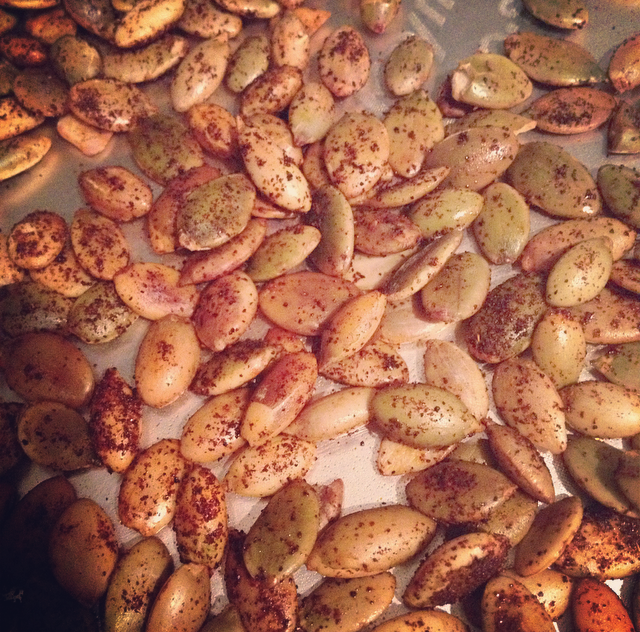
This recipe is so easy and tasty it’s almost ridiculous. It really highlights the fall and winter seasonal flavors that might not be combined in salad form but are absolutely ridiculously good when combined. This recipe calls for one of my favorite seasonal ingredients, pumpkin seeds. Now, if we want to be fancy we’d call them pepitas instead of pumpkin seeds which has a literal translation of “little seed of a squash”. It’s basically the spanish culinary term for a pumpkin seed. I gave the salad a little upgrade by roasting them with paprika before adding them to the recipe. You can find my recipe for roasted pumpkin seeds here and just sub out the salt for paprika. This is one salad where you can really personalize! Next time I might also roast some delicata squash and add it in, or even pumpkin or butternut squash! 

This salad is really going to be a seasonal staple for us and will be ever evolved. It makes a great simple, quick meal or healthy and tasty potluck dish! It’s super simple to make the night before and combine when you’re ready to serve.  It’s gluten-free, dairy free, nut-free, healthy and easy. Yes PLEASE!

IMG_9911


Seasonal Kale Radicchio Salad w/ Poppyseed Dressing

For the Salad
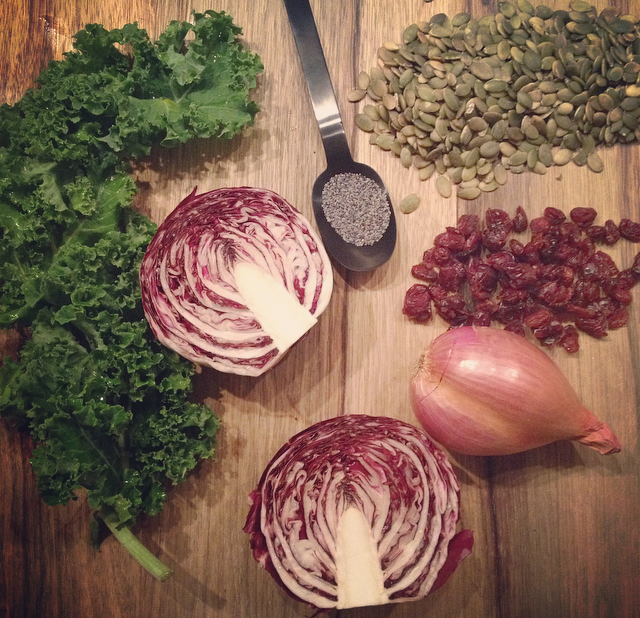
1 head kale, washed, stemmed, massaged and torn into pieces
1 head radicchio, washed and cut and cut in chiffonade
pepitas/ pumpkin seeds
olive oil
paprika
dried cranberries
1 small thinly sliced shallot

Poppyseed Dressing
3 tbsp Katz late harvest sauvignon blanc vinegar
2 tbsp local honey
2 tsp dijon mustard
pinch grey salt
pinch fresh cracked pepper
2-3 tbsp grapeseed oil
1 tsp diced shallot

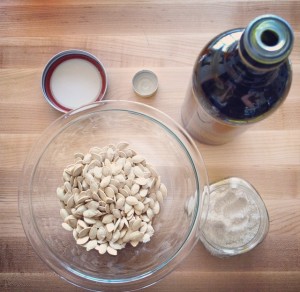
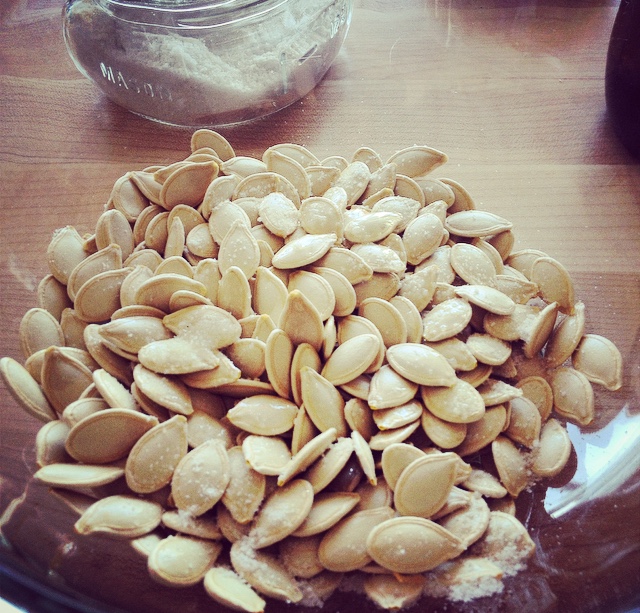
Pre-heat the oven to 350 degrees. Lay the pepitas out on non-stick foil and spray with olive oil or other high-heat oil. Dust with smoked paprika and toast for 10 minutes, keeping an eye and adjusting time according to how your oven heats. Once they’re done remove from the oven and let cool.

IMG_9901

Meanwhile, thoroughly wash and de-stem the kale.IMG_9899IMG_9900

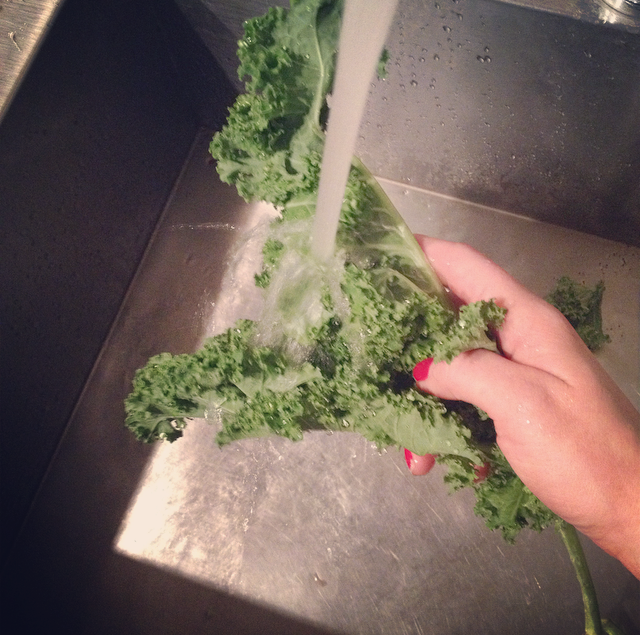
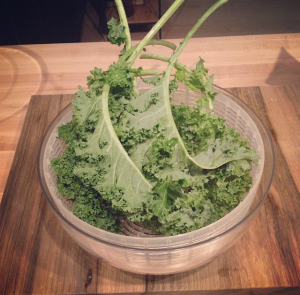
I wash the kale well, and use a large OXO SoftWorks Salad Spinner to dry kale and I absolutely love it! Add a tiny bit of grey salt and massage the kale in the bowl until it reduces in size and turns a darker color.

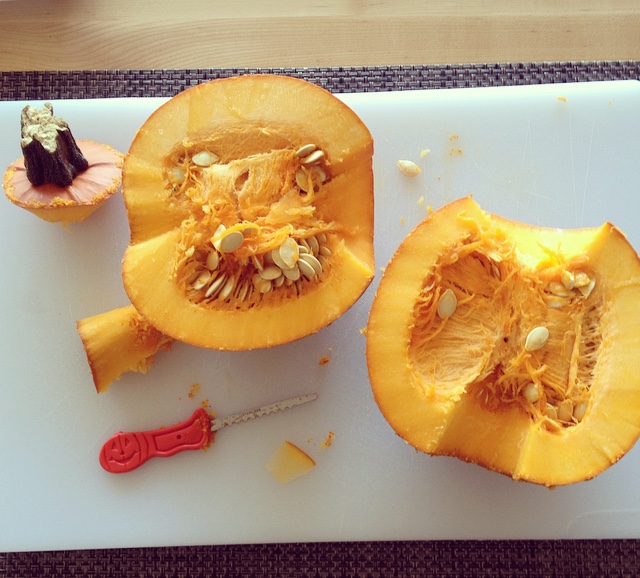
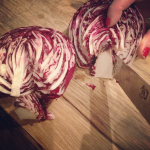
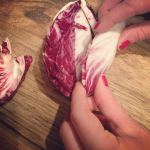
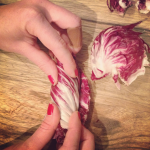
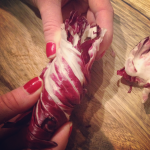
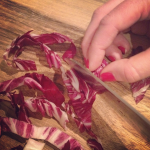
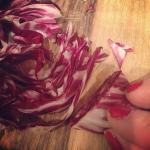
Grab the radicchio, peel the outer layer, slice in half and core the halves. Pull apart a few layers at a time, fold and chiffonade. The chiffonade technique is basically rolling the leaves and thinly slicing.

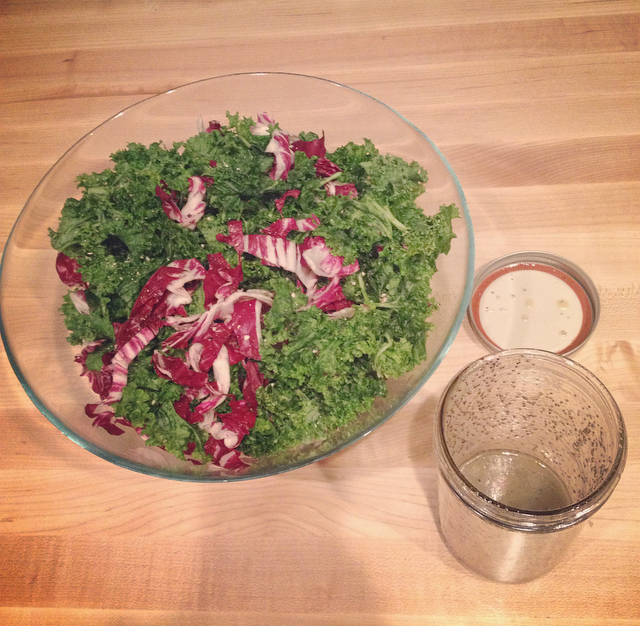
Place kale and radicchio in a bowl. Add the toasted pepitas and cranberries to taste.

Place all dressing ingredients in a mason jar and shake to combine.

When you’re ready to serve, add the dressing to the bowl and toss.

Variations
Substitute pepitas for walnuts and add goat cheese and parsley with plain oil dressing
Spiced pecans and dried cranberries with a warm bacon vinaigrette
Mandarine oranges with slivered almonds and a sesame vinaigrette
Roast up some delicata squash, butternut squash or pumpkin and throw it in

Roasted Pumpkin Seeds

FullSizeRender_3

The leaves are changing, the mornings are colder, and the urge to get cozy under a blanket with a cup of tea is creeping. This means only one thing…it’s pumpkin season! One of my favorite things about Seattle is that we actually get seasons. Spring is rainy, summer is gorgeous, fall is crisp and cozy and while we don’t get snow every winter it has been known to dump a few inches every few years.

Fall might be my favorite season to cook. So many comfort foods like potato leek soup, Ratatouillebutternut squash and my personal favorite- anything with roasted pumpkin. Most people get excited about carving pumpkins and drinking pumpkin spice lattes. I get equally excited about hacking a pumpkin open and roasting that delicious goodness! Cube it and add to salads, make pumpkin soup, puree it for baked goods, add some sautéed spinach and toasted quinoa and you have a wholesome hearty vegan meal.

Roasted pumpkin seeds are a great snack, party appetizer, salad addition or kitchen adventure with aspiring little chefs! The recipe is super simple and can be personalized in so many ways!

Roasted Pumpkin Seeds
Prep Time: About 10 minute to scoop out pumpkin and remove stringy parts from seed
Cook Time: Aprox. 20 minutes 

Rice Bran Oil
Pumpkin or squash seeds
Grey or pink salt
Baking tray
Paper towels
Bowl

FullSizeRender_4Scoop out the pumpkin and separate the seeds from the stringy insides. Pinching the seeds while you run the strainer under cold water works to remove most of the stringy parts. Line a baking tray with paper towels. Wash the seeds in a strainer, being sure to remove all the stringy parts, and them flat the lined baking sheet. Pat the top of the seeds with a paper towel, it’s okay if they stick a little! Just remove the seeds from the paper towel and keep patting.

Preheat oven to 350°F. Put the seeds in a bowl and toss with oil. I recommend rice bran oil since it doesn’t have a taste and it has a high burn point ensuring that it’s good for baking and grilling. You can also use grapeseed oil, safflower oil or avocado oil. Those each have their own slight taste so it depends on what flavor your’e going with. Add a few pinches of salt, toss, and add a bit more salt. You can add to taste depending one how much you like salt. I use it sparingly.

Remove the paper towels from your baking tray and spread out the oiled seeds on the tray. You won’t need to add additional oil to the tray. Shake the pan out a bit so that most of the seeds are laying in one single layer. Some of the seeds will overlap, which is just fine!

Place the baking sheet in the oven. Turn seeds after ten minutes then allow them to roast until the corners of thee seeds start to brown. Depending on your oven, this could be between 17-25 minutes.

Remove the tray from the oven and allow the seeds to completely cool. Roasted seeds will keep in an airtight container for up to four days!

FullSizeRenderThe Kitchn has a few amazing ideas for other ways to flavor pumpkin seeds:

Sweet Pumpkin Seeds: Omit or reduce the salt and roast the seeds on parchment-lined baking sheet. Let cool, then toss with brown sugar or a little maple syrup. Not too much, just enough to lightly coat the seeds. You can also add cinnamon, allspice, nutmeg or other ‘sweet’ spices. Toss well to coat evenly. Return the tray to the oven and continue to roast for another 10 to 15 minutes or so.

Sweet-Hot Pumpkin Seeds: Toss the seeds with a little honey and sriracha or chili flakes. A little cumin might be nice, or curry powder. Roast as with sweet seeds.

Savory Pumpkin Seeds: Add herbs such as chopped rosemary, dried oregano and/or spices such as smoked paprika, chili powder, cumin to the seeds before roasting. Check carefully to be sure the herbs and spices aren’t browning too quickly. If so, roast at a sightly lower heat.

Pumpkin Seed Butter (Gluten-Free, Dairy Free)

FullSizeRenderLast summer I got hooked on pumpkin seed butter. Before that, I didn’t even know such a thing existed. I felt pretty nut-butter gourmet knowing that there was macadamia butter as well as cashew butter. I knew that you could grind your own; I’ve seen and even used the machines in my local Whole Foods to make fresh almond butter. But those machines were big, and scary, not to mention loud and quite menacing to look at. The though had NEVER dawned on me that it was something that could be made at home. Until a combination of a strong desire for a food processor, DIY itch and budgeting came together. Random components, but quite a story!

This recipe was adapted from the the kitchn’s Pumpkin Seed Butter recipe. I LOVE that they say it was inspired by a nut butter that they tasted at the Portland Farmers Market because I’m pretty sure it’s the same nut butter that hooked me on Pumpkin Seed Butter. Nut-Tritious Foods is a wonderful little company based out of  Vancouver, Washington.  They do a great job of educating customers why cold-pressed nut butters are better for you. I pulled the info below from their about page because it’s REALLY important to know!

“… we COLD-PROCESS and don’t use heat to get our nut butter into the tub. Heat will oxidize the healthy fats (poly- & mono-unsaturated) and make them more like a saturated fat! Most all jar nut butters have been heat processed – you can tell by the ‘nutcrete’ in the bottom of the glass jar.” An additional note, the heat processing method allows the nut butter to sit on the shelf in a jar until it’s purchased. Personally, I’d much rather have the fresh stuff that I know is perishable and know that I’m getting the most nutrition out of my consumption.

Check out my Almond butter recipe here.

Pumpkin Seed Butter

2 cup raw pumpkin seeds, without shells
1/2 cup ground sunflower seeds
1/4 cup flax meal*
1/4 cup  grapeseed oil
1 spoon of honey (to taste)
pinch grey salt

*Flax Meal: You can easily make flax meal in a coffee

Combine  pumpkin seeds, sunflower seeds , and flaxseed meal in your food processor. Blend until the ingredients are well chopped and blended. You’ll need to stop and scrape the sides down so all the ingredients get blended together.

Add the honey and blend until the nut butter starts to form. This can take up to ten full minutes so have patience! Once you see the play dough texture, where the seed butter starts to form a ball and move around the bowl you’re getting close! Add the oil and continue to blend 5-10 minutes more until the butter is consistently smooth. Your food processor might get warm but don’t worry too much, you can always let it cool a little bit and then blend away. I used the 1/4 cup of oil and it was just fine, but you may want to add more depending on how you like your nut butter.

Place in an airtight container (tupperware or glass jar) and store in refrigerator up to 2 weeks.

There are plenty of additions to this recipe, you can mix up the ratios. You can choose olive oil or coconut oil. You might want to add salt, or use salted pumpkin seeds. You can also pre-heat the oven to about 350 and roast the seeds on a parchment paper or foil wrapped cookie sheet for 10-15 minutes. If you oven roast them, stir the seeds once or twice during cooking and let them cool before adding to the food processor. There is also a delicious looking adaption for Maple Pumpkin Seed Butter and Chocolate Pumpkin butter.

Kombucha, Som, Pok Pok and a new Kitchen

Dear friends! As you can tell, I’ve been on a bit of a writing hiatus the past few… months! Works been busy, personal life has been busy, there’s been travel and apparently it’s important to sleep every now and then?! What a cramp on a busy gals schedule hey? But i’ve dearly miss and you and even though I haven’t been posting, I have still been cooking up a storm and gathering new recipes to share! We had the weekly staples- batches of kombucha,and almond butter.We traveled to visit our family and threw in a few beer soaked grilled bratwurst, paleo chocolate chip banana bread and Pecan Pies with fresh homemade crust (of course!). I can’t visit without baking a few pies! One of my favorite parts about visiting family is playing the role of both ‘imported resident chef’ and ‘kitchen instructor’. I have So much fun teaching the niece and nephews to cook! We had a ball in the kitchen and they do great!

photoBut, as I was saying. This entire summer has been booked SOLID with both work and play. And just when I thought things would calm down in the fall, our landlord decided to sell the condo after four years of renting so we had to find a new place. Luckily, we found a place that we just LOVE and we move this weekend. THIS WEEKEND! A matter of hours away! I’m so excited I can barely handle it! I can’t wait to unpack and organize the new kitchen! With the fast pace of the last 3 months, cooking as been more of a chore than it usually is. I’ve really leaned on simple recipes, the local pho restaurant, and cereal for dinner. But with a new kitchen comes new recipes and excitement to cook! Which brings me to my fall and winter sports.

I HATE to, and won’t, drive in snow and/or ice… so my fall/winter sports consist of cooking, baking, menu planning from the ridiculous amount of time I spend on Pinterest (A Byte of Life boards here), testing out my wine cellar, catching up on all the shows that everyones been raving about and listening to the rain falling outside. Oh, and pumpkins! I LOVE PUMPKIN!  I’ll eat slow roasted pumpkin right off the baking sheet! And Gingerbread. I LOVE gingerbread! But back to the point- my winter sports are gingerbread and/or pumpkin flavored, with a side of wine, and a good show in the background.

This year, I have a new hobby to add to the list. Pok Pok. If you’ve NEVER been to Pok Pok, you HAVE to go to either Portland or New York and experience their wings and one of their drinks with their drinking vinegar called som. Som is a drinking vinegar that has been an age old practice in many cultures around the world for it’s health benefits. Pok Pok has been serving their drinking vinegars since 2005, both as a cocktail mixer and diluted with soda as a soft drink. They use organic cane sugar for sweetener and let me tell you, while I’m not a soft drink person in the slightest, this stuff is downright addicting! You can purchase the Pok Pok Som online form both Pok Pok and ChefShop.com. A girlfriend and I just took an amazing cooking class at ChefShop.com so you can expect future blog post about them too!

Well, their chicken wings are known nation wide, and their cocktails are red-eye flight worthy. This, coming from a confirmed wine and anti-chicken wing girl. Let’s just keep this short and say that Pok Pok changed my life, as evidenced by the fact that after the first bite I waived down the waiter and asked if I could PLEASE purchase their cookbook but only if the amazing chicken wings were included. He handed me a copy to review. Each page coated in plastic which was an amazing idea because I was pouring over it as I was elbow deep in eating amazing chicken wings,The Pok Pok cookbook holds a special spot on my shelf , I personally confirmed that the chicken wing recipe is included, and it has been added to the list of fall and winter hobbies.

Tune in for more amazing thai inspired recipes from the Pok Pok cookbook, updates from this years International Food Bloggers conference (last years post) and to see how the Som Kombucha turns out! I had a bit of Som leftover and had a batch of kombucha ready tonight so I figured I’d do a little variation on my blueberry ginger kombucha and try some ginger som kombucha. I’ll let you know how it goes!

Banana Bread {Paleo, Gluten-Free, Dairy-Free, Sugar-Free}

photo 2


It feels like fall in the city. The weather had been grey and gloomy all week, which is quite a change from last weeks sunburn weather! Grey clouds always get me in a comfy cozy mood, and inspire me to drink tea and curl up with a good book and a blanket. But, what’s tea without a little tea treat, am  right?

This amazing banana bread entered into my heart a few weeks ago when I had a day off and went to go visit my sister at work. She’s been on this “Paleo Kick” that I usually roll my eyes at, but I have to say this recipe immediate became a kitchen staple and has now replaced my  tried and true Banana Bread recipe that is YEARS old! It’s THAT good kids! 

Gluten-free cooking is nothing new to me. I LOVE baking with Bob’s Red Mill All-Purpose Gluten-Free Baking Flour and have made quite a few goodies with it. Most recently I made a Strawberry Basil BreadGingerbread cookiesChocolate Chip Cookies, amazing Vanilla Cupcakes, and even tried my hand at Vegan Gluten-Free Donuts! To be clear, I am NOT a big believer in following every food fad that comes along, and most definitely did NOT jump on the Paleo band wagon when it came in vogue, nor am I on that bandwagon now. This bread is quite simply one of the most delicious healthy baked goods I’ve ever had. It’s mainly bananas and eggs, a little homemade almond butter, gluten-free flour, and some apple sauce to hold it all together. That’s it! No added sugars. No two stick of butter and 5 cups of refined white flour. Just simple, regular ingredients you can pronounce and happily eat.

IMG_7780 

There are many variations you can try with this recipe and I list a few at the end of this recipe. Next time I might throw in some blueberries, or try coconut flour to make a bit more of a dessert style bread. What variations would you, or are you, going to try?

Paleo Banana Bread
Adapted from Civilized Caveman Cooking Creations Recipe 
Prep Time: 10 mins | Cook time: 30-45 minutes

Ingredients
2 1/2 cups  yellow bananas, mashed (approx. 4 bananas) 
4 eggs
1/2 cup homemade almond butter
4 tablespoons Apple sauce (original recipe called for melted grass-fed butter or coconut oil)
1/2 cup gluten-free flour
2 tsp cinnamon (original recipe called for 1 tbsp but that’s a little heavy for a summer bread)
1 teaspoon baking soda
1 teaspoon baking powder (gluten-free or homemade)
1 teaspoon vanilla
pinch of sea salt

Instructions
1. Pre-heat your oven to 350 degrees fahrenheit
2. Combine your bananas, eggs, and nut butter, and apple sauce and mix well
3. Add in in the flour, cinnamon, baking soda, baking powder, vanilla, and sea salt and mix well
4. Grease a 9×5 glass (see notes) loaf pan with a fat of your choice (I use Rice Bran oil)
5. Pour in your batter and spread it evenly throughout
6. Place in your preheated oven and bake for 55-60 minutes or until a toothpick inserted into the center comes out clean (If you use a metal pan it will probably bake in 35-40 minutes so start checking at 35 to ensure the middle stays moist)
7. Remove from oven and flip your bread out onto a cooling rack
8. Slice and serve

Variations
1. Alternate Nut Butter: You can use any almond butter you desire: coconut, sunflower seed, macadamia nut, etc
2. Alternate Flour: My sister uses coconut flour, but I bet that almond flour or macadamia nut meal could be delicious
3. Flavors: Cranberry Orange – Only use 3 tablespoons of butter. Add zest of one whole orange diced, juice of one whole orange, and 1 cup dried cranberries or fresh if you want
4. Flavors: Chocolate Blueberry – Add 1 cup of fresh blueberries and 1/2 cup of cocoa powder
5. Flavors: Pumpkin Pecan – Reduce the almond butter to 1/4 cup and add 1/2 cup of pumpkin puree and 1 cup of roughly chopped pecan pieces

If you want to make these into muffins, use the same recipe and for mini muffins bake approximately 25 mins and normal size muffins 30-35 minutes.


Pumpkin Pie

DSC_0787

There is a special feeling of accomplishment and “arrival”reserved for the moment when you look at your LOVELY freshly baked pumpkin pie cooling on the rack,  knowing that you both roasted the pumpkins used in the pie AND made the crust from scratch. You “can” use the canned stuff, but roasting your own pumpkins just puts this already delicious recipe over the edge of deliciousness! Roasting pumpkins isn’t as hard as you may think and it truly is worth the time for some AMAZING tasting pumpkin pie! You can find my simple recipe HERE.

I like to use organic local pumpkins whenever available. The nice thing about doing pumpkin pie, is that you can roast extra pumpkin and use it later in the week! I usually roast a pumpkin to make puree for the pie, and roast a pumpkin to roast in chunks to use with toasted quinoa and roasted chickpeas for dinner, or tossed in a salad.

Pumpkin Pie

Prep:15 mins |Cooking: 55 mins

Ingredients

3/4 cup granulated sugar
1 teaspoon ground cinnamon
1/2 teaspoon salt
1/2 teaspoon ground ginger
1/4 teaspoon ground cloves
2 large eggs
1  15 oz. canned Pumpkin or 1 3/4 cups pumpkin puree
1 12 fl. oz. can Evaporated Milk
1 unbaked 9-inch deep-dish pie shell (homemade recipe HERE)
Whipped cream (optional)

Directions

Mix sugar, cinnamon, salt, ginger and cloves in small bowl. Beat eggs in large bowl. Stir in pumpkin and sugar-spice mixture. Gradually stir in evaporated milk.
POUR into unbaked pie shell.
BAKE in preheated 425° F oven for 15 minutes.
Reduce temperature to 350° F; bake for 40 to 50 minutes or until knife inserted near center comes out clean.
Cool on wire rack for 2 hours.


RECIPE TIPS
Pie is done when center reaches 200°F. Tap center surface of pie lightly – it should spring back when done. For easy clean up, spray pie pan with cooking spray before placing pie crust in pan. If pie crust is over browning, cover edges with foil.
To use prepared frozen pie crust: Place cookie sheet in oven and pre-heat oven as directed. Pour filling into frozen crust and bake on preheated cookie sheet.
High Altitude Adjustments: Reduce sugar to 2/3 cup and increase butter to 3 tablespoons. Reduce oven temperature to 325°F.