I’m sick. Anyone that know’s me know that’s I’m TERRIBLE at being sick. I mean… TERRIBLE!! I’m grumpy, irritable, independent and needy all at once and just a downright mess. The moment I feel even the slightest hint of energy, I’m off running a marathon. Well, I did it again. Somehow the bug got me something fierce! It just laid me FLAT and thanks to my prince charming with patience as fortified as Knox itself, I was well cared for and starting to feel the slightest bit better today. Which of course meant that I needed to jump into the kitchen and cook up 15 pots of something-or-rather and bake this-and-that.

Oh, how very wrong I was! “Simply” whipping up some home roasted garlic turned into chopping two massive leeks, a head of celery, handful of mushrooms, a large onion, a few handfuls of frozen peas and adding a can of white beans to a home prepared chicken stock base with pepper, bay leaves, cayenne and dried parsley (darn not picking up a fresh head at the store!)… see what I mean! I can’t REST! Now, I have to say…the soup smells lovely simmering in the pot but I completely over exerted myself into a grumpy bear and now I need to go sit in the corner and put myself into what I’m now referring to as an “adult timeout” and think about what I’ve done! New mantra… MUST rest… or at least try harder 🙂

1. Preheat the oven to 400°F.
2. Peel away the outer layers of the garlic bulb skin, leaving the skins of the individual cloves intact. Using a knife, cut off 1/4 to a 1/2 inch of the top of cloves, exposing the individual cloves of garlic.
3. Place the garlic heads in a baking pan (you can use either muffin or small loaf pans as they both work equally well.) Use Misto spray (or you can free hand pour) olive oil on the open garlic tops.
4. Cover with aluminum foil and bake for 30-35 minutes, or until the cloves feel soft when pressed.
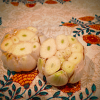
5. Allow the garlic to cool 5-10 minutes so you can handle with bare hands. The garlic should simply slip out of the skins. If it doesn’t, simply use your fingers and peel back the skins and slide the garlic out .
Now you have some delicious home roasted garlic! Roasted garlic should last about a week in the fridge in an airtight container, but can also be frozen and used later in soups, pastas, spreads (especially with heirloom tomatoes basil and fresh potato or sourdough bread!) or any other cooking dish that might call for garlic. The only problem you might encounter, as with many other “make yourself” projects… you’ll be spoiled for the homemade and won’t want to use store bought! That’s what happened when I made Home roasted red peppers!

I LOVE collecting recipes and seeing how others use ingredients! How do you plan to use your home roasted garlic?