Taco Tuesday: Black Bean & Lime

TTTTRRAADDDIITTTIIOOONNNN!!! TRADITION!

“Traditions, traditions. Without our traditions, our lives would be as shaky as… as… as a fiddler on the roof!”(Tevye, Fiddler on the Roof)

Oh, excuse me! I was just practicing my Fiddler on the Roof singing. In case you’re inspired to watch the intro video you can check it out here: Fiddler on the roof – Tradition.

But this outburst of song was inspired by the weekly taco Tuesday tradition that we have.This post was actually last weeks Taco Tuesday adventure but I got busy and figured I better get it up before tonight’s Taco Tuesday adventure (sneak peek: fish tacos are on the menu!). Our Tuesday tradition keeps menu planning simple and I love that I can pick up the ingredients on the weekend and just grab some fresh cilantro from the market on Monday/Tuesday (or heck even Sunday if I’m lazy!) and then everything’s pretty much ready to go when we get home. Because let’s be real, by the time you get home from work and get through chores/errands/working out/traffic/family/pets… the last thing you want to do is cook up some tedious elaborate meal! Well, maybe that’s just me so those of you that are with me… read on!

black bean and lime tacos

I am the more carnivorous eater in our house, but also dairy-free so we try to find meals that I can get excited about without featuring meat/dairy for the main protein focus. There are a few wonderful things about tacos. First, the word itself. Taco…ttaaccoooo…TACO! It’s just fun to say!  But another very wonderful feature of the taco is that it’s the everyone food. A taco can literally be made that will please anyone! From the meat and potatoes crowd to the vegan or gluten-free eaters, a taco will always have your back. They can be (deep breath) meat free, vegetarian, gluten-free, meat focused, lactose free, diary free, corn free, (air), wheat-free, egg free, nut free, tree-nut free, soy free, fish free, paleo…they can LITERALLY feed ANYONE!

Another amazing thing about tacos is that you can make them with whatever is in the fridge! They can be as simple or elaborate as you desire! Paging through our new cookbook I received as a birthday present from our recent trip to Sonoma, I was remembering the wonderful pureed black beans from Elote Cafe. They…were…delicious!!! Between that and a ridiculous excess of limes in our house (I’m not sure why… maybe it has something to do with a reverse sock monster effect? Someone PUT limes in the fridge?! We also have a glasses gnome that sneaks in an puts their sticky little paws all over our glasses! But back to the point! We had a randomly large amount of limes and decided to use them up in this tasty taco Tuesday recipe! For texture, I pureed some of the beans and left some of them whole. And… since I’m obsessed with grilled corm we also did a few ears of corn!

So sit back, relax, maybe make yourself a delicious sommer sherpa  and enjoy the tradition of taco Tuesday with us!! Stay tuned for tonight’s fish tacos recipe coming soon and let me know what your favorite taco recipes are! I’ll be featuring your suggestions in my Taco Tuesday Pintrest board!

chopped cilantro and jalapeno

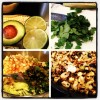
Black Bean & Lime Tacos w/Grilled Corn

1 can black beans
1 spoon full minced garlic and juice
Cracked Salt & Pepper to taste
Cayenne Pepper to taste
2 limes, juiced (plus any additional wedges you want for garnish)
2 Ears Corn
Flour Tortillas (or corn for a gluten-free option)

Optional garnish/additions: Cheese, sour cream, grilled southwest cabbage slaw, avocado, Cilantro, jalapeño, chopped/grilled onions, grilled mushrooms, hot sauce/salsa, Elote, red peppers, radishes, fruit salsa

  1. Soak the corn for 20 minutes then pre-heat the oven and wrap corn in foil and cook for 30 minutes. At that point I usually open up the foil and start to turn the corn every 5 minute to attain a good char. You can also use canned corn and heat on the stove if you’d like.
  2. The beans usually take 10 minutes to prepare so when you’re ready heat the beans over the stove or in the microwave with the garlic, salt/pepper, cayenne pepper and juice of two limes. Once it’s thoroughly heated transfer to a vita mix blender and blend until creamy. You can also use an emulsion blender, potato masher, or food processor.
  3. Slice the avocado and prepare the garnishes you desire
  4. Heat the tortillas over open flame on the stove (or heat in the micro between two damp paper towels or in the oven wrapped in foil).
  5. Spread out the black beans and garnish away!

Quick Healthy Breakfast

Breakfast is one of my favorite meals. I LOVE everything breakfast related…scones, muffins, breads, eggs, savory roasted veggies!  There’s something so relaxing about a good cup of coffee to get your day started that can only be enriched by a delicious breakfast to accompany it! You might find it odd, then, that breakfast is one of the most stressful times of day for me during the week.

Living in Seattle I’ve grown accustomed to seeing grey drizzle outside which makes it THAT much harder to crawl out of a warm bed. Once I do finally drag my lazy butt out of bed the last thing that I want to do is race the clock to get out the door and off to start my day. The typical morning looks something like: WakeupgetreadygetbreakfastCOFFEEneedfood! This leaves me a ball of stress when it comes to breakfast during the week. I’m guessing I’m not the only one who needs some good, healthy and QUICK breakfast options! Well rest assured I’ve got your back!!!

Quick Breakfast Sandwiches from Macheesmo (Photo from Macheesmo.com)

I used to love grabbing one of the English muffin breakfast sandwiches from Starbucks because they were quick and mostly healthy. Until I realized one morning as I unwrapped that wonderful warm bag and got the first whiff of my toasted breakfast sandwich as I sunk my hungry little face into the sandwich…I have EVERY ONE of these ingredients at home! Why did I just pay $3 for something that I could have literally made so easily before walking out of the house. Getting on the budgeting bandwagon I decided that with some planning ahead I could have a delicious breakfast at home while staying budget and health conscious! It just takes a little planning ahead!


Egg McMuffin Pan
Egg McMuffin Pan

Off to the recipe boards I went googling, blog scouring, pintrest-ing away and here is a little showcase of the handiwork. Above you’ll see the English muffin breakfast sandwich from Macheesmo and I LOVE that he illustrates how you can make them ahead and freeze them! Such a time saver!!  You can find the recipe here: Quick Breakfast Sandwiches from Macheesmo.

One of the best things I found to equip my kitchen for mornings was a little Egg plan! It was the PERFECT size for an English muffin breakfast sandwich! Simply heat the pan, scramble an egg and let it cook while toasting your muffin and continuing to get ready! SO EASY! One tip for the pan is that it can be a little larger than some English muffins so the egg will hang over the side of the bread a little which I actually don’t mind. Oh, and I’d only use one egg… two can get a little… souffle over the pan-ish! 🙂

My Pintrest Boards (if you need a little more inspiration):

Update: I JUST found 365 days of breakfast and I LOVE it!! LOVELY breakfast food photography that could make you hungry even after a Thanksgiving feast! I LOVE scrolling through their photos and getting some inspiration for breakfast meals!

And since we ALL love food pictures, here are a few other ideas for quick breakfasts:

Make your own fruit on the bottom yogurt cups
Make your own fruit on the bottom yogurt cup
Make Ahead Oatmeal in Jars
Apple Bran Muffins
Apple Bran Muffins
Baked Eggs Napoleon
Baked Eggs Napoleon
Breakfast Banana Split with Yogurt and Jam
Waffle Nut Butter Banana Sandwich
Quinoa Breakfast Bake

Gluten-Free 101

Gluten-Free
Gluten-Free

Pasta, Bread, Cookies, Pizza…

Why would you ever say goodbye to these wonderful LIFE staples!? Well, how about you find you’re allergic to gluten and they’re basically Krypontine to you?

When I first discovered as a teen that I was lactose-intolerant it was awful trying to navigate the lifestyle changes. Finding alternatives for my beloved milk, cheese and ice-cream were the least of my worries. Eating out became a nightmare, explaining that “it’s an allergy, not a preference” while fiercely praying that the kitchen might understand that I wasn’t TRYING To be high-maintenance and serve up my meal without any “special” presents from the kitchen. From helping a waitress to understand that yes that butter slathered on my toast might be delicious but it is still “diary” to learning how to navigate the hidden dairy in menus…food intolerance was frustrating and embarrassing to the extreme.

I state all of this only to lend validity to my statement, “gluten-intolerant friends… I UNDERSTAND your pain!” Whether it’s a choice to minimize gluten in your diet to an allergic necessity, the initial stages of gluten-free living will take work! I promise you though that like lactose intolerance you will learn what to look for and what to stay away from while embracing your choices as such and not as an ailment or your own personal “freak” button.

The may clinic has a GREAT article that lists gluten/gluten-free foods and what to generally avoid. Typically, you’ll need to avoid wheat, oats (unless specifically listed gluten-free), barley, rye, spelt and other flours. Gluten can reside in VERY obscure places so you will have to learn to navigate food labels. For example, beer and soy sauce contain gluten. As do many gravies, dressings and sauces. The Mayo Clinic Gluten-Free Article gives you a few great lists to read up on where you’ll find gluten and what to avoid.

Basic List of Gluten Free Foods

  • Beans, seeds, nuts
  • Eggs, Soy and most dairy products
  • Fresh meats, fish and poultry (not breaded, batter-coated or marinated)
  • Fruits, vegetables
  • Rice, Corn/Corn Meal, Flax, Quinoa
  • Gluten-free flours (rice, soy, corn, potato, bean), Hominy (corn), Amaranth, Arrowroot, Buckwheat, Tapioca, Millet, Teff, Sorghum

So, now that you have a basic list of what your new best friend foods are, let’s dig into the FUN part!! Thankfully the now mainstream nature of food allergies has done wonders for the food industry. No longer does gluten-free mean “taste and texture of cardboard”. I LOVE giving my family and friends treats that are gluten-free and/or vegan only to tell them afterward that the cookie they just ate was in fact gluten AND diary free! I have to give a little humor here and share a name with you that you may here now that you are on a gluten-free path: glutard. Pronounced glue-tard. Definition: one who can not process gluten. I have my version also: lactard. Pronounced lack-tard. Definition: one who can not process lactose. (if you can’t laugh at yourself what’s this world coming t0!)

Shout out

flying apron bakery & cafe


Here I have to pause and give a shout out to my wonderful local Flying Apron Cafe who has been helping glutards and lactards like ourselves enjoy cakes, cookies, muffins and savory dishes for years now! Their commitment to quality and TASTEFUL food paved the way for much of Seattle’s gluten-free progress and I’m forever grateful! If you’re not located in Seattle you can STILL enjoy their amazing food thanks to the new recipe book Flying Aprons Gluten-Free and Vegan Baking Book.


Our Tried and True Recipes
There have been quite a few requests for gluten-free recipes on the blog and we’ve been enjoying some wonderful gluten-free recipes that I’ve been posting on the Gluten-Free page as we try them! Also I wanted to highlight a few great sites for you. If you have any that you discover on your gluten-free journey that you’re loving PLEASE write and let me know so I can include them in this list! This is a journey for ALL of us to share and I’m happy to update this list as more resources that you find to be “tried and true” surface!
Update: I’ve also created a page dedicated to living gluten-free which you can view here: Gluten-Free Living

Recipe Inspiration

  • elana’s pantry includes many gluten-free as well as paelo recipes for everyday foods that you may have thought were “off-limits” due to dietary restrictions or lifestyle changes. She also includes substitution’s for making recipes gluten-free  which I found incredibly helpful! There truly is a science to baking and keeping the right ratios of ingredients to retain the right consistency and taste.
  • cannelle et vanille has a long list of some really wonderful looking gluten-free goodies from sweets to savories, breakfast to dinners and everything in between you’ll find some great inspiration for gourmet gluten-free cooking
  • one of my go-to sites for natural and healthy living is Whole Life Nutrition which contains a plethora of recipes for not only gluten-free living, but also cleanses and natural living recipes, tips tricks and plans (they also have a section of the elimination diet which might be helpful for you to read up on if you’re newly gluten-intolerant)
  • gluten-free goddess is an EXCELLENT blog about all things gluten-free and some lovely food photography as well!
  • gluten-free girl and the chef is a fun site with recipes and videos for a gluten-free lifestyle
  • another site i love, 101 cookbooks, has some great gluten-free recipes that you can take a look at and their photos are truly inspiriting!
  • Whole Foods is my go-to market for gluten-free baking and cooking. They also have awesome recipes and menu ideas posted online!
  • PCC Natural Markets also has online recipes, tips for gluten-free living as well as aisles stocked with products and friendly staff that can help you on your journey! Go wander for a few hours and you’ll find some treats!
  • Search Results for Pintrest Boards titled Gluten-Free Living (I have not clicked through and verified that all recipes listed are gluten-free. I’m merely providing a way for 4 more hours of you day to dispensary while you get lost in Pintrest!)

And there you have it wonderful friends! A VERY swift gluten-free 101 guide! PLEASE contact me if you have specific questions, need recipe help, have a recipe or resource to share!!!

Cheers to delicious living!!!

Easter Brunch Cake: Spiced Carrot Cake w/ Walnut Coconut Glaze (Paleo)

Spiced Carrot Cake w/ Walnut Coconut Glaze

Happy Easter everyone!! What better way to celebrate the Seattle sun than with a delicious cake for Easter brunch. A member of the family recently enrolled in cooking school so this was the year for me to take a back seat in the kitchen and a prime seat on the patio with a mimosa and let someone else do the work!

But, a chef can’t QUITE sit still that long so I whipped up a breakfast cake recipe, keeping in mind the diet of our Paleo host and hostess and I have to report that it turned out to be a delightful little post-brunch treat.

I was positive that our new chef would do just fine filling our stomachs with the main course so we needed a festive cake that was just a tad sweet, had a nice moist yet crunchy texture and a flavor that was both rich and light to satisfy the last few remaining bits of space in our brunch-ers stomachs. This cake did the trick! I wasn’t sure how it would turn out, since my recipes are comprised of a little of this and a handful of that but the measurements below are rough estimates.

Notes: If it feels a bit dry, add more applesauce or soy milk. A bit too wet  opt for more coconut or a dash more flour. With the glaze, keep the mindset that less water is better! It’s easier to add more water than have a half batch of glaze leftovers.

I did a bit too much and wound up with a half bowl of glaze! Above all else, pour another mimosa and have a wonderful day!!


Spiced Carrot Cake w/ Walnut Coconut Glaze (Paleo)

  • 1/2 c apple sauce
  • 1 c coconut flour
  • 1 tsp baking soda
  • 1/2 tsp cinnamon
  • 1/4 tsp salt
  • 2 large eggs
  • 3/4 c packed light-brown sugar
  • 1/3 c soy milk
  • 2 c shredded carrots
  • 1/3 c unsweetened coconut

Glaze & Topping:

  • 1/3 c unsweetened coconut
  • water (as much as needed)
  • chopped walnuts

Directions

  1. Preheat oven to 350 degrees. Spray an 8inch round cake pan with Pam or Misto with Canola oil.
  2. In a medium bowl, whisk flour, baking soda, cinnamon, and salt; set aside.
  3. In a small bowl, whisk eggs, sugar, applesauce and soy milk until smooth.
  4. Gently mix egg mixture into dry ingredients until moistened; mix in carrots. Transfer batter to prepared pan.
  5. Bake until a toothpick inserted in center comes out clean, 40 to 45 minutes (if browning too quickly, tent cake with aluminum foil). Cool in pan, 15 minutes. Turn out of pan, remove paper, and cool completely on a rack, right side up.
  6. Transfer to cake pedestal, and sprinkle with crumbled walnuts
  7. Make glaze and drizzle over the top of the cake and walnuts or dust with confectioners’ sugar.

Seafood Breakfast for Dinner: Potato Parsnip Pancakes with Shaved Crab, Poached Eggs and Breakfast Cocktail Sauce

Living so close to Pike Place Market truly does spoil us. Brunch, being one of my favorite meals to cook and eat, has recently become a fun tradition to try new recipes and variations on the good old favorites. We decided to do a seafood brunch Sunday morning so down to the market I went only to returned with fresh AMAZING crab from the Pike Place Fish Market. Not only do they stock a wonderful inventory of fresh, quality fish but they are notorious for throwing the fish great distances, much to the amazement of the crowd. It was a quite a feat to even make it the few blocks home before digging into “sample” the crab meat which I KNEW would be amazing. Even with my high expectations I was blown away. The freshness and quality of the crab was evident in how rich, buttery and just wonderful it tasted.

Potato Parsnip Pancakes with Shaved Crab, Poached Eggs and Breakfast Cocktail Sauce

As I started preparing the brunch, grating the parsnip and potato and setting aside to drain, mentally setting the table and project managing the meal, starting the cocktail sauce… pause here. I opened a jar of our much loved Pike Place Fish Market cocktail sauce, mashed up a little avocado because I love them with both eggs and crab and started the grinder for some fresh coffee grounds to mix in. DON’T turn up your nose yet! It’s quite delicious and thanks to a trip to Seatown for Mother’s Day happy hour, Tom Douglas has me hooked on cocktail cause with coffee grounds.

I mixed and I blended, mashed and molded. Calling my trust taste tester over, I scooped up a bit for each of us and we had the same response when we tasted…it’s missing something. After much deliberation it was decided that a “kick” was missing. Imagine how dejected I was that I would need to make ANOTHER trip to the market and postpone making brunch until my taste tester made a most wonderful suggestion: let’s have the left over fajitas for lunch and have breakfast for dinner! What a brilliant idea! In our afternoon chores we picked up some fresh horseradish root and then it was game time! Breakfast for dinner, yes please!

Seafood Breakfast: Potato Parsnip Pancakes with Shaved Crab, Poached Eggs and Breakfast Cocktail Sauce
Serves 2

Ingredients:
1/2 lb crab meat, already cooked
eggs (one for the pancakes and one to top each pancake)

For the Breakfast Cocktail Sauce
1 Jar Pike Place Fish Market Cocktail Sauce
2 tbsp Fresh bold roast coffee, ground at a medium grind
Fresh Lemon, squeezed into the sauce to taste
Fresh horseradish root, exterior layer removed, soft white flesh grated and chopped

For the Potato Parsnip Pancakes
3 medium mini gold potatoes, grated
1 medium sized parsnip, grated
1 egg, lightly beaten
fresh cracked salt & pepper to taste

  1. Grate the potato and parsnip in a colander and sprinkle with a bit of salt. Let stand for about 20 minutes. I also take one more step and lay out the grated vegges on a paper towel and pat dry.
  2. In the mean time, make the breakfast cocktail by combining all ingredients to taste. Cover and let stand in the fridge.
  3. Place grated vegges in a bowl.
  4. Heat some oil in a skillet over medium/high heat
  5. At this time, heat a sauce pan with water to poach the eggs
  6. Lightly beat one egg and add it to the veggies, seasoning with fresh cracked pepper to taste.
  7. Add a scoop of the mixture to the hot skillet, forming into a patty once in the pan and cook until brown on one side (about 8 minutes) then  flip and cook the until brown on the other side.
  8. Place pancakes on paper towel to drain excess oil and serve.
  9. Poach eggs in boiling water for 90 seconds to 2 minutes depending on how you runny you like your yolk. Remove from water with a slotted spoon and place in a small ramekin to drain for a few seconds.
  10.  Plate  up the potato parsnip pancakes and top with the breakfast cocktail sauce. Top with shaved crab, squeeze a bit of fresh lemon and place your poached egg on the top. Garnish with a bit more cracked pepper and dried parsley.
  11. Enjoy!!!

Grilled Cabbage Slaw

In our house there are two forms of “to do lists”, there’s a “his” and a “hers”. “His” consist of various house chores and interior renovation tasks such as sanding, painting, scrubbing grout, fixing and rearranging various wires and boxes and electrical “this and that’s”.  Tasks on that list are actually being completed while I curl up in the corner, typing away on the dining room table which is against the living room wall with boxes to the right of me, boxes to the left of me, boxes in front of me… ten points and a big golds star to any of you that know that Little Rascals quote. We’re in the middle of redecorating the little perch and I’m actually quite thankful to report that I have a very dashing handyman that LOVES this type of work. Or, at least enjoys it more than I do! He’s been slaving away and I’ll post before and after pictures once we have the new carpet in.

    Grilled Southwest Cabbage "Slaw"Let me proceed to the “her” version of the to do list: banana bread, morning muffins (which I made this weekend and posted here), blueberry muffins with crumbles on top, stir fry, fajita’s… this is just a sample of the meals that are on my list. And I must say, to quote the great Ron Burgundy, “I’m not even mad.” Settling up my part of the redecoration manual labor with some good homemade meals is quite fine with me! After brand new paint in the bedroom and a gorgeous new living room painted the perfect shade of meringue yellow which at the moment is shining brightly in the rare spring Seattle sunshine, my handyman deserved a good hearty meal. I decided to follow the coupon clipping and headed to Metropolitan Market to get some steak for our fajita’s. Up to the counter I bounded, with WAY more than I went in for and happily presented my coupon with a sense of great accomplishment at a few dollars well saved, only to realize that I apparently can’t read dates and the coupon wasn’t good for another 3 days! We already had our hearts set on steak fajita’s so I put back the second of the “buy-one-get-one-free” coupon that was no more, and juggled my groceries to the car.

As all wonderful recipes transpire, parts of this meal are NOT what I originally intended and I have to say that they actually turned out much better! I meant to marinate the meat, and didn’t, yet it was more perfect that I could hope! About an hour before I was going to prep the meal I was still trying to think of a recipe enhancement. While taking a mental inventory of the fridge I stopped on the middle right shelf where 1 1/2 heads of green cabbage still lived as remnant from the post St. Patty’s Day sale at the market. SLAW! I’d never in my life made slaw and wasn’t even sure if it would go with steak fajita’s but it was going to be made and tested to world, watch out! I have to say, the slaw turned out INCREDIBLE! So incredible, in fact, that I make a brand new batch when we enjoyed our next day leftovers. The key to this slaw is fresh ingredients, an entire Anaheim pepper for kick, fresh lime juice and the Creme de la Creme finishing touch is that I pan grilled it! That deep charred taste completed the entire meal. I’ll never again eat another raw slaw… to the grill with that side!

Grilled Southwest Cabbage “Slaw”

3 c. cabbage, chopped
1 ear corn, uncooked
1 medium Anaheim pepper, sliced and diced very thin with seeds
1 good handful cilantro, rinsed and chopped
1/2 Lime, juiced
1 spoon full minced garlic and juice
Cracked Salt & Pepper to taste
Cayenne Pepper to taste

  1. In a large bowl, mixing all ingredients and set aside uncovered, to let the flavors mix (you can set this aside for however long you’d like which makes this a great prep ahead of time part of a meal, but let it set at least 20 minutes
  2. Heat a non-stick pan over high heat and grill the cabbage until it’s charred, turning every few minutes (approx. 10 minutes)


    Grilled Cabbage Slaw Salad with Seared Flank Steak and Galaxy Rice Cheese
Grilled Cabbage Slaw Salad with Seared Flank Steak and Galaxy Rice Cheese
    Seared Steak Fajitas with Grilled Cabbage Slaw and Avocado
Seared Steak Fajitas with Grilled Cabbage Slaw and Avocado

Cilantro Lime Chicken & Baked Potato Skins

Date night in our house is very important! We happened upon “Thursday nights” one week when we’d gotten home from work, gone to the gym, headed back home and realized that we were NOT in the mood to stay in and do our usual cook at home in pj’s. This, my fine friends, was the birth of date night! From that point forward EVERY THURSDAY we do something special but that doesn’t always mean going out. Since we’re trying to keep a closer budget (thank you new couch which will arrive in 8 weeks!!) and we both love to cook so much the past month or so we’ve been doing date night at home. I also have SO many recipes to cook through that this is a way to assure that I cook through at least one a week!

Cilantro Lime Chicken, Baked Potato Skins & Moscow Mules ...gone Sherpa

This date night was really one that made the memory books! I wanted to do something special and as you may have read in my previous post, our “honey do” lists for the house are pretty different…
his= house updates & open jars I can’t man handle open
hers= various dishes and meals he’d like me to cook

Well, I decided to really out do myself this week and built an entire meal around his favorite drink, the Moscow Mule . It’s a vodka based drink traditionally served in Copper serving Mugs and it has the most refreshing blend of ginger beer, mint and lime! We added a little twist to ours, the Sherpa Twist, and you’ll just have to read about it in the Moscow Mule with a Sherpa Twist post!

It took a few iterations of  the menu but I finally gathered a few favorites and decided on cilantro chicken lime skewers and a game day favorite, baked potato skins. These usually have cheese so I tired out a new dairy-free cheese (review here) and was quite pleased with it! You can find Galaxy Rice cheese and their other various produces at Whole Foods. We grilled the chicken skewers  as opposed to baking them because I have a wonderful grill master that’s willing to brave the cold for me. But if you don’t have access to a grill or it’s too cold, you can bake  the chicken in the oven (as a full breast) or grill up in a pan (slice chicken as directed in recipe).

Enjoy this meal with some delicious Moscow Mule with a Sherpa Twist and you’re ready to party!!

Cilantro Lime Chicken Skewers & Baked Red Potato Skins
(For the chicken)
2 1/2 limes,fresh juice
drizzle olive oil
4tbsp minced garlic
Fresh cracked salt and pepper to taste
2 chicken breasts
Fresh Cilantro

(for the potato skins)
Small red potatoes
Milk (Soy Milk for me, half and half if you don’t have allergies)
Fresh cracked salt and pepper to taste
1.5 slices of Apple wood smoked bacon per person
Cheese (I used rice for mine, and regular Tillamook cheddar for my master griller skins)
Garnish Options: Cilantro, chives, salsa, sour cream, salt & pepper to taste

Marinate/Night before

  • Combine lime juice, oil and garlic and fresh chopped cilantro in a large ziplock
  • Rinse chicken and slice into 1in thick strips, season to taste with salt and pepper
  • Add to bag and mix around all the juices and spices mix
  • Marinate chicken overnight, turning once or twice to mix up the juices and spices
  • Wash the potatoes and pat them dry for tomorrow skins and cook up the bacon for the skins

For the Meal

  • Remove chicken from bag and thread onto metal skewers .
  • Make a small batch of the marinade and brush onto skewers while they grill. Start grilling/heat up the grill judging by how long the potatoes take. Chicken should take about 10-15 minutes to grill so once the potatoes go in the oven, send the chicken to the grill.
  • Meanwhile, place potatoes in a zip lock and microwave until soft (depends on potato but I’d judge about 45 seconds per potato just to be sure that they don’t get mushy).
  • Lay potatoes out to cool down, then half and scoop out into a bowl. Splash with soy/milk and season to taste with salt and pepper mix together and crumble in the bacon. (optional add ins: Broccoli, cheese, grilled onions). Scoop the mixture back into the skins, careful to not
  • Pre-heat oven to 400 & send the chicken to the grill
  • Bake the potato skins for 8-11 minutes. Top with cheese to melt and bake 3-5 min more

Curry Coconut Turkey Veggie Soup

Curry Coconut Turkey Veggie Soup
Can’t WAIT to make this one! Got this recipe from the BFF and she’s an incredible cook! Once I make it I’ll upload a pic!

ingredients

  • Onion
  • Carrots
  • Celery
  • EVOO
  • 1lb Ground Turkey
  • Salt
  • Curry/cumin (to taste)
  • 2 qts Chix broth
  • 5tbsp Thai yellow curry sauce from TJ
  • Zucchini/mushrooms
  • 1/2 can coconut milk
  • Little more salt and some cayenne
  • 1/2-3/4 c fresh chopped cilantro

directions

  • Sauté onions, carrots and celery in EVOO until the carrots barely become soft
  • Add the turkey and brown in the same pot seasoning with salt, curry and cumin to taste
  • Add chicken broth the ingredients already in the pot
  • Add 5tbsp Yellow curry sauce from Trader Joes , chopped zucchini and mushrooms and 1/2 can of coconut milk with salt and cayenne to taste and simmer until veggies are cooked
  • Just before serving, mix in 1/2-3/4 c fresh chopped cilantro and let simmer for a few minutes

Weekend Breakfast: Eggplant and Scrambled Eggs

I love weekends! What’s better than waking up and realizing that the first of two day’s you’ve been looking forward to all week are finally here!

One of the best parts of the weekend, in our house, is weekend breakfast! During the week, breakfast is a chore and provides quite a bit of entertainment while I bang around opening cabinets and drawers in the attempt to find a suitable meal that can be made quickly or eaten on the go.

But Weekends…walking into the kitchen, opening the fridge and creating some delicious weekend masterpiece is nearly a religious experience for me! Today, however, there was little inspiration flowing so I gave creative powers the day off and opted for my simple “go-to” stand by’s of eggplant and and scrambled eggs.

Not only is this meal gluten-free, dairy-free, paleo, low fat but it’s also incredibly simple and quite delicious!

Eggplant & Scrambled Eggs

  • Pre-heat oven to 450
  • Slice eggplant and lay on baking sheet covered with a sheet of Reynolds Wrap Non-stick aluminum foil 
  • Misto Spray olive oil  on the top of the eggplant and season with fresh cracked pepper
  • Cook for 15-17 minutes, or until eggplant is as cooked/crispy as you like
  • When there is about 5 minutes left on the oven timer, scramble one egg with garlic, cayenne pepper, fresh cracked pepper, dried parsley and cook.
  • Enjoy!!

Today I also tried something that we picked up last week and I haven’t yet tried, Reynolds Wrap Non-stick aluminum foil (also available through My Amazon.com Store). We make broiled veggies 3-5 times a week and no matter how much olive oil I lather on the veggies or Misto spray on foil the eggplant ALWAYS sticks! It drives me nuts and has caused a few choice words to escape on various occasions! So, last week we picked up a roll of the alleged “non-stick” foil and today was the day! I was skeptical as I pulled it out of the drawer mentally recounting the countless fights with the baking sheet and foil as it they tried to hold onto my precious eggplant with their sticky powers.

I am quite happy to report that I’m a believer! Foil CAN be non-stick! Ring the bells, sound the horns! That foil worked wonders and I actually liked that it wasn’t quite flawless, as you can see in the photo the end cut of the eggplant stuck to the sheet a bit. Full dramatically narrated product review posted here. This is now a STAPLE of my modest little kitchen! With the tiny space that we have, every utensil, pot, pan and gadget must earn it’s spot!


And on a completely non-related side note… have you ever tried to spell  “utensil” and gotten it right the first time!? I’ll shamelessly admit that it took me a few tries… what a strange word!


Broiled Eggplant

Gluten Free Gingerbread Cookies

Disclaimer: This is a recipe for GLUTEN-FREE gingerbread. If you’re looking for regular gluten-FILLED gingerbread, you can find the recipe HERE.

Starting before Thanksgiving, there is a certain craving that I start to notice. It’s not just for the warmth of a cup of tea, or the delicious flavors of roasted turkey and holiday meals. No, it’s much MUCH more than that… I get the urge to bake EVERYTHING in my recipe books!  Channeling the reverse of Santa who consumes the baked goods, I try to make enough cookies, cakes and treats to feed everyone who might get within 10 feet of my door! Unless you adore baked goods being forced upon you at every turn, it’s best to avoid me for the holiday season!

While I do a lot of baking for others, which includes cooking with those luxuries I can’t enjoy like whole milk and butter, there are a few treats that I make in abundance purely to keep around the house. Gingerbread  cookies are my ALL TIME favorite! How can one go wrong with the delicious rich spices, the crunch of the crispy edges and the soft wonderful center… the complimentary royal icing that adorns the top of that lovely treat and even more, the sprinkles or toppings that are hand-picked to decorate the surface of such a treat. Okay okay, I’m getting a little too into the description of the cookie but does that explain how much I adore them!

I love gingerbread and use ANY excuse to throw a party (yes, it’s actually true!) so it goes without saying that I host a gingerbread decorating party each year. This year, there were actually quite a few gluten-free guests in attendance and I decided that it would be a good exercise to be a bit more mindful with minimizing gluten in my own diet. So, off on the adventure I was to make a gluten-free gingerbread cookie! COOKIES FOR ALL!!! For the cookie part, I complied the recipe from a few different ones that I found and  kinda pulled a “wing-it” with this one. They turned out GREAT! I love Bob’s Red Mill gluten-free flour, even the non-glutards (don’t get offended… I’m a lactard) couldn’t tell the difference and enjoyed them!!


Gluten-Free Gingerbread Cookies

Ingredients

5 Cups Bob’s Redmill Gluten-Free flour
2 T. baking powder
2 t. baking soda
2 t. cinnamon
1 t. ground ginger
1 t. salt
1/2 t. ground nutmeg
1/2 t. ground cloves
1 1/2 cups brown sugar
1/2 cup applesauce
1/3 cup oil
1/3 cup molasses T. vanilla

In a small bowl, stir together gluten-free flour, baking powder, baking soda, cinnamon, ginger, salt, nutmeg, and cloves, and set aside.
In a medium bowl, place the remaining ingredients, and stir to combine.
Add the dry ingredients to the wet ingredients and stir well to combine.
Cover the bowl, place it in the refrigerator, and chill the dough for 1 hour or more.
Using a little safflower oil, lightly oil (or mist with oil) two non-stick cookie sheets and set aside.
Sprinkle a little gluten-free flour over a work surface.
Divide the chilled dough into quarters, work with only one-quarter of the dough at a time, and keep the remaining dough covered and chilled until needed.
Working in batches, roll out the quarter of dough to 1/4-inch thickness, and cut into desired shapes with cookie cutters.
Carefully transfer the cut cookies to the prepared cookie sheet.
Bake them at 350 degrees for 6 minutes (the cookies will feel slightly soft to the touch).
Allow them to cool on the cookie sheets for 3 minutes before transferring them to a rack to cool completely.
Repeat the rolling and cutting-out procedure for the remaining cookie dough.
Store the cookies in an airtight container.

Good House Keeping Royal Frosting
2 cup(s) confectioners’ sugar
2 tablespoon(s) meringue powder
3 tablespoon(s) water, plus additional as needed
Assorted food colorings (optional)
Directions
In bowl, with mixer at low-speed, beat confectioners’ sugar, meringue powder, and water until blended. Scrape side of bowl with rubber spatula. Increase speed to medium; beat until soft peaks form, about 10 minutes. Icing should be stiff enough to hold its shape when piped. Thin with more water, if needed.
Tint icing with food colorings as desired; keep surface covered with plastic wrap to prevent drying out.