What are you made of?

There are times that life just spins you around, flips you you upside down, then pushes you over seemingly just to show you who’s boss. Situations will happen that are completely unexpected and often uncomfortable. Sometimes our choices are the catalyst of these situations and other times, well that just how the hand is dealt.

While these times of adversity are often extremely uncomfortable and stressful, they provide an incredible potential to be building blocks of our character. A phrase I’ve come to really appreciate is, “Adversity introduces a man to himself.” I read this phrase, believe it or not, on the back of the bread we buy (which is INCREDIBLE bread; Dave’s Killer Bread. If you get a chance to read his story here, DO so!) That phrase cuts to the core of what adversity truly is; an introduction to what you’re made of.

Hard times WILL come, and the only thing that you can control is how you respond to the situation. Don’t waste your energy worrying about things out of your control. Take it one step at a time. Ask yourself, in this moment or new few moments, what can I control. You’ll find that the only answer is, “my response.”

I challenge you to change your mindset on adversity. Often we view hard situations as something we have to try to “live” through. Instead, take it as an opportunity to roll up your sleeves and take a good look at who you are and what you’re made of. Trust yourself to handle each situation as it arises and remember, it will all work out. Not usually as you planned…but sometimes that opens the door to opportunities you had never even imagined.

When you just feel overwhelmed and need a reminder, revert to this picture, posted at right. Own those words and remember that it WILL be okay. Things WILL work out, we just have to keep our chin up and take one day at a time. Rachel always knows JUST what to say to cheer us up and encourage us to face the day and kick it’s butt! You can read her inspiration on her blog, Daily Peptalk From a Best Friend. (Direct link to picture at right found here).

Positive Minds Live Positive Lives

I am continually amazed at how much power our mind holds. Sometimes changing your entire mood and outlook is really just deciding to making a mindful choice and willing yourself to feel differently.

Today, my mental outlook mirrors the color dominating Seattle today, grey. Just…simply grey. I’m finding myself with no energy, no drive, no real passion or goal that I’m chasing after today. While browsing the Fitness section on Pintrest (LOVING the site!) I saw this picture and it actually made me stop, re-read it twice and ponder how very true it is. I couldn’t wait to share it with all of you!!

This is SO true! Happy people act as such because they’re happy inside. Think of one person that makes you happy, or one person that when you think of them you smile because of their contagious laugh or positive mental outlook on life. Days, like emotions, come and go and some are harder to bear than others. But one thing remains true, YOU determine how you feel and thus, your mental outlook on life. Stop for a moment and take a mental check list of your passion, happiness and outlook on life. Are you living the life you desire? If not, what needs to change?

Make the choice to act the way you desire to act, even if you don’t feel like it right now, and you will naturally focus your energy on achieving it.

“I think, therefore I am” (Descartes )

If you need a little boost, check out the awesome site that the image above came from: http://positive-notes.tumblr.com/

You Are Not Carrie Bradshaw

Take a moment and read this GREAT post that a girlfriend passed along to me. Even though I have seen only one episode of Sex in the City (I know I know ladies, gasp away!) I am familiar with the story line and even more familiar with the true to life events and scenarios that Carrie faces during the show.

We all have mental struggles. We’ve all, at some point, created our own persona of who we “should” be, how we “should” act, and what job(s) and lifestyles that we “should” be living. (Have I ever mentioned how much I dislike the word “should”?) I’ve written a few letters like this to myself and have come to realize that when we battle ourselves in our own mind there is an unfair advantage of well, to put it physically, a syndrome similar to 1000 super charged psychotic bouncy balls in a confined space. Our mind is strong and plays tricks on us sometimes. But YOU ARE stronger!

Remember that YOU can choose WHO you want to be, how you respond and act, what you spend your time doing and how you spend your money resulting in a lifestyle of your choosing. Remember that you have the power to create what you desire, sometimes it just takes a little reminder like this. Sitting down and writing a letter like this out takes thought and commitment but it’s an investment in the most valuable thing you’ll ever own: your self-awareness.

You Are Not Carrie Bradshaw.

Weekend Breakfast: Eggplant and Scrambled Eggs

I love weekends! What’s better than waking up and realizing that the first of two day’s you’ve been looking forward to all week are finally here!

One of the best parts of the weekend, in our house, is weekend breakfast! During the week, breakfast is a chore and provides quite a bit of entertainment while I bang around opening cabinets and drawers in the attempt to find a suitable meal that can be made quickly or eaten on the go.

But Weekends…walking into the kitchen, opening the fridge and creating some delicious weekend masterpiece is nearly a religious experience for me! Today, however, there was little inspiration flowing so I gave creative powers the day off and opted for my simple “go-to” stand by’s of eggplant and and scrambled eggs.

Not only is this meal gluten-free, dairy-free, paleo, low fat but it’s also incredibly simple and quite delicious!

Eggplant & Scrambled Eggs

  • Pre-heat oven to 450
  • Slice eggplant and lay on baking sheet covered with a sheet of Reynolds Wrap Non-stick aluminum foil 
  • Misto Spray olive oil  on the top of the eggplant and season with fresh cracked pepper
  • Cook for 15-17 minutes, or until eggplant is as cooked/crispy as you like
  • When there is about 5 minutes left on the oven timer, scramble one egg with garlic, cayenne pepper, fresh cracked pepper, dried parsley and cook.
  • Enjoy!!

Today I also tried something that we picked up last week and I haven’t yet tried, Reynolds Wrap Non-stick aluminum foil (also available through My Amazon.com Store). We make broiled veggies 3-5 times a week and no matter how much olive oil I lather on the veggies or Misto spray on foil the eggplant ALWAYS sticks! It drives me nuts and has caused a few choice words to escape on various occasions! So, last week we picked up a roll of the alleged “non-stick” foil and today was the day! I was skeptical as I pulled it out of the drawer mentally recounting the countless fights with the baking sheet and foil as it they tried to hold onto my precious eggplant with their sticky powers.

I am quite happy to report that I’m a believer! Foil CAN be non-stick! Ring the bells, sound the horns! That foil worked wonders and I actually liked that it wasn’t quite flawless, as you can see in the photo the end cut of the eggplant stuck to the sheet a bit. Full dramatically narrated product review posted here. This is now a STAPLE of my modest little kitchen! With the tiny space that we have, every utensil, pot, pan and gadget must earn it’s spot!


And on a completely non-related side note… have you ever tried to spell  “utensil” and gotten it right the first time!? I’ll shamelessly admit that it took me a few tries… what a strange word!


Broiled Eggplant

Reynolds Wrap Non-stick aluminum foil

We make broiled veggies 3-5 times a week and no matter how much olive oil I lather on the veggies or Misto spray on foil, the eggplant ALWAYS sticks! It drives me nuts and has caused a few choice words to escape on various occasions! So, last week we picked up a roll of the alleged “non-stick” foil to try. Reynolds Wrap boasts that they have a non-stick foil…I’ll be the judge of that!

I was skeptical as I pulled it out of the drawer while mentally recounting the countless fights with the baking sheet and foil as it they tried to hold onto my precious eggplant with their sticky powers. I figured that I’d throw the big guns and go “initiation style” on the foil. With the tiny space that we have, every utensil, pot, pan and gadget must earn its spot! So, I led with the closer and tore a sheet of the allegedly non-stick foil, laid it down on the baking sheet, and gingerly positioned my little eggplant slices on the tray while mentally apologizing to them if in fact the foil failed and they too became victims of yet another foil accosting. They make it easy to know which side of the foil is non-stick by making the opposite side shiny. Didn’t win me over completely, I’m not that easily wooed, yet, but I thought it was a nice feature.

Oven pre-heated…timer set…in…they…go. I anxiously awaited the 15 minute timer’s count down, tried to sidetrack myself with a tweet which, of course, was about the non-stick challenge currently happening in the kitchen!
Then… BEEP….BEEP… DONE!!! I leaped up too… okay let’s be honest here, I was already standing in the kitchen watching the timer count down. I dramatically opened the door, pulled out the tray, and shook the baking sheet. Much to my delight, the eggplant responded and moved around on the sheet as if gliding with ice-skates over a frozen pond! Success, delight, joy! I’m a believer! Foil CAN be non-stick! Ring the bells, sound the horns!

That foil worked wonders and I actually liked that it wasn’t quite flawless, as you can see in the photo the end cut of the eggplant stuck to the sheet a bit. This is now a STAPLE of my modest little kitchen!

And on a completely non-related side note… have you ever tried to spell “utensil” and gotten it right the first time!? I’ll shamelessly admit that it took me a few tries… what a strange word!

Reynolds Wrap Non-stick aluminum foil  (also available through My Amazon.com Store)

Punch of Misunderstandings- Refreshing Cockatil Punch

One of the fun parts of living downtown is that you never know what will happen! While walking home from our Thursday night date night a few weeks ago, we were walking the rainy streets of Seattle after a drink and some happy hour appetizers at RN74 (review to come, stay tuned!) we walked past Goorin Hat Brother’s location on 1st avenue. Music was playing, the place was packed, and the scene resembled a scene from A Christmas Carol with the dreary outside and such a rosy and cozy party happening indoors. Leaning out of the open door, the 20’s era clad worker beckoned us in, “There’s live music folks”… pause from us…”there’s an open bar and GREAT drinks, come on in and have one”. Now THAT was the sales man’s trick, know who you’re selling to!

Besides the fact that we stayed for over an hour and the two hats that I walked out with we did enjoy a few glasses of the truly delicious libations. Luckily, they were distributing the recipe!! Not only is the alcohol itself smooth and delicious, but their packaging is just classic!!

Despite the silly name, the punch is actually quite forward and smooth! Enjoy!!

Punch of Misunderstandings
(Recipe from Deaths Door Spirits)
Serves 8-12 people

ingredients

  • 1 bottle Death’s Door White Whiskey
  • 12 oz Death’s Door Vodka
  • 12 oz Sombra Mezcal
  • 12 oz Agave Nectar
  • 12 oz Lime Juice (Fresh, approx 12 limes)
  • 64oz COLD water
  • 4 c ice


  1. Combine agave and lime juice into large punch bowl and stir to combine
  2. Add whiskey, vodka, Sombra Mezcal and cold water to nectar-juice mixture and stir thoroughly to combine
  3. Add approx 4 cups ice to chill
    Serve with a slice of red apple as a garnish if you desire


Simple Tapas Dinner

Everyone has had those days where you’d rather gnaw your own arm off than cook. No matter how much you usually adore it, there is just no inspirational energy left in your body. Those types of days pose a special problem for me because, surprise surprise, I’m picky. I like my food how I like it and when I want it and I want to use fresh ingredients. If you opened my freezer you wouldn’t find any Hungry Man dinners or Lean Cuisine Steamers.

But alas, last night I just did NOT want to cook and was so thankful that I’ve learned to plan ahead and stock the kitchen! It’s NOT hard to eat delicious enriching and nutritious meals, even on those days that come hell or high water you are NOT picking up a pan! Below is an illustration of a simple, healthy meal that I literally “threw” together from what was in the fridge.

Those are the days I’m thankful that it is so easy to eat wholesome food if you just plan ahead a bit and stock GOOD quality ingredients. Above is a little plate of broiled zucchini and yams, sliced heirloom tomatoes with cracked sea salt and pepper dusted with dried parsley, a few grapes, fresh basil and arugula and some balsamic drizzled grilled chicken breast and a few rosemary crackers. We recently tried a  salad at Bisato in Seattle (my review posted here) with 20 year aged balsamic dressing and it was INCREDIBLE! We wound up ordering another of the salads and that weekend went on a hunt to Pike Place to find a bottle! Stocking your pantry with fresh ingredients and using quality oils/vinegar and spices really does wonders for sprucing up a meal! Even a simple meal like chicken and veggies becomes a work of art with the right flavors!

Shown in this picture at left clockwise from the wine 🙂 is….
Rook Wine
La Panzonella Rosemary Croccantini (Whole Foods stocks them)
Oven Grilled Zucchini
Baked pepper chicken with 20 year balsamic drizzled over the top
Fresh Basil
Oven Grilled Yam Fries
Heirloom tomatoes with fresh cracked salt and pepper
Red Grapes

How do you spruce up a simple meal?

Gluten Free Gingerbread Cookies

Disclaimer: This is a recipe for GLUTEN-FREE gingerbread. If you’re looking for regular gluten-FILLED gingerbread, you can find the recipe HERE.

Starting before Thanksgiving, there is a certain craving that I start to notice. It’s not just for the warmth of a cup of tea, or the delicious flavors of roasted turkey and holiday meals. No, it’s much MUCH more than that… I get the urge to bake EVERYTHING in my recipe books!  Channeling the reverse of Santa who consumes the baked goods, I try to make enough cookies, cakes and treats to feed everyone who might get within 10 feet of my door! Unless you adore baked goods being forced upon you at every turn, it’s best to avoid me for the holiday season!

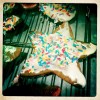
While I do a lot of baking for others, which includes cooking with those luxuries I can’t enjoy like whole milk and butter, there are a few treats that I make in abundance purely to keep around the house. Gingerbread  cookies are my ALL TIME favorite! How can one go wrong with the delicious rich spices, the crunch of the crispy edges and the soft wonderful center… the complimentary royal icing that adorns the top of that lovely treat and even more, the sprinkles or toppings that are hand-picked to decorate the surface of such a treat. Okay okay, I’m getting a little too into the description of the cookie but does that explain how much I adore them!

I love gingerbread and use ANY excuse to throw a party (yes, it’s actually true!) so it goes without saying that I host a gingerbread decorating party each year. This year, there were actually quite a few gluten-free guests in attendance and I decided that it would be a good exercise to be a bit more mindful with minimizing gluten in my own diet. So, off on the adventure I was to make a gluten-free gingerbread cookie! COOKIES FOR ALL!!! For the cookie part, I complied the recipe from a few different ones that I found and  kinda pulled a “wing-it” with this one. They turned out GREAT! I love Bob’s Red Mill gluten-free flour, even the non-glutards (don’t get offended… I’m a lactard) couldn’t tell the difference and enjoyed them!!


Gluten-Free Gingerbread Cookies

Ingredients

5 Cups Bob’s Redmill Gluten-Free flour
2 T. baking powder
2 t. baking soda
2 t. cinnamon
1 t. ground ginger
1 t. salt
1/2 t. ground nutmeg
1/2 t. ground cloves
1 1/2 cups brown sugar
1/2 cup applesauce
1/3 cup oil
1/3 cup molasses T. vanilla

In a small bowl, stir together gluten-free flour, baking powder, baking soda, cinnamon, ginger, salt, nutmeg, and cloves, and set aside.
In a medium bowl, place the remaining ingredients, and stir to combine.
Add the dry ingredients to the wet ingredients and stir well to combine.
Cover the bowl, place it in the refrigerator, and chill the dough for 1 hour or more.
Using a little safflower oil, lightly oil (or mist with oil) two non-stick cookie sheets and set aside.
Sprinkle a little gluten-free flour over a work surface.
Divide the chilled dough into quarters, work with only one-quarter of the dough at a time, and keep the remaining dough covered and chilled until needed.
Working in batches, roll out the quarter of dough to 1/4-inch thickness, and cut into desired shapes with cookie cutters.
Carefully transfer the cut cookies to the prepared cookie sheet.
Bake them at 350 degrees for 6 minutes (the cookies will feel slightly soft to the touch).
Allow them to cool on the cookie sheets for 3 minutes before transferring them to a rack to cool completely.
Repeat the rolling and cutting-out procedure for the remaining cookie dough.
Store the cookies in an airtight container.

Good House Keeping Royal Frosting
2 cup(s) confectioners’ sugar
2 tablespoon(s) meringue powder
3 tablespoon(s) water, plus additional as needed
Assorted food colorings (optional)
Directions
In bowl, with mixer at low-speed, beat confectioners’ sugar, meringue powder, and water until blended. Scrape side of bowl with rubber spatula. Increase speed to medium; beat until soft peaks form, about 10 minutes. Icing should be stiff enough to hold its shape when piped. Thin with more water, if needed.
Tint icing with food colorings as desired; keep surface covered with plastic wrap to prevent drying out.


Vegan Coffee Cake


The crumble topping was good, not too sweet and had a balanced cinnamon spice-ness. The cake was pretty simple. I like a more fluffy cake, but in it’s defense, this one did have a ‘melt in your mouth’ quality to it. Overall, it’d say its a solid cake, but it’s not necessarily the most amazing one ever. I’ll be experimenting with different recipes to find the ultimate and will keep you all posted!!


Vegan Coffee Cake
(Adapted from Usually Vegan)

Ingredients
Topping
1 cup whole wheat flour
1/3 cup brown sugar
1 tsp cinnamon
1/4 tsp nutmeg
1/4 c.+ tbps canola oil


Cake
3/4 cup soy-dairy milk
1 tsp apple cider vinegar
1/3 cup (half sugar, half honey)
1/2 cup canola oil
1 tsp vanilla
1 1/4 whole wheat flour
2 tsp baking powder
1/2 tsp salt


Directions

  • Preheat oven to 375°F
  • Grease an 8 in. pan,
  • In a mug, mix  milk for the cake and the vinegar; set aside to curdle (trust me… you’ll know when it’s curdled)
  • Mix dry ingredients for topping well in a bowl. Slowly drizzle in canola oil by the tablespoon, using your fingers to swish around the mixture until crumbs form. Alternate drizzling and mixing until all the oil is used and large crumbs have formed.
  • Mix cake ingredients together. For this recipe, I just threw it all in a bowl and I”m wondering if maybe that lent a hand to the non-fluffy nature of the cake. next time I’ll try mixing the wet ingredients together, including the curdled milk, and separately mix the dry ingredients then combine.
  • Pour the cake batter into the prepared pan. Sprinkle crumbles on top.
  • Bake for 35 to 40 min. or until a knife inserted through the center comes out clean
  • We were supposed to let it cook for an hour before eating it, but let’s be real, who can wait an hour when the house smells like coffee cake!

Roasted Fennel Pasta with Tomato Dressing

I don’t make New Year’s resolutions, because if I did then my number one AND two would have been broken for the past few YEARS: cook through my recipes and cook with more diverse foods! Thanks to Presidents Day, a little holiday afforded me the time and the inspiration to try TWO new recipes! Something possessed me to pick up fennel at the market this week and while I can’t remember actually consciously eating fennel up to now something in me decided that we needed to cook it!

Keeping with the homemade and new recipes theme, I found a delicious tomato dressing/compote recipe  Martha Stewart.com (link below) and what was it drizzled over? That’s right…fennel. It was a sign from the cooking gods! Below I’ve worked in both recipes into the overall preparation of the meal but will have links to the specific recipes below.  The recipe below served 3 people healthy portions but there was only leftover pasta. If you want leftovers to enjoy I suggest doubling the fennel and sauce portion of the meal.

This meal is Meat-free, dairy-free (if you omit the Parmesan like I do) AND Vegan; if you use gluten-free bread & pasta it’s also a gluten-free option as well! Look at the endless possibilities!


Ingredients

Pasta

  • 1/2 package pasta of your choice ( I used Angel Hair)

Garlic Bread

  • Whatever rustic loaf you like
  • Optional- Parmesan or Dairy Free Cheese for the garlic bread.We love the grated blend  Parmesan from DeLaurenti that we pick up fresh from Pike Place

Roasted Fennel

  • 3 fennel bulbs (choose with thick base), stalks cut off, bulbs sliced
  • EVOO (extra virgin olive oil)

Tomato Dressing:

  • EVOO (extra virgin olive oil)
  • 10 ounces (1-pint container) grape or cherry tomatoes
  • minced garlic (to taste in all recipes, I don’t measure much!)
  • 2/3 cup dry red wine
  • 1/4 cup balsamic vinegar
  • 1 tablespoon sugar
  • 1/4 teaspoon salt
  • 1 teaspoon red-wine vinegar

  1. Pre-heat oven to 400°F.
  2. Chop top of fennel stock off, wash bulb and cut as shown below. (Note, the lovely photography is from the Simply Recipes site, I didn’t remember to take a photo of this step). You can wash your tomatoes at this time also if you’d like.
  3. Lay out baking sheet with aluminum foil over it. Toss the fennel in olive oil. This time I used a bowl to coat, which resulted in a bit too much olive oil on the fennel, next time I suggest laying out on a baking sheet and brushing with an OXO Basting Brush.
  4. Crack fresh pepper over fennel and drizzle with balsamic vinegar.
  5. Roast for 30-40 minutes, until fennel is caramelized.
  6. Prep the garlic bread on aluminum foil so it’s ready to put in the oven! I use my handy dandy Misto Sprayer and spray some EVOO over the bread, drizzle with minced garlic, fresh cracked pepper, and dried parsley. If you’re doing cheese (Being lactose intolerant I don’t use the cheese but it’s still quite delicious!)  add the cheese on the top.
  7. When fennel has about 25 minutes left start the water to  boil the water for the spaghetti. Add the spaghetti when the water boils and cook to your desired tenderness.
  8. In a medium pan, drizzle olive oil for the tomato dressing over medium heat. Add the tomatoes when the pan is hot. Make sure you keep swirling the pan around so that all the skins have a chance to cook.
  9. Add the garlic, red wine, and balsamic vinegar to the dressing pan, mixing well. Simmer until the liquid reduces and tomatoes start to get soft (about 5 minutes). At this step I cut the tomatoes in half with my spatula to allow the juices to mix.
  10. Stir in sugar, salt, and red-wine vinegar, and cook for 1 minute.
  11. When there is 10 minutes left on the fennel timer, stick the bread in the oven to toast and the cheese has melted.
  12. Serve and enjoy a culinary masterpiece!!

My overall review:  I think this is one of the best meals I’ve ever made!! The savory grilled and caramelized flavor complimented the liquorice taste of the fennel blended, which perfectly with the tomato balsamic sauce and the texture of the pasta. Add some grilled potato garlic bread and it was simple divine!!!

Recipes this meal was inspired from:
Roasted Fennel Recipe

Warm Tomato Dressing