Roasted Pumpkin Seeds

FullSizeRender_3

The leaves are changing, the mornings are colder, and the urge to get cozy under a blanket with a cup of tea is creeping. This means only one thing…it’s pumpkin season! One of my favorite things about Seattle is that we actually get seasons. Spring is rainy, summer is gorgeous, fall is crisp and cozy and while we don’t get snow every winter it has been known to dump a few inches every few years.

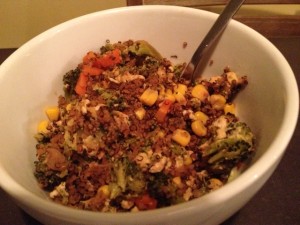
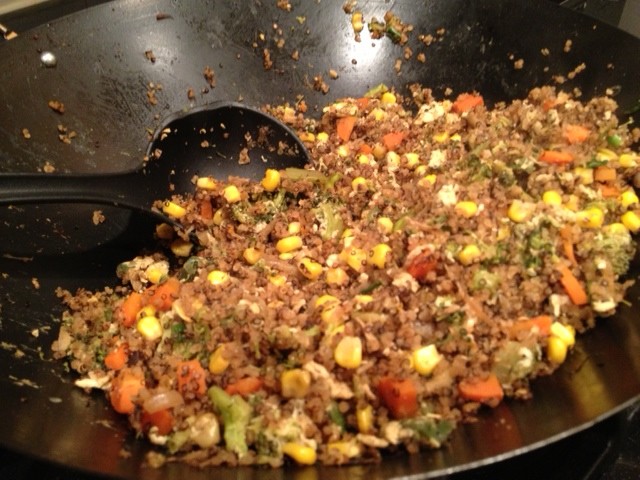
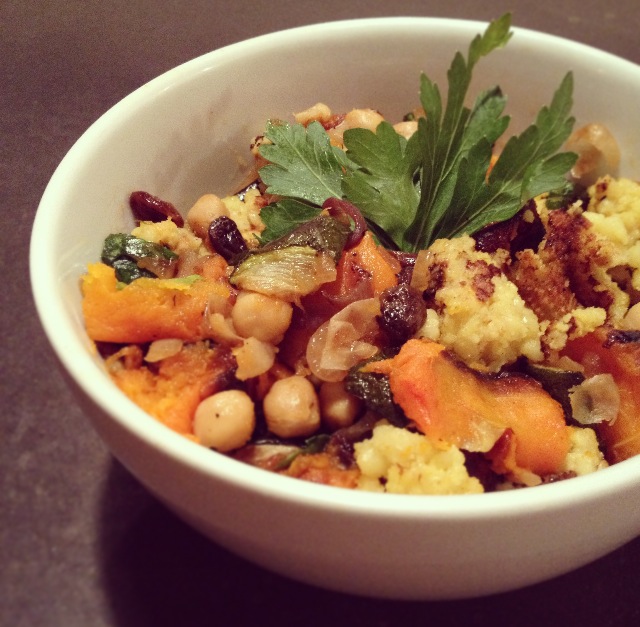
Fall might be my favorite season to cook. So many comfort foods like potato leek soup, Ratatouillebutternut squash and my personal favorite- anything with roasted pumpkin. Most people get excited about carving pumpkins and drinking pumpkin spice lattes. I get equally excited about hacking a pumpkin open and roasting that delicious goodness! Cube it and add to salads, make pumpkin soup, puree it for baked goods, add some sautéed spinach and toasted quinoa and you have a wholesome hearty vegan meal.

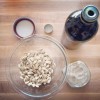
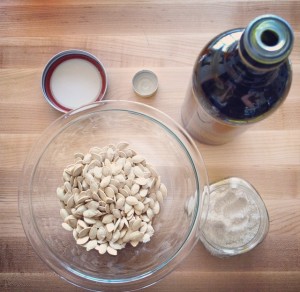
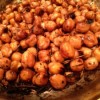
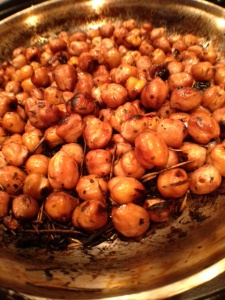
Roasted pumpkin seeds are a great snack, party appetizer, salad addition or kitchen adventure with aspiring little chefs! The recipe is super simple and can be personalized in so many ways!

Roasted Pumpkin Seeds
Prep Time: About 10 minute to scoop out pumpkin and remove stringy parts from seed
Cook Time: Aprox. 20 minutes 

Rice Bran Oil
Pumpkin or squash seeds
Grey or pink salt
Baking tray
Paper towels
Bowl

FullSizeRender_4
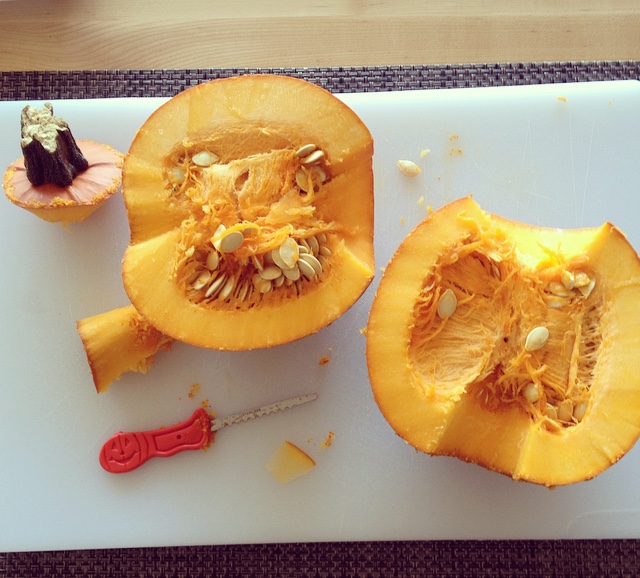
Scoop out the pumpkin and separate the seeds from the stringy insides. Pinching the seeds while you run the strainer under cold water works to remove most of the stringy parts. Line a baking tray with paper towels. Wash the seeds in a strainer, being sure to remove all the stringy parts, and them flat the lined baking sheet. Pat the top of the seeds with a paper towel, it’s okay if they stick a little! Just remove the seeds from the paper towel and keep patting.

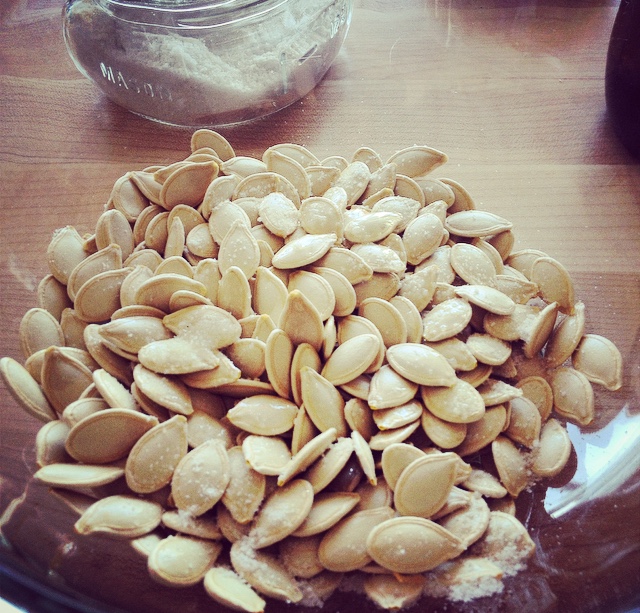
Preheat oven to 350°F. Put the seeds in a bowl and toss with oil. I recommend rice bran oil since it doesn’t have a taste and it has a high burn point ensuring that it’s good for baking and grilling. You can also use grapeseed oil, safflower oil or avocado oil. Those each have their own slight taste so it depends on what flavor your’e going with. Add a few pinches of salt, toss, and add a bit more salt. You can add to taste depending one how much you like salt. I use it sparingly.

Remove the paper towels from your baking tray and spread out the oiled seeds on the tray. You won’t need to add additional oil to the tray. Shake the pan out a bit so that most of the seeds are laying in one single layer. Some of the seeds will overlap, which is just fine!

Place the baking sheet in the oven. Turn seeds after ten minutes then allow them to roast until the corners of thee seeds start to brown. Depending on your oven, this could be between 17-25 minutes.

Remove the tray from the oven and allow the seeds to completely cool. Roasted seeds will keep in an airtight container for up to four days!

FullSizeRenderThe Kitchn has a few amazing ideas for other ways to flavor pumpkin seeds:

Sweet Pumpkin Seeds: Omit or reduce the salt and roast the seeds on parchment-lined baking sheet. Let cool, then toss with brown sugar or a little maple syrup. Not too much, just enough to lightly coat the seeds. You can also add cinnamon, allspice, nutmeg or other ‘sweet’ spices. Toss well to coat evenly. Return the tray to the oven and continue to roast for another 10 to 15 minutes or so.

Sweet-Hot Pumpkin Seeds: Toss the seeds with a little honey and sriracha or chili flakes. A little cumin might be nice, or curry powder. Roast as with sweet seeds.

Savory Pumpkin Seeds: Add herbs such as chopped rosemary, dried oregano and/or spices such as smoked paprika, chili powder, cumin to the seeds before roasting. Check carefully to be sure the herbs and spices aren’t browning too quickly. If so, roast at a sightly lower heat.

Quick & Easy Fall Meal: Delicata Squash, Quinoa, Chicken

Screen Shot 2014-09-17 at 8.54.40 PMThere are nights that you get home and the LAST thing you want to do is cook. But, a bowl of cereal just isn’t going to cut it either. Image one of those days then add a three day moving process where so many things wen’t wrong you’ve lost count, and you just want it all to be over. That’s how the past week has been. I’ve been tired before, but I’m pretty sure I’ve never felt this level of exhaustion…falling into bed because I can’t bear to keep my body upright or my eyes open any longer. But I also can’t seem to stomach the idea of consuming another meal that doesn’t come from my own kitchen. I vowed that tonight was be the night, without and idea of what magic would happen to result in a consumable meal.

photoA quick triage of the fridge, pantry and cooking dishes quickly indicated that tonight was going to be a “throw together” meal and it was time to get a little creative. This was one of the meals where I just started chopping, sautéing and hoping that adding enough herbs would do the trick to result in a meal that was worth eating. There are a few kitchen staples that are always on hand (a post to come about that!) so that I can throw together a decent meal on little time and minimal ingredients and effort.  One of my go-to fall meals is a simple combination of toasted quinoa, butternut squash and toasted chickpeas. I decided to do a variation on this meal with some delicata squash I picked up at the market and a few frozen chicken breast I had in the freezer. I have to admit, there were a few points in the evening that I started to calculate how quickly a pizza could be delivered but the end result was just delicious! This is for sure getting added to the “fall staples” list! Delicata squash are a city chef’s dream. They’re much smaller than other fall and winter squash (save maybe acorn squash) so you’re not lugging 15 pounds of squash home and you don’t have to peel them! They’re super simple to thin slice and pan cook or roast in the oven on a foil sheet at 425 to get that delicious, caramel, melty, amazing squashey goodness!

To make this recipe vegetarian, substitute the chicken with toasted chickpeas.

Delicata Squash, Quinoa, Chicken

1 medium Delicata squash
2 chicken breast
1/2 cup dry quinoa
Fresh chopped or dried parsley
Cracked pepper to taste
Grapeseed oil

  • In a medium stock pot, toast the quinoa over medium heat, moving the quinoa in the pan, until you see it start to brown. Remove from heat, wash, place back in pan with 1 cup water, cracked pepper and fresh chopped or dried parsley. Cover and bring to a boil then turn off the heat and let it sit until the rest is ready.
  • Meanwhile, pre-heat a pan with grapeseed oil or any other high cooking heat oil. Wash Delicata squash exterior, cut in half, scrape out seeds and slice thin then add to the pre-heated pan with some fresh cracked pepper and parsley. Move in pan until lightly browned.
  • Cube the chicken and add to pan with the squash. Add cracked pepper and parsley to taste.
  • Move contents of pan chicken and squash are browned. Cut one of the pieces of chicken in half to assure it’s cooked throughout.
  • Serve in a bowl with peanut sauce, fig or stone fruit compote, or balsamic drizzle.

Butternut Squash Couscous (Vegetarian, Vegan, Meat Free, Dairy Free)

photoThe way that I describe this dish, is a middle eastern version of fried rice. It’s a great meal the throw together and one that you can experiment with spices that you don’t likely use in your daily cooking. The original recipe calls for a steaming method of cooking, which is the traditional method. I neglected to read the directions before I started the recipe and didn’t think we even owned a steamer! Well, after I completely revamped the entire cooking method, I realized that we DO have a steamer so I guess I’ll try that next time!

Couscous is very low in fat, and has about the same in protein, fiber and carbs as quinoa. Quinoa beats couscous in the mineral content, but couscous packs an amazing 87% of your daily suggested intake. About 55mcg is suggested daily and couscous has 43mcg per once cup serving. Selenium has antioxidant properties, can help the body regulate the thyroid hormones, support a healthy immune system, and aid in metabolism. One of selenium’s most important roles is as an antioxidant helping to prevent cell damage due to free radicals. (Sources: WebMD and Eating Well)

One VERY important thing that I did not note, until I’d already washed and set aside four cups of couscous, is the water to couscous ratio in this recipe. Much like rice or quinoa, there is a two to one ratio for water to couscous. Now, this recipe called for 4 cups of dry couscous. Four cups of dry couscous is quite a large portion, borderline obscene actually. I only realized this fact at the very moment where I was pouring the 8 cups of water and 4 cups of couscous  into my stove top pan and it was nearly brimming over. And, I hadn’t event started it boiling yet! My denial for the amount of couscous I was in the middle of making could no longer be indulged and I pulled out the large stock pot and transferred my absurd amount of couscous into the larger pot. While there was much more couscous than I would normally cook, about 9 servings worth, the ratio of the other ingredients worked perfectly. The only thing I would change is to maybe try cutting the couscous by half. 

To serve, mix the roasted zucchini and butternut squash, chickpeas, raisins and sautéed onion together in a bowl and add a little more chopped parsley. (Typically, chickpeas from a can are already cooked but double-check.) Add in the couscous and stir well. The couscous will be a little gummy which is possibly due to my cooking method and not steaming it as directed. Garnish with more fresh  parsley if you wish. You can also add grilled chicken or tofu to this if you want more protein like I usually do.

Squash Couscous
Yield: 9 cups of couscous + a good amount of veggies for 4 people 
Recipe and method adapted from the recipe on Canadian Living
*Note: Due to preference and feeding two people versus 6, I suggest cutting the couscous, chicken stock and water in half. If you LOVE couscous or have a lot of people to feed, keep the recipe as is!

Ingredients
1 1/2 lb (one medium large)  butternut squash, peeled and chopped in 2 inch cubed
2 large zucchini, sliced into 2 inch cubes
1 medium yellow onion, diced
1/2 cup raisins
2 cups  ( 1  15 oz can)  chickpeas, drained and rinsed
1/4 c chicken bullion paste for chicken stock
8 cups water
2 tbsp chopped fresh parsley
1 tsp ground ginger
1/2 tsp pepper
1/4 tsp salt
1/2 tsp turmeric
4 cups Israeli couscous ( I only had 3 cups, so I added one cup of the golden small couscous
additional parsley to garnish

Directions
Wash and chop the zucchini and butternut squash. Don’t forget to de-seed the squash. Lay out on aluminum foil on a baking sheet and roast at 450 for 30-45 minutes. Turning every 10 -15 min. Wash the couscous and set aside.

Chop the onion and fry it on the stove with some olive oil in a large stock pot. Set aside in a large bowl which you’ll use to mix up the rest of the ingredients. Drain and rinse the chickpeas and add to the bowl, along with the raisins and some more parsley (to taste). Add the zucchini and butternut squash to this bowl once they’re browned on all sides.

Bring 8 cups of water to a boil in the large stock pot you used for the onions. Stir in the 1/4 cup of bullion, parsley, ginger, pepper, salt, and turmeric. Let boil together for a few minutes. Add the couscous and let it come back to a boil. Be sure to stir it all up every few minutes. Cook until the couscous soaks up the broth and get’s to a consistency you like.

Add the couscous to your large bowl with the onions, raisins and chickpeas, zucchini and butternut squash and stir. Garnish with additional parsley if you wish.

Tonight we’re eating this with some delicious bone in pork chops that are currently brining, but you can serve with grilled chicken, boiled eggs, firm tofu, or grilled steak. The options are endless!

Wine Marinated Crispy Chickpeas (Vegan, Vegetarian, Meat-Free, Dairy-Free)

Simple Tasty Winter Meals(Vegan, Vegetarian, Dairy-Free, Meat-free)
It’s “officially” fall in the Pacific Northwest. All of the normal indications are here: I need sunglasses, a jacket, a scarf, a tank top, gloves and an umbrella all in the course of about five minutes. The sun is setting earlier, waterproofing boots is on my to-do list, and my shorts get packed away.

Another indication that it’s fall is here is the lack of daylight. There is an impending sluggish feeling that starts to set in when we realize that we go to work when it’s dark and leave work it’s dark. Unless you’re one of the lucky few that has a window near your cubicle or in your office, it’s possible to only catch a glimpse of real “light” through ever distant windows on the run from the  much needed afternoon coffee break to back to back afternoon meetings.

When the rain starts, the fall flavor craving starts. These cravings battle the ever sluggish feelings and makes us torn when it comes to dinner. Either it’s the event that keeps me going during the day and I can’t wait to rush home and cook something that I’ve pinned, liked, saved or stashed. Or, the last thing I want to do is be in the kitchen as a continuation of my daily servitude but am conflicted when I mentally explore the ease of ordering pizza.

Marinated Chickpeas

1 can chickpeas, drained
White Wine
Minced garlic
Dried Parsley, garlic, rosemary pepper
EVOO or cooking spray

  1. Open the can of chickpeas, drain and rinse
  2. Marinate the chickpeas in spices, white wine and a few dashes of balsamic in a bowl or tupperware
  3. When you’re about 17 minutes away from the other dishes being ready, pre-heat a pan with some EVOO or cooking spray
  4. Remove the chickpeas from the marinade, I use a slotted spoon to do so, and toast on medium-high until the exterior starts to brown (usually about 10-15 minutes)
  5. Shake the pan every few minutes  to move the chickpeas around so they brown evenly
  6. Once they’re browned to your linking, remove from the heat and serve

I usually pair with baked butternut squash, sauteed garlic kale or kale chips and toasted quinoa.

Cooking Notes:

The Wine:  I NEVER cook with a wine I wouldn’t drink. So, choose whichever you’d like. Anything from a Chardonnay to Riesling works. I usually use a traditional table white wine or a dry Pinot Grigio

Marination Time : Since this is a go-to meal I usually only marinate them for about an hour, but if you can remember in the morning to prepare them it will taste MUCH more delicious

Fresh Heirloom Tomato Bruschetta

IMG_3815Somewhere in my DNA, there is an Italian heritage hanging out. Though I haven’t yet been to the country I seem to have an affinity for anything Italian. The culture, language, food, and history are all part of Italys draw on me.  Italy is a country that has always had a pull on my heartstrings. Chianti is my favorite wine AND Italy was my favorite part of Eat, Pray, Love. Honestly, I usually start the book with the intention to simply stop after Italy but I always get wrapped up in the purpose of the book and wind up reading India and Indonesia and mirroring her own journey in my life as I read it.

While pasta and pizza are the two dishes that will likely come to mind when you think of Italian cooking, there are SO many other amazing and unique recipes and preparation styles that grace us from that fantastic country. I don’t remember the first time that I had bruschetta, but I do remember the first time that I had my other half’s bruschetta. It was after one of our first road trips together, the sun was shining, we were in the honeymoon of early enamoration and the world was our oyster. Yep, I just made up a word variation for enamored! He “whipped” up his now famous bruschetta while I arranged some tapas on a plate then we grabbed a bottle of wine, our sunglasses, and headed up to the roof to eat alfresco. This is one of my favorite meals I’ve actually ever had because it combined so many of my all time favorite things: those I love, wine, tapas style eating, sunshine, eating outside and fresh foods.

IMG_3818This bruschetta has been requested MANY times and while he’s never used a recipe, it always has that taste of spending a summer day eating outside on the roof with someone you love. You’ll notice there are not measurements. In the true Italian form, this is a dish that is best mastered over multiple and personalized to the chef and guests tastes so you can experiment with the ratios on each of the ingredients and put your own spin on the taste and texture.

One thing I will note about this dish, is how little oil you need. Olive Oil is both delicious and good for you when used in moderation, but this spread needs very little olive oil which increases the flavor and allows you to focus on the texture of the herbs and tomatoes versus any exceeding amount of oil. The shallots, onion and garlic have their own natural oils and juices, and finding a balance between those natural oils and a minimal amount of EVOO to sauté in will be the key!

Fresh Garden Bruschetta

heirloom cherry tomatoes, washed and halved
basil, washed and chiffonaded
fresh cracked black pepper and sea salt, to taste
aged balsamic
EVOO, used sparingly
minced garlic
red onion, chopped
shallots, chopped
grated parmesan or mozzarella cheese
artisan bread slices

  1. Wash and prepared each of the veggies as directed and slice up the artisan bread
  2. In a medium bowl, mix the tomatoes, basil, cheese and a drizzle of balsamic, adding fresh cracked pepper and sea salt to taste
  3. Heat a pan over medium-high heat, using the EVOO sparingly
  4. Add onions and shallots and cook until they start to turn translucent
  5. Add the garlic to the pan and reduce to medium low, cooking just a few minutes longer to mix flavors 
  6. Pour the hot mixture into the bowl, and gingerly toss all ingredients together
  7. You can either serve this immediately or make it ahead of time, cover and refrigerate up to 3 hours

Potato Leek Soup (Vegan)

photo 2When the weather turns soggy, I start to practice my winter sport of “being in the kitchen”. From caramelizing and chopping to baking to broiling, when the weather turns to mush I turn to the kitchen. …and a glass of wine, but that’s a year round sport!

This year I’ve really tried to focus on cooking “in season” and challenging myself to prepare my “typical” foods in a different way. While leek’s are not something that we traditionally have on hand in our house, they made the headliner in today recipes. To be honest, the lack of consistent main stage placement in our cabinet is purely due to the fact that I only know two ways to cook them; sautéed or made into leek soup. While they are can be found year round, they are in season November to February and are more readily available.

The more I looked into the nutrition characteristics of leeks, the more I realized that I wasn’t the only one who usually passed up these shallot and garlic relatives in the grocery aisles; many people shy away from these cardio enriching veggies because they don’t know how to cook or prepare them. Leeks are high in folate, which is a key B complex vitamin for supporting and balancing our cardiovascular system (source) as well as being very high in potassium and very low in sodium, giving it naturally diuretic properties (source). Sharing the same family as garlic and onions, they boast immune, antioxidant, and heart-healthy benefits. 

Enjoyed in in salads with vinaigrette, in soups, sautés, risottos, sauces, pastas, frittatas, creamed, carmelized, Bruschettaed… there are SO many ways to prepare leeks it will blow your mind! Check out this Leek Pinterest Board for more inspiration!

When shopping for leeks, look for ones that are  firm and straight, with dark leaves and white bodies. Quality leeks should not be yellowing, wilting or cracking. To store, keep them unwashed and untrimmed,wrapped in a paper towel inside a plastic bag in the fridge up to a week. Cooked leaks should be kept for no more than two days, but you can freeze them up to three months once they’re blanched for three minutes and stored in an airtight bag.

I have to warn you, you’ll need a spoon readily accessible once this soup is cooked, is so good you’ll be eating it out of the pot!

photo 1Vegan Potato Leek Soup
Adapted from recipe posted on Care2.com Serves 4 – 6
Ingredients:

1 tbsp EVOO (extra virgin olive oil)
3 large leeks, whites and greens, washed and sliced
2 medium yellow onions, chopped
½ tsp fresh cracked sea salt
3 cloves garlic, or 1 ½ tsp minced garlic
2 large white potatoes, washed and cubed
5 cups chicken stock (use vegetable stock if you’re making entirely vegan)
½ tsp crushed rosemary

  1. Wash all veggies
  2. Heat EVOO in stock pan with the chopped leeks, onion, garlic and sea salt, sauté  stirring often until the onions begins to turn translucent
  3. Add the potatoes and vegetable stock and bring to a boil. Cover, reduce heat and simmer 20 minutes
  4. Meanwhile, get your blender out and prepared to blend up the soup
  5. Once cooked, remove the soup from the heat and ladle  into your blender, 1 cup at a time (if you have an immersion/stick blender you can blend the soup right in the pot)
  6. Blend the soup  until smooth and free of chunks
  7. Pour smooth soup into a heat-proof bowl and continue until all of the soup has been blended
  8. Transfer the blended soup back to the original soup pot and warm over low heat until heated through
  9. Serve hot

Padron Peppers

IMG_3763We fell in love with these tasty little treats on our trip to Spain last spring. Known to the locals as Pimientons de Padron, they originated in the Galicia region of Spain but can be found throughout the country and are served a part of the national tapas tradition.

These guys aren’t necessarily spicy hot, only one in ten usually pack heat, but they have a mild kick which meshes with the smokey grilled flavor and the cracked salt. Preparation is quite simple: rub with olive oil and fresh cracked sea salt then oven grilled in a cast-iron skillet. You can usually find them fresh in season from may through late september.

Padron Peppers
Prep  5 min| Cook 25 min

Ingredients:
2 tsp. Avocado or Safflower oil (these are best for high-heat cooking)
1/2 lb. pimentons de padron
Fresh cracked Sea Salt
Cast Iron Skillet & Aluminum Foil

Preparation:
Pre-heat the oven to 350. Wash and pat the peppers with a paper towel to dry them. Toss them in the oil and crack some fresh sea salt on top then place in a cast iron skillet that is covered with aluminum foil. Once the oven is pre-heated, place the skillet with the oil coated peppers and cook for 20-30 minutes, turning once or twice to make sure all the surfaces are charred. Crack more fresh sea salt over the peppers and serve!

Pair well with some delicious Sangria and tapas!

White Nectarine, Mozzarella, Basil “Stacks”

StacksWhite Nectarine, Mozzarella, Basil “Stacks”
Serves two

2 ripe, but slightly firm white nectarines
2 fresh mozzarella balls
1 bunch fresh basil, washed
Mandarano balsamic glaze

Wash the nectarines and basil, laying the basil out on a paper towel to pat dry. Slice the bottoms of the nectarines, then carefully slice so you have layers to stack.  Taking a sharp knife, slice the mozzarella balls. Stack up the ingredients, starting with a slice of the white nectarine and alternating the other ingredients until you have your “stack” created. Drizzle with the balsamic glaze and enjoy!

Cucumber Tomato Feta Salad


IMG_2818
IMG_2820Summer is FINALLY here!! That’s right, ladies and gents, the Pacific Northwest finally has consistent sunshine! With the change of the weather, comes the change of the taste buds. I trade my warming winter ratatouille  and warming  cast-iron portions of delicious steaming cassoulet for the lighter summer fare like the Cilantro Lime Chicken & Baked Potato Skins I made for dinner TWO nights in a row (yes, they are THAT good and SO simple).

A few of my other “go to” summer meals are:
Hawaiian Poke & Ginger Ono Sashimi
Prosciutto Wrapped Chicken & Asparagus
Healthy Chicken Veggie Spring Rolls with Garlic Ginger Dipping Sauce

This year I needed a new salad, something that was out of my normal cooking pallet. I’ve had different variations of this type of salad (Fez on Wheels Turkish Shepherd Salad, and Tom Douglas’ Home Remedy Jackie’s Greek Salad are two of my favorites) and decided it was time to make it myself.

Of course, after I used the “wing it” approach I realized that looking for a recipe could have been smart idea. Psh, who needs a recipe when you have a photo of the ingredients and taste testing! Next time I WONT forget the mint or the fresh lemon juice. The Epicruious version called for scallions instead of the red pepper and the Simply Recipes version called for 1 tsp fresh chopped oregano.  There is also a more italian style version that A Taste of Home posted with mozzarella that I’ll be trying next week! Whatever the variations you use,  it’s even better than next day once the flavors marinate together for a while. Also makes a great potluck or BBQ side!

Do you have any special additions or variations of this delicious dish? Next time I’m thinking I’ll add some quinoa!

IMG_2814Ingredients
2 tbsp red wine vinegar
1/4 c fresh squeezed lemon juice
fresh cracked salt and pepper to taste
drizzle of EVOO (extra virgin olive oil)
2 large cucumbers, peeled and seeded
cherry tomatoes (to taste), washed and halved
1/2 c chopped fresh mint, Chiffonade
7 oz fresh sheep feta, crumbled
1 cup pitted halved Kalamata olives

IMG_2816Directions

To make the dressing, mix the red wine vinegar, lemon juice, cracked pepper and drizzle of EVOO to a small bowl and whisk together then set aside. If you have a jar, you can also just add the ingredients and shake the living heck out of the ingredients to mix. Wash and half the cucumbers, then use a spoon to scoop out the seeds in the center then slice and place in a medium bowl. Add olives. Wash and half the tomatoes and add them to the cucumber bowl. Rinse and pat the mint dry, then  Chiffonade it. That’s a fancy little french term for stacking herb leaves on top of each other than tightly rolling them and cutting horizontally to produce long thin strips. Add the dressing to the cucumber bowl and toss lightly, sprinkling in the feta and tossing all the goodness together. Serve as a main with some humus and pita bread, or as a delicious side!

Enjoy!

Quinoa Veggie “Fried Rice”

601230_10152624692795131_821917340_nI LOVE finishing things. It’s weird. The joy that I get from the last bit of toothpaste used up, or taking the last olive of the jar, or finishing a pen….okay that last one is quite a feat ADMIT it… but I digress! The female + Type A + Project Manager/List Lover in me LOVES to feel that sense of completion. Once something is opened in our house it immediately goes into that awkward “use me up” stage and has a bullseye on it. So, the half used bag of quinoa was starting to get on my nerves. Seriously, it was taunting me EVERY time I opened the pantry cabinet and I’d had enough of being laughed at by Quinoa!

Don’t worry, I’m not crazy. The quinoa didn’t actually laugh at me. But I vowed to incorporate into more meals because we both LOVE it and it’s quite the superfood! The mister taught me an amazing trick that makes the quinoa taste AMAZING! Have you ever tried toasting it first!? Serious, life meet changed! Check out the nutrients and protein that this little grain punches in my post for toasted quinoa here.

photo 4

Well, I just have a little extra time on my hands these days So I decided to take up my reoccurring vow to cook through at least a FEW of my million recipes I’ve carefully drooled over and curated on my Pinterest boards. One of the dishes I REALLY wanted to try was for Quinoa Veggie “fried rice”. The mister has commented a few times that he REALLY likes fried rice while I’m not a big “rice” fan, BUT we both love quinoa. I found an AMAZING looking picture on Pinterest, pulled that quinoa out of the pantry and away I went!

I adapted the recipe since I prefer to use recipes as guidelines and then just change it up and see what happens and it was delicious!!

photo 2Quinoa Veggie “Fried Rice”:

Recipe adapted from Dam Delicious Blog Post
Yields 4-6 servings

INGREDIENTS:

  • EVOO
  • 4 eggs
  • 2 cloves garlic, minced
  • 1 small onion, diced
  • 4-5 large mushrooms, sliced (or to taste if you’d like more)
  • 1 head broccoli, cut into florets
  • 1 zucchini, chopped
  • 1 can corn
  • 1 large carrot, peeled and finely chopped
  • 2 cups toasted cooked quinoa (recipe for toasted quinoa here)
  • soy sauce (to taste)
  • 3 green onions, sliced
  • Baby Bok Choy, base cut off so leaves are free, amount to taste

DIRECTIONS:

  1. Heat dash of EVOO (extra virgin olive oil) in a  Wok (or medium skillet) over low heat. Add garlic and onion, and cook, stirring often, until onions become translucent, about 4-5 minutes.
  2. In the mean time, start the quinoa  (full recipe here). Short recipe: Toast quinoa until it starts to pop, like popcorn and the outer shells turn a light to dark brown. Rinse under cold water and return to pan. Add water (1 cup water for ever half cup dry quinoa) and bring to a boil, continuously stirring. Reduce to a simmer and cover for 10 minutes then “fluff” with a fork or spatula.
  3. Add mushrooms, broccoli and zucchini. Cook, stirring constantly, until vegetables are tender. Add a bit of water and soy sauce, cover with large lid and let steam for 5-7 minutes.
  4. Add corn, carrots and quinoa. Cook, stirring constantly, until tender.
  5. Push all veggies to one side of the Wok and crack the eggs into the hotter side of the pan and “beat” in the pan, turning once cooked on the bottom. Mix into the veggies and combine all the goodness.
  6. Stir in green onions and bok choy.
  7. Add quinoa, mix thoroughly and let heat for 3-5 minutes.

Options:

  • Cook eggs in Wok or Skillet first- fry until cooked through, about 2-3 minutes per side, flipping only once. Let cool before dicing into small pieces and add with the green onions at the end
  • Use 1/2 cup corn and half cup peas
  • Include fresh ginger
  • Grate carrots instead of chop them
  • Omit the Boc Choy
  • Make a sauce for the dish and drizzle it over the cooked veggies at the end