January is the month of giveaways over here and it’s awesome! Score for YOU! Earlier this week I posted about my AstroTwins giveaway so if you haven’t had a chance to enter yet you still have a little bit of time before it’s over! This weeks giveaway is back to a food focus and we all have resolutions and goals that we set in January. If you resolution is to incorporate more Gluten-Free living into your diet are you in LUCK! I’ve partnered with Krusteaz to do a giveaway of the same prize pack that they sent me when I wrote my The Gluten-free Gobble Waffle recipe using the gluten-free buttermilk pancake mix! My entire family is still raving about those waffles and how amazingly delicious they were! Trust me, you’ll want to get in on this giveaway! You can click THIS link to learn more about the mixes, find recipes and a retailer near you.
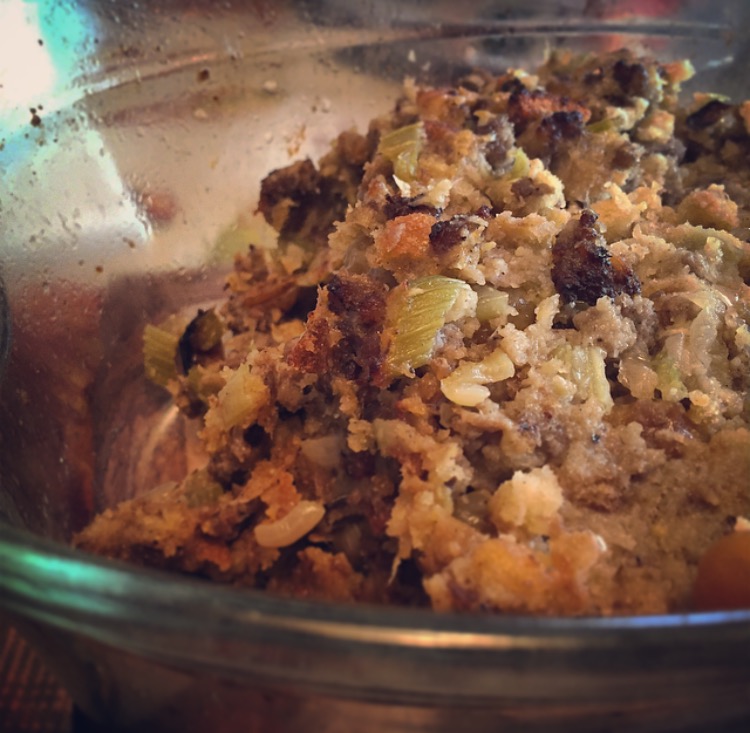
There is one part of Thanksgiving that I love, stuffing. I’m usually a hard core protein and veggies first gal but there is ONE day of the year that whole lifestyle gets turned upside down. This year is my lucky year, we get on both Thanksgiving and Christmas! But, there’s a little variation this year, we’re testing out gluten-free stuffing. We took my mum’s classic stuffing recipe and substituted the Mrs. Cubbison’s Corn Bread Stuffing for homemade gluten-free croutons.
I’d been baking through some of the gluten-free mixes that Krusteaz sent me as part of the Krusteaz Blogger Bake-Off and we had a half pan of the gluten-free corn bread and decided to adapt moms amazing classic stuffing recipe to be gluten-free.
Gluten-Free Stuffing prep time: 45 min | cook time: 1 hr 30-45 min
Gluten- Free Honey Cornbread and Muffin Mix
1 Cup almond milk
1/3 Cup olive Oil + some for crisping the crumbs
1 Egg
Poultry seasoning
1 lb. roll of gluten-free sausage
1 medium yellow onion, chopped
1/2 bunch finely chopped celery
1/2 stick of butter
1 sour green apple, finely chopped
1/2 c golden raisins
1/4 c brandy
2 3/4 gluten-free chicken broth
Steps 1- 5 you can make up to three days ahead of time and store in an airtight container in the fridge. For day-of assembly, start at step 6.
Pre-heat oven to 450 degrees. To make the cornbread croutons, take the corn bread and cut into small chunks. Toss lightly with extra virgin olive oil and dust with poultry seasoning. Bake corn bread in pre-heated oven until crispy, 30-40 minutes.
Soak the 1/2 c golden raisins soaked in the 1/4 c brandy plus the 3/4 c. of the chicken broth. (Save the other 2 cups of chicken broth for later in the recipe).
Sauté onion in 1/2 stick of butter. Throw in celery and sauté until translucent. Throw in the chopped apple and let sauté for just a bit longer. Scoop the mixture onto a plate.
In the same pan, add the sausage and cook until crispy. Drain off any fat, there might not be any but you can soak it up with a paper towel.
Drain the raisins, saving the liquid, and add to the sausage in the pan. Add the onion celery mixture and simmer about 5 minutes. Then add the brandy and chicken broth from the raisins and an additional 2 cups of chicken broth.
Pre-heat the oven to 350.
In a large bowl add the sausage and veggie mixture and a box of the stuffing crumbs and fold until moist. Don’t over mix or crush the bread piece.
Butter either a two quart or three quart glass baking dish and add the mixture. Add a few pieces of very thinly sliced butter to the top of the dish. Cook 45 minutes covered in pre-heated oven.
Turn heat up to 415, remove lid and cook for an additional 15 minutes. The top will look a little burned but don’t worry, that’s the BEST part and it tastes AMAZING!
There are a few things that I look forward to each year at Thanksgiving: getting together with family and my mum’s stuffing. There are a few things I love about the holiday season, the red Christmas cup at Starbucks, twinkle lights going up on all the trees downtown, the hope of snow in the city, Christmas cheer and decorations, presents under the tree and stuffing. Yes, stuffing. If you haven’t had my mum’s stuffing at Thanksgiving you haven’t lived friends. Bold statement I know, but it’s true. My mum has used the same stuffing recipe for as long as I can remember and I’ve loved it for as long as I can remember. For a gal who’s doesn’t usually lose her mind over bread, butter or sausage I go crazy for my mum’s stuffing. Thanksgiving doesn’t feel the same without it. There is some magic that happens when you cook up some Jimmy Dean sausage (the regular flavor! None of the others taste as good, we’ve tried!) and throw it in a casserole dish with some chopped onion and celery apple and mix it with a box of Mrs. Cubbison’s Corn Bread Stuffing. It’s magic folks, pure magic. Already being in the kitchen cooking is a HUGE advantage in this situation because then I get the snag a few bites of the mixed up goodness before going in the oven.
This year mum and I cooked up the Turkey day feast and we had a blast in the kitchen! She brined and cooked the bird and whipped up some gravy from scratch and made a batch of her ridiculously delicious cranberry sauce and some homemade cinnamon apple sauce. I was in charge of roasting up our veggies and making a Pumpkin and Pecan pie with crust from scratch. I didn’t have time to home roast a pumpkin like I usually do so a can of Libby’s pumpkin stepped in. It’s a great pinch hit if you don’t have time to roast your own pumpkins. The entire feast was incredibly tasty, but my heart belongs to the stuffing. I dream about this stuffing all year and for some reason never wrote down the recipe so this year I made it a point to get her recipes and write them down! The next few weeks will be sprinkled with her mum’s recipes for Thanksgiving feast!
If you have one oven like we do, you can make the day-of cooking a bit easier by making most of this recipe ahead of time and simply assembling and cooking in between turkey and your other side dishes.
Mom’s Famous Thanksgiving Stuffing prep time: 3o min | cook time: 1 hour
Mrs. Cubbison’s Corn Bread Stuffing, 1 12 oz box
1 lb. roll of Jimmy Dean regular flavored sausage
1 medium yellow onion, chopped
1/2 bunch finely chopped celery
1/2 stick of butter
1 sour green apple, finely chopped
1/2 c golden raisins
1/4 c brandy
2 3/4 chicken broth
Steps 1- 4 you can make up to three days ahead of time and store in an airtight container in the fridge. For day-of assembly, start at step 5.
Soak the 1/2 c golden raisins soaked in the 1/4 c brandy plus the 3/4 c. of the chicken broth. (Save the other 2 cups of chicken broth for later in the recipe).
Sauté onion in 1/2 stick of butter. Throw in celery and sauté until translucent. Throw in chopped apple and let sauté for just a bit longer. Scoop the mixture onto a plate.
In the same pan, add the sausage and cook until crispy. Drain off any fat, there might not be any but you can soak it up with a paper towel.
Drain the raisins, saving the liquid, and add to the sausage in the pan. Add the onion celery mixture and simmer about 5 minutes. Then add the brandy and chicken broth from the raisins and an additional 2 cups of chicken broth.
Pre-heat the oven to 350.
In a large bowl add the sausage and veggie mixture and a box of the stuffing crumbs and fold until moist. Don’t over mix or crush the bread piece.
Butter a glass baking dish (you can use either a two quart or three quart glass baking dish) and add the mixture. Add a few pieces of very thinly sliced butter to the top of the dish. Cook 45 minutes covered in pre-heated oven.
Turn heat up to 415, remove lid and cook for an additional 15 minutes. The top will look a little burned but don’t worry, that’s the BEST part and it tastes AMAZING!
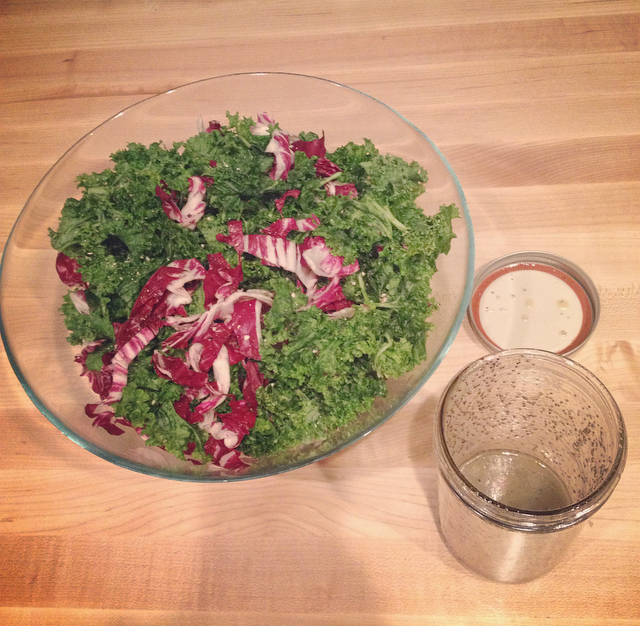
I met this delicious seasonal dish at a baby shower a few weeks ago. Let’s set the stage here; I’m not usually super amazing thrilled baby showers attendee. But, one of my very good girlfriends recently had her first shower and there was a sacred promise that there would be no games, which is a huge plus for encouraging attendance. Little did I know that I would be greeted upon entry with a glass of La Marca Processco (which is my favorite) and ushered into a room of absolutely fantastic gals. With a glass of bubbly in my hand and a smile on my face I was shown to the food table. This, my fine friends, was both a visual and tasty delight! There were numerous quiche options, fresh shrimp with cocktail sauce, three types of homemade mini cupcakes and an absolutely amazing kale radicchio salad which I shamelessly had thirds of.
The bubbly was also flowing, but, that has no correlation to the ‘yum’ factor of this salad. Not only was it visually delightful, but it was so delicious that I had to remind myself I was in public and shoving salad into my mouth as quickly as I could was not socially appropriate. It was tangy, creamy, crunchy, herbaceous, earthy and downright amazing. Three bites in I was begging for the recipe. It was a simple and side dish that is easily transported for events and was SUPER tasty. Had I hit the side-dish mecca? Quite possibly my friends, quite possibly.
For halloween our office did a “Crocktober” and one look at the food sign up sheet had my insides yelling for something even remotely healthy! Someone’s got to make a non-crockpot dish to balance this whole situation out right!? So, when asked to sign up for a dish to share I decided that there needed to be a little balance to the baked goods, 3 types of mac n cheese (including one that boasted being ‘texas style’ which apparently meant extra cheese and cream), pork, meatballs, cookies, brownies and otherwise carbacious cheese covered feast that was about to ensue. This festive gathering needing kale, lots of kale. Good, wholesome tasty kale. There was no other thought in my mind than to debut the kale radicchio salad recipe. If we’re being completely honest, I made this salad for a few reasons; one of preservation so I knew there would be something I would eat there, and I also really needed some motivation to blog this recipe (that a few people have specifically asked for in the past week) and try my hand at homemade poppyseed dressing. Unless I had a deadline of hungry mouths tomorrow and feeling the moral obligation to balance out the cholesterol and sugar levels of the office party, this recipe could have been put off for months.
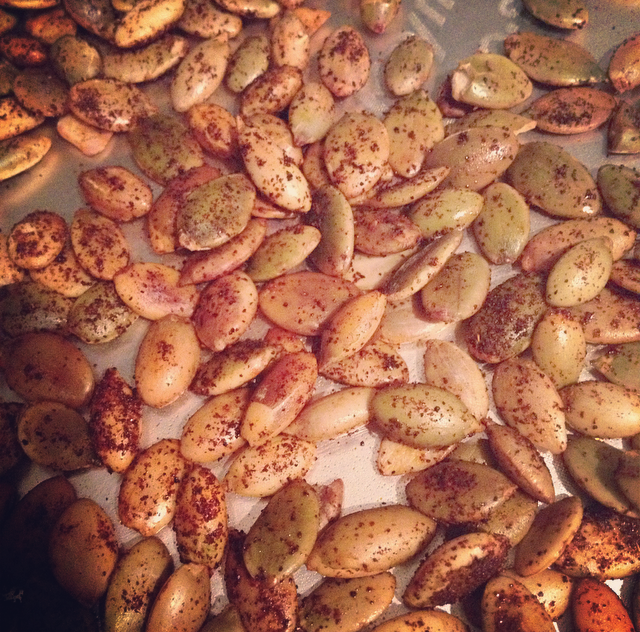
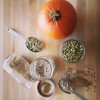
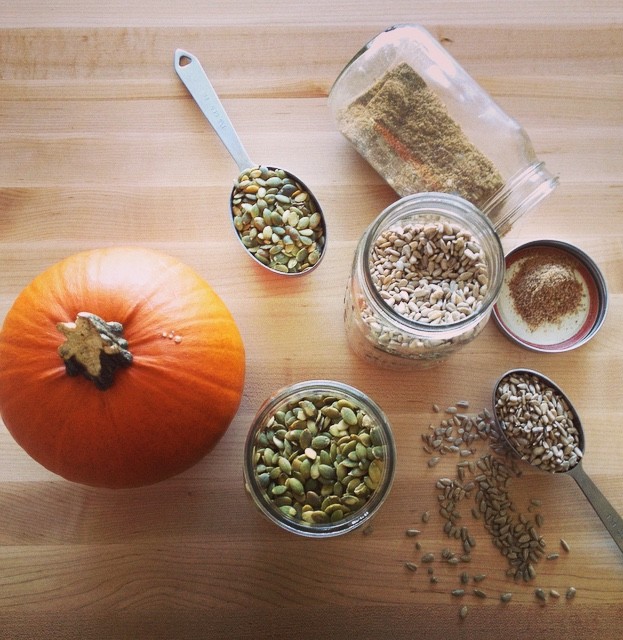
This recipe is so easy and tasty it’s almost ridiculous. It really highlights the fall and winter seasonal flavors that might not be combined in salad form but are absolutely ridiculously good when combined. This recipe calls for one of my favorite seasonal ingredients, pumpkin seeds. Now, if we want to be fancy we’d call them pepitas instead of pumpkin seeds which has a literal translation of “little seed of a squash”. It’s basically the spanish culinary term for a pumpkin seed. I gave the salad a little upgrade by roasting them with paprika before adding them to the recipe. You can find my recipe for roasted pumpkin seeds here and just sub out the salt for paprika. This is one salad where you can really personalize! Next time I might also roast some delicata squash and add it in, or even pumpkin or butternut squash!
This salad is really going to be a seasonal staple for us and will be ever evolved. It makes a great simple, quick meal or healthy and tasty potluck dish! It’s super simple to make the night before and combine when you’re ready to serve. It’s gluten-free, dairy free, nut-free, healthy and easy. Yes PLEASE!
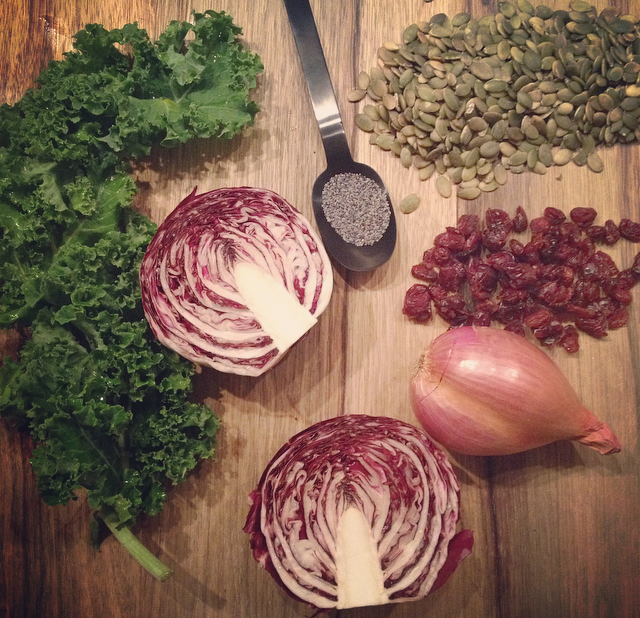
Seasonal Kale Radicchio Salad w/ Poppyseed Dressing
For the Salad
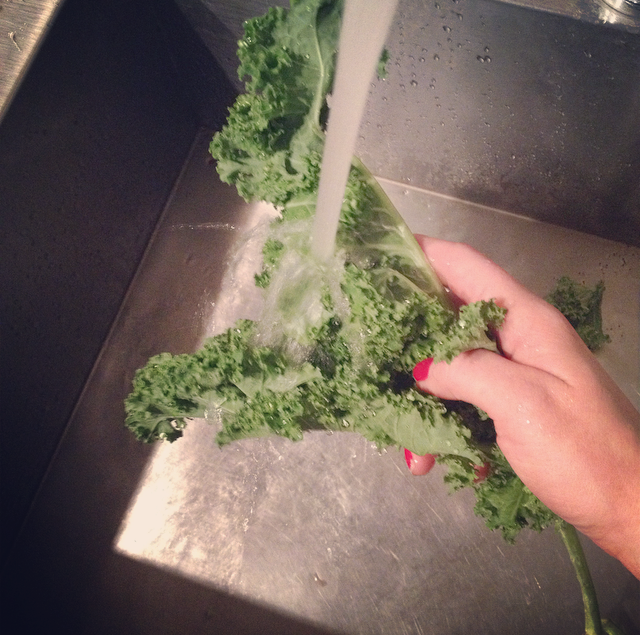
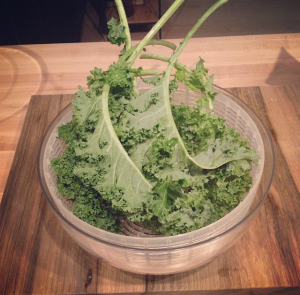
1 head kale, washed, stemmed, massaged and torn into pieces
1 head radicchio, washed and cut and cut in chiffonade
pepitas/ pumpkin seeds
olive oil
paprika
dried cranberries
1 small thinly sliced shallot
Pre-heat the oven to 350 degrees. Lay the pepitas out on non-stick foil and spray with olive oil or other high-heat oil. Dust with smoked paprika and toast for 10 minutes, keeping an eye and adjusting time according to how your oven heats. Once they’re done remove from the oven and let cool.
Meanwhile, thoroughly wash and de-stem the kale.
I wash the kale well, and use a large OXO SoftWorks Salad Spinner to dry kale and I absolutely love it! Add a tiny bit of grey salt and massage the kale in the bowl until it reduces in size and turns a darker color.
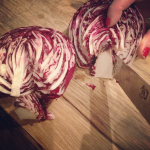
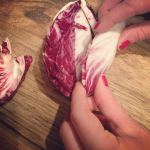
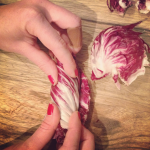
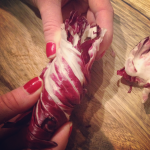
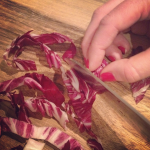
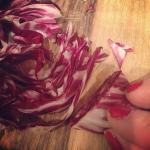
Grab the radicchio, peel the outer layer, slice in half and core the halves. Pull apart a few layers at a time, fold and chiffonade. The chiffonade technique is basically rolling the leaves and thinly slicing.
Half and core the radicchio
Rolling up the radicchio
Roll the radicchio leaves
Radicchio roll
Slice the radicchio in thin layers
Successful chiffonade
Place kale and radicchio in a bowl. Add the toasted pepitas and cranberries to taste.
Place all dressing ingredients in a mason jar and shake to combine.
When you’re ready to serve, add the dressing to the bowl and toss.
Variations Substitute pepitas for walnuts and add goat cheese and parsley with plain oil dressing
Spiced pecans and dried cranberries with a warm bacon vinaigrette
Mandarine oranges with slivered almonds and a sesame vinaigrette
Roast up some delicata squash, butternut squash or pumpkin and throw it in
Last summer I got hooked on pumpkin seed butter. Before that, I didn’t even know such a thing existed. I felt pretty nut-butter gourmet knowing that there was macadamia butter as well as cashew butter. I knew that you could grind your own; I’ve seen and even used the machines in my local Whole Foods to make fresh almond butter. But those machines were big, and scary, not to mention loud and quite menacing to look at. The though had NEVER dawned on me that it was something that could be made at home. Until a combination of a strong desire for a food processor, DIY itch and budgeting came together. Random components, but quite a story!
This recipe was adapted from the the kitchn’s Pumpkin Seed Butter recipe. I LOVE that they say it was inspired by a nut butter that they tasted at the Portland Farmers Market because I’m pretty sure it’s the same nut butter that hooked me on Pumpkin Seed Butter. Nut-Tritious Foods is a wonderful little company based out of Vancouver, Washington. They do a great job of educating customers why cold-pressed nut butters are better for you. I pulled the info below from their about page because it’s REALLY important to know!
“… we COLD-PROCESS and don’t use heat to get our nut butter into the tub. Heat will oxidize the healthy fats (poly- & mono-unsaturated) and make them more like a saturated fat! Most all jar nut butters have been heat processed – you can tell by the ‘nutcrete’ in the bottom of the glass jar.” An additional note, the heat processing method allows the nut butter to sit on the shelf in a jar until it’s purchased. Personally, I’d much rather have the fresh stuff that I know is perishable and know that I’m getting the most nutrition out of my consumption.
2 cup raw pumpkin seeds, without shells
1/2 cup ground sunflower seeds
1/4 cup flax meal*
1/4 cup grapeseed oil
1 spoon of honey (to taste)
pinch grey salt
*Flax Meal: You can easily make flax meal in a coffee
Combine pumpkin seeds, sunflower seeds , and flaxseed meal in your food processor. Blend until the ingredients are well chopped and blended. You’ll need to stop and scrape the sides down so all the ingredients get blended together.
Add the honey and blend until the nut butter starts to form. This can take up to ten full minutes so have patience! Once you see the play dough texture, where the seed butter starts to form a ball and move around the bowl you’re getting close! Add the oil and continue to blend 5-10 minutes more until the butter is consistently smooth. Your food processor might get warm but don’t worry too much, you can always let it cool a little bit and then blend away. I used the 1/4 cup of oil and it was just fine, but you may want to add more depending on how you like your nut butter.
Place in an airtight container (tupperware or glass jar) and store in refrigerator up to 2 weeks.
There are plenty of additions to this recipe, you can mix up the ratios. You can choose olive oil or coconut oil. You might want to add salt, or use salted pumpkin seeds. You can also pre-heat the oven to about 350 and roast the seeds on a parchment paper or foil wrapped cookie sheet for 10-15 minutes. If you oven roast them, stir the seeds once or twice during cooking and let them cool before adding to the food processor. There is also a delicious looking adaption for Maple Pumpkin Seed Butter and Chocolate Pumpkin butter.
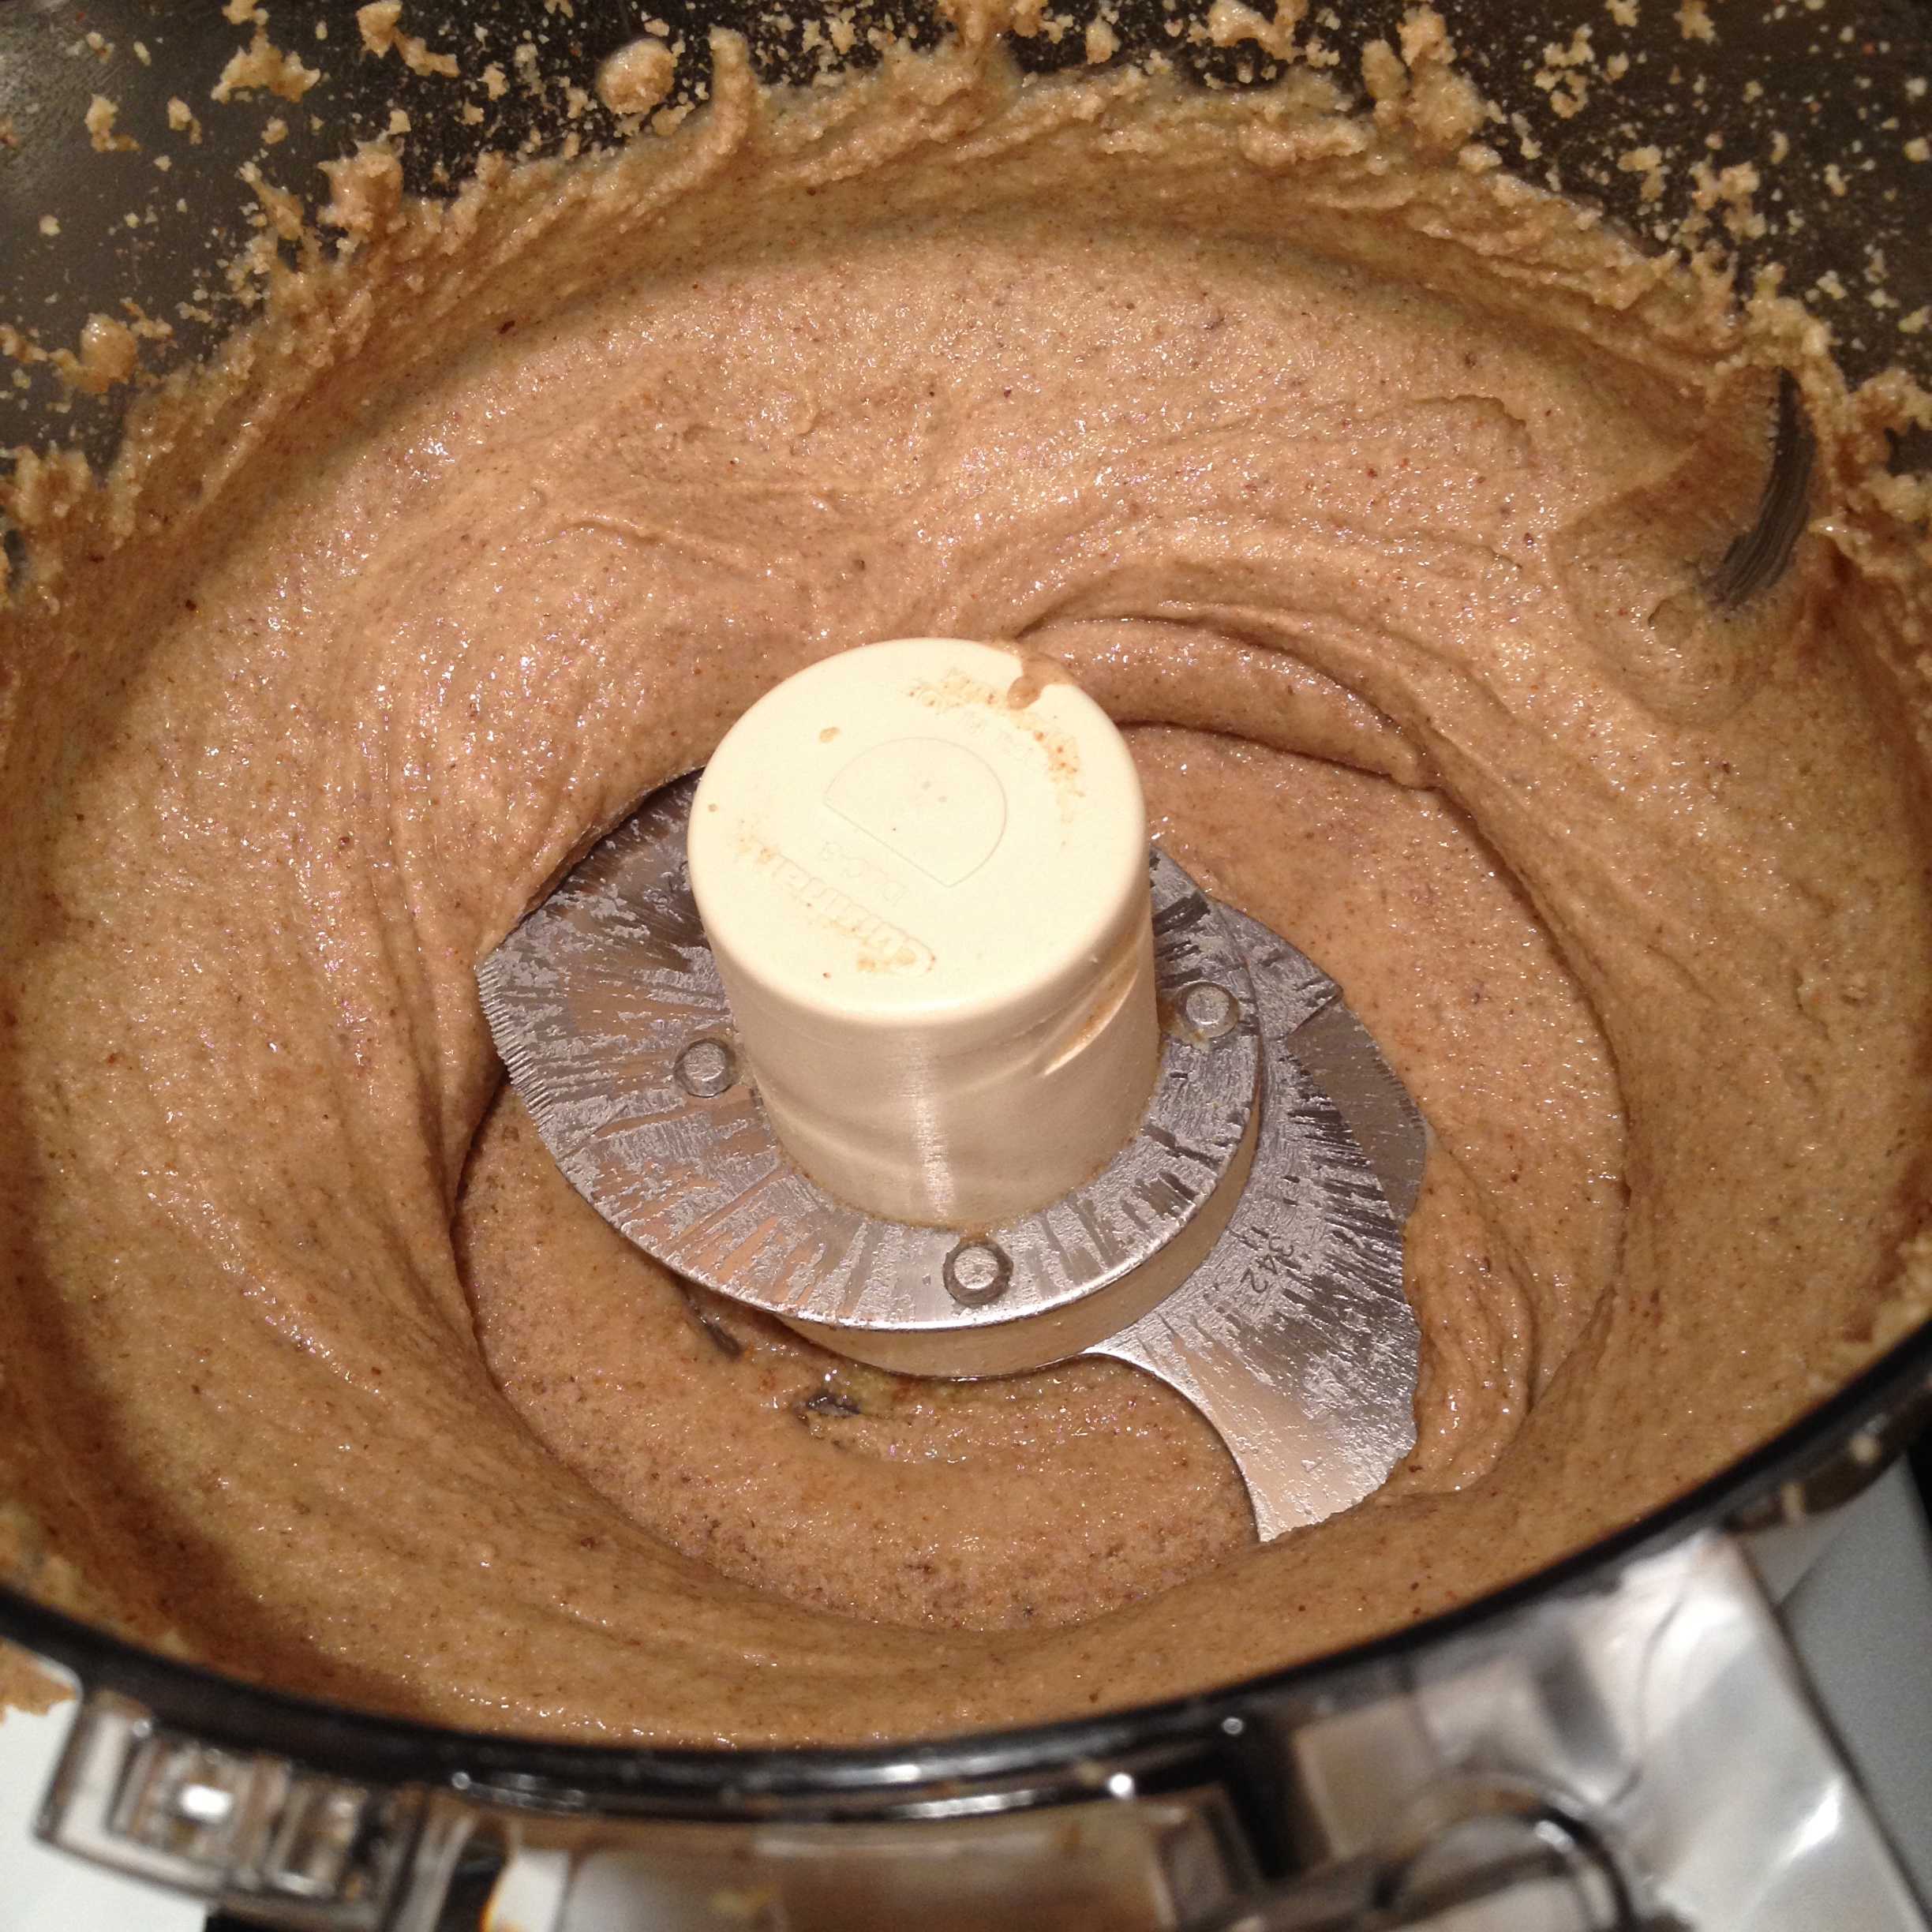
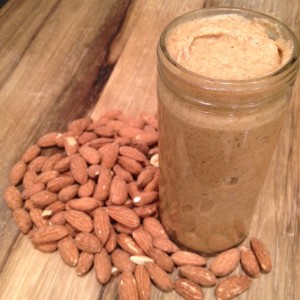
Let me start this story by giving a little background on the hardware featured in this particular post. I’d been eying food processors like a kid looks at the passing candy store window, or cat looks at a fish bowl. I WANTED a food processor for reasons I can’t quite explain. The strong urge to rice cauliflower isn’t something that normal people think of, but I’ve also never claimed nor do I want to be “normal”…not if it means giving up dreams like rice-ing cauliflower. But, this particular post is about nut butter so I shall continue. The story is, I got hooked on the stuff then went into budget mode and got the DIY itch at the same time and scoured the internet for almond butter recipes.
We used to get a tub of fresh cold-pressed almond butter, and one of pumpkin seed butter each week. But, two tubs of $8/each nut butter per week got me thinking, “I HAVE to be able to same something close at home that could do the trick!” So, off to Costco I ventured to live out my food processor dreams. After extensive food processor research (yep, that’s a thing!) I decided to purchase the Cuisinart Prep 11 Plus™ 11-Cup Food Processor With Blade Storage (link takes you to Amazon.com- but I purchased at my local Costco for $140). I liked this one because not only was it cheaper than the ones I found on Amazon, but it came with the extra blades AND a nifty little blade holder, AND still had the Cuisinart warranty. Pretty good life choice if you ask me!
I won’t lie, there was a little intimidation when I started researching some nut and seed butter recipes. They warned that it would take up to 20 minutes to make nut butter. Who’s got the time! BUT, my amazing, lovely, wonderful food processor did the trick much quicker and is sturdy enough that I don’t have to stand and hold it. I could turn it on and do other chores in the kitchen in-between checking on the butter progress. I’d love to say that the first batch was an incredible success, that it was as if I had been making nut and seed butter all my life and that I was a natural…what, with my infinite patience and such. But alas, I was not an instant success. I did not make fantastic, amazing nut and seed butter the first time I tried. The first almond butter tasted weird because I used flax oil instead of flax meal. The flax oil had a very…”earthy” taste which tasted healthy but wasn’t amazingly tasty. But, with a very patient taste tester and a few batches, the recipe was pretty dialed in!
Homemade Raw Almond Butter Yield: one pint Time: 10-15 minutes
Ingredients 4 cups almonds
1/2 cup sunflower seeds
1/4 cup flax-seed meal
1/4 cup grapeseed oil
Directions Combine almonds and flaxseed meal in your food processor. You’ll need to stop and scrape the sides down so all the ingredients get blended together. Keep blending until you see the nut butter starts to form into a play dough texture . This can take up to ten full minutes so have patience! Once you see the play dough texture, where the seed butter starts to form a ball and move around the bowl you’re getting close! Add the oil and sunflower seeds and continue to blend about 5 minutes more until the nut butter is consistently smooth. Your food processor might get warm but don’t worry too much, you can always let it cool a little bit and then blend away. I used the 1/4 cup and it was just fine, but you may want to add more depending on how you like your nut butter.
Place in an airtight container (Tupperware or glass jar) and store in refrigerator up to 2 weeks.
There are plenty of additions to this recipe, you can mix up the ratios. You can try using coconut oil. You might want to add salt, or use salted almonds. You can also pre-heat the oven to about 350 and roast the almonds on a parchment paper or foil wrapped cookie sheet for 10-15 minutes. If you oven roast them, stir the almonds once or twice during cooking and let them cool before adding to the food processor. You can also try adding honey if you like it a little sweeter, or even add cinnamon.
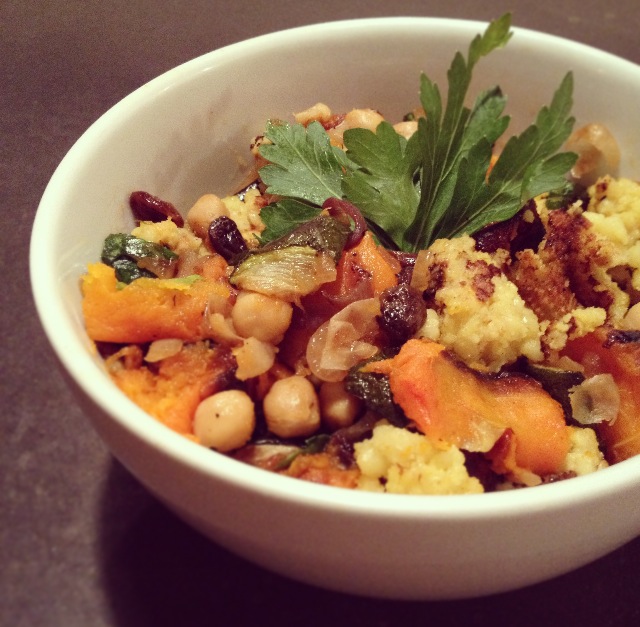
The way that I describe this dish, is a middle eastern version of fried rice. It’s a great meal the throw together and one that you can experiment with spices that you don’t likely use in your daily cooking. The original recipe calls for a steaming method of cooking, which is the traditional method. I neglected to read the directions before I started the recipe and didn’t think we even owned a steamer! Well, after I completely revamped the entire cooking method, I realized that we DO have a steamer so I guess I’ll try that next time!
Couscous is very low in fat, and has about the same in protein, fiber and carbs as quinoa. Quinoa beats couscous in the mineral content, but couscous packs an amazing 87% of your daily suggested intake. About 55mcg is suggested daily and couscous has 43mcg per once cup serving. Selenium has antioxidant properties, can help the body regulate the thyroid hormones, support a healthy immune system, and aid in metabolism. One of selenium’s most important roles is as an antioxidant helping to prevent cell damage due to free radicals. (Sources: WebMD and Eating Well)
One VERY important thing that I did not note, until I’d already washed and set aside four cups of couscous, is the water to couscous ratio in this recipe. Much like rice or quinoa, there is a two to one ratio for water to couscous. Now, this recipe called for 4 cups of dry couscous. Four cups of dry couscous is quite a large portion, borderline obscene actually. I only realized this fact at the very moment where I was pouring the 8 cups of water and 4 cups of couscous into my stove top pan and it was nearly brimming over. And, I hadn’t event started it boiling yet! My denial for the amount of couscous I was in the middle of making could no longer be indulged and I pulled out the large stock pot and transferred my absurd amount of couscous into the larger pot. While there was much more couscous than I would normally cook, about 9 servings worth, the ratio of the other ingredients worked perfectly. The only thing I would change is to maybe try cutting the couscous by half.
To serve, mix the roasted zucchini and butternut squash, chickpeas, raisins and sautéed onion together in a bowl and add a little more chopped parsley. (Typically, chickpeas from a can are already cooked but double-check.) Add in the couscous and stir well. The couscous will be a little gummy which is possibly due to my cooking method and not steaming it as directed. Garnish with more fresh parsley if you wish. You can also add grilled chicken or tofu to this if you want more protein like I usually do.
Squash Couscous Yield: 9 cups of couscous + a good amount of veggies for 4 people Recipe and method adapted from the recipe on Canadian Living *Note: Due to preference and feeding two people versus 6, I suggest cutting the couscous, chicken stock and water in half. If you LOVE couscous or have a lot of people to feed, keep the recipe as is!
Ingredients
1 1/2 lb (one medium large) butternut squash, peeled and chopped in 2 inch cubed
2 large zucchini, sliced into 2 inch cubes
1 medium yellow onion, diced
1/2 cup raisins
2 cups ( 1 15 oz can) chickpeas, drained and rinsed
1/4 c chicken bullion paste for chicken stock 8 cups water 2 tbsp chopped fresh parsley 1 tsp ground ginger 1/2 tsp pepper 1/4 tsp salt
1/2 tsp turmeric 4 cups Israeli couscous ( I only had 3 cups, so I added one cup of the golden small couscous additional parsley to garnish
Directions Wash and chop the zucchini and butternut squash. Don’t forget to de-seed the squash. Lay out on aluminum foil on a baking sheet and roast at 450 for 30-45 minutes. Turning every 10 -15 min. Wash the couscous and set aside.
Chop the onion and fry it on the stove with some olive oil in a large stock pot. Set aside in a large bowl which you’ll use to mix up the rest of the ingredients. Drain and rinse the chickpeas and add to the bowl, along with the raisins and some more parsley (to taste). Add the zucchini and butternut squash to this bowl once they’re browned on all sides.
Bring 8 cups of water to a boil in the large stock pot you used for the onions. Stir in the 1/4 cup of bullion, parsley, ginger, pepper, salt, and turmeric. Let boil together for a few minutes. Add the couscous and let it come back to a boil. Be sure to stir it all up every few minutes. Cook until the couscous soaks up the broth and get’s to a consistency you like.
Add the couscous to your large bowl with the onions, raisins and chickpeas, zucchini and butternut squash and stir. Garnish with additional parsley if you wish.
Tonight we’re eating this with some delicious bone in pork chops that are currently brining, but you can serve with grilled chicken, boiled eggs, firm tofu, or grilled steak. The options are endless!
(Vegan, Vegetarian, Dairy-Free, Meat-free)
It’s “officially” fall in the Pacific Northwest. All of the normal indications are here: I need sunglasses, a jacket, a scarf, a tank top, gloves and an umbrella all in the course of about five minutes. The sun is setting earlier, waterproofing boots is on my to-do list, and my shorts get packed away.
Another indication that it’s fall is here is the lack of daylight. There is an impending sluggish feeling that starts to set in when we realize that we go to work when it’s dark and leave work it’s dark. Unless you’re one of the lucky few that has a window near your cubicle or in your office, it’s possible to only catch a glimpse of real “light” through ever distant windows on the run from the much needed afternoon coffee break to back to back afternoon meetings.
When the rain starts, the fall flavor craving starts. These cravings battle the ever sluggish feelings and makes us torn when it comes to dinner. Either it’s the event that keeps me going during the day and I can’t wait to rush home and cook something that I’ve pinned, liked, saved or stashed. Or, the last thing I want to do is be in the kitchen as a continuation of my daily servitude but am conflicted when I mentally explore the ease of ordering pizza.
Marinated Chickpeas
1 can chickpeas, drained
White Wine
Minced garlic
Dried Parsley, garlic, rosemary pepper
EVOO or cooking spray
Open the can of chickpeas, drain and rinse
Marinate the chickpeas in spices, white wine and a few dashes of balsamic in a bowl or tupperware
When you’re about 17 minutes away from the other dishes being ready, pre-heat a pan with some EVOO or cooking spray
Remove the chickpeas from the marinade, I use a slotted spoon to do so, and toast on medium-high until the exterior starts to brown (usually about 10-15 minutes)
Shake the pan every few minutes to move the chickpeas around so they brown evenly
Once they’re browned to your linking, remove from the heat and serve
I usually pair with baked butternut squash, sauteed garlic kale or kale chips and toasted quinoa.
Cooking Notes:
–The Wine: I NEVER cook with a wine I wouldn’t drink. So, choose whichever you’d like. Anything from a Chardonnay to Riesling works. I usually use a traditional table white wine or a dry Pinot Grigio
–Marination Time : Since this is a go-to meal I usually only marinate them for about an hour, but if you can remember in the morning to prepare them it will taste MUCH more delicious
Somewhere in my DNA, there is an Italian heritage hanging out. Though I haven’t yet been to the country I seem to have an affinity for anything Italian. The culture, language, food, and history are all part of Italys draw on me. Italy is a country that has always had a pull on my heartstrings. Chianti is my favorite wine AND Italy was my favorite part of Eat, Pray, Love. Honestly, I usually start the book with the intention to simply stop after Italy but I always get wrapped up in the purpose of the book and wind up reading India and Indonesia and mirroring her own journey in my life as I read it.
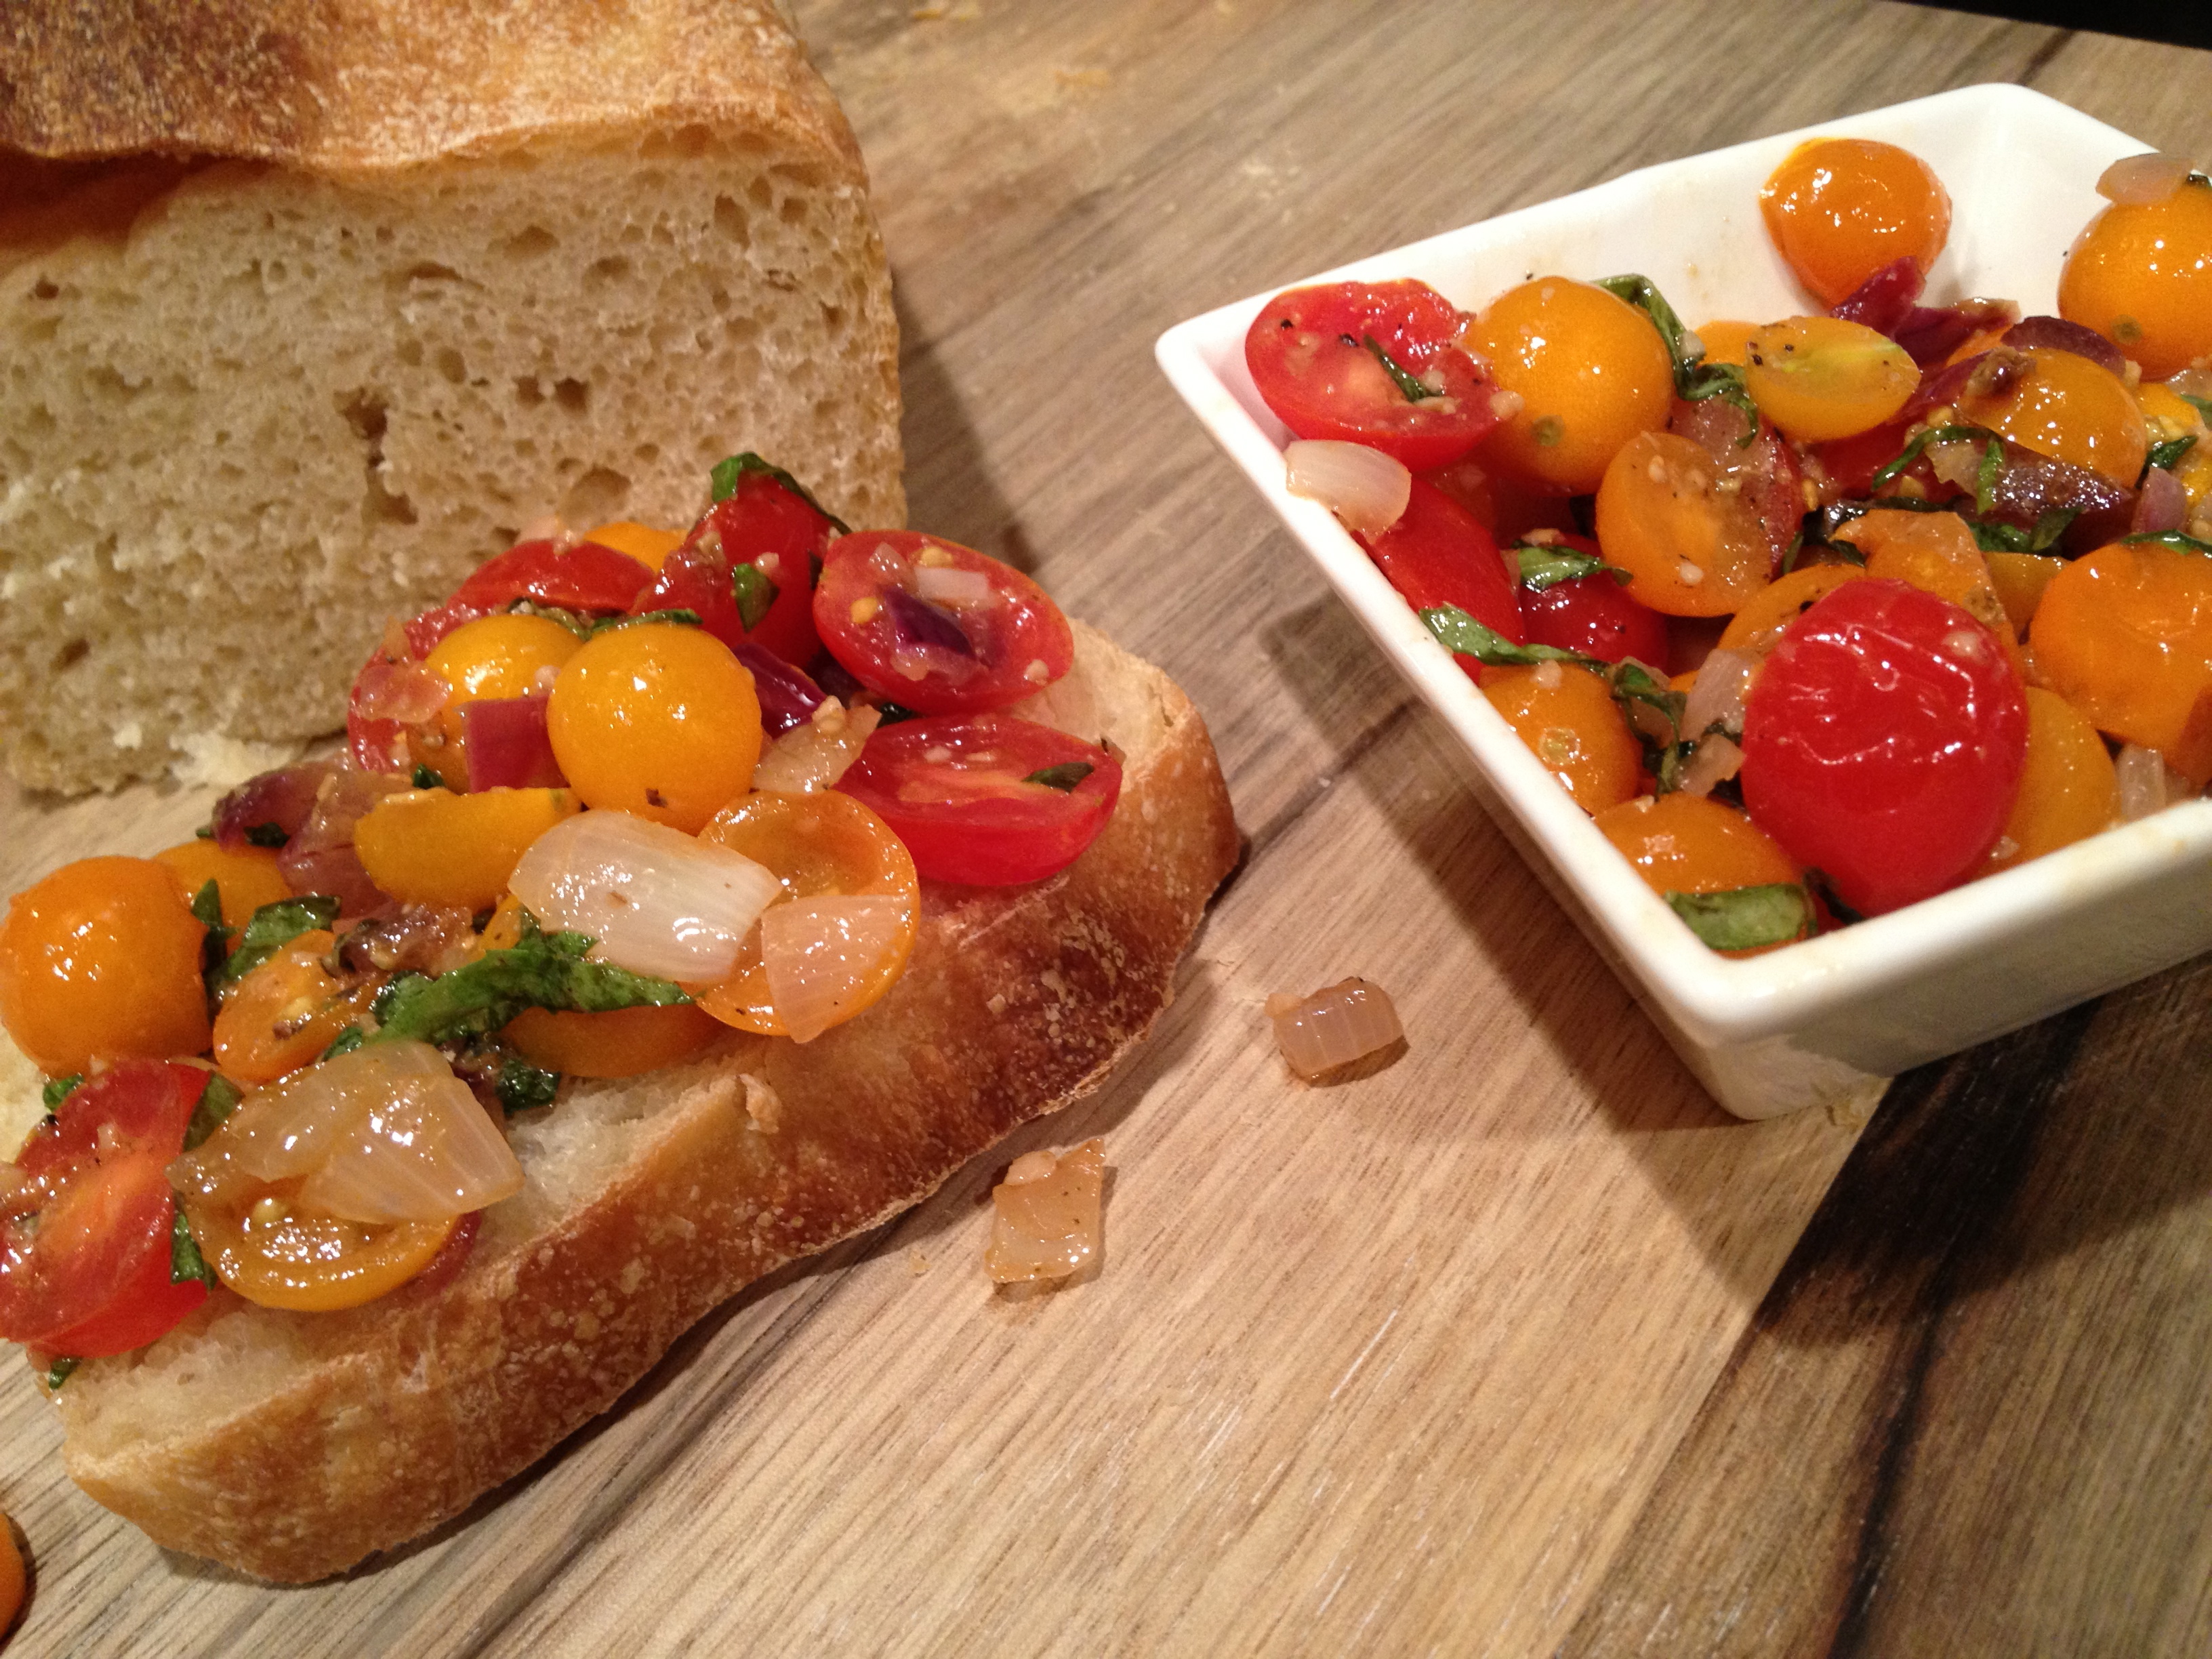
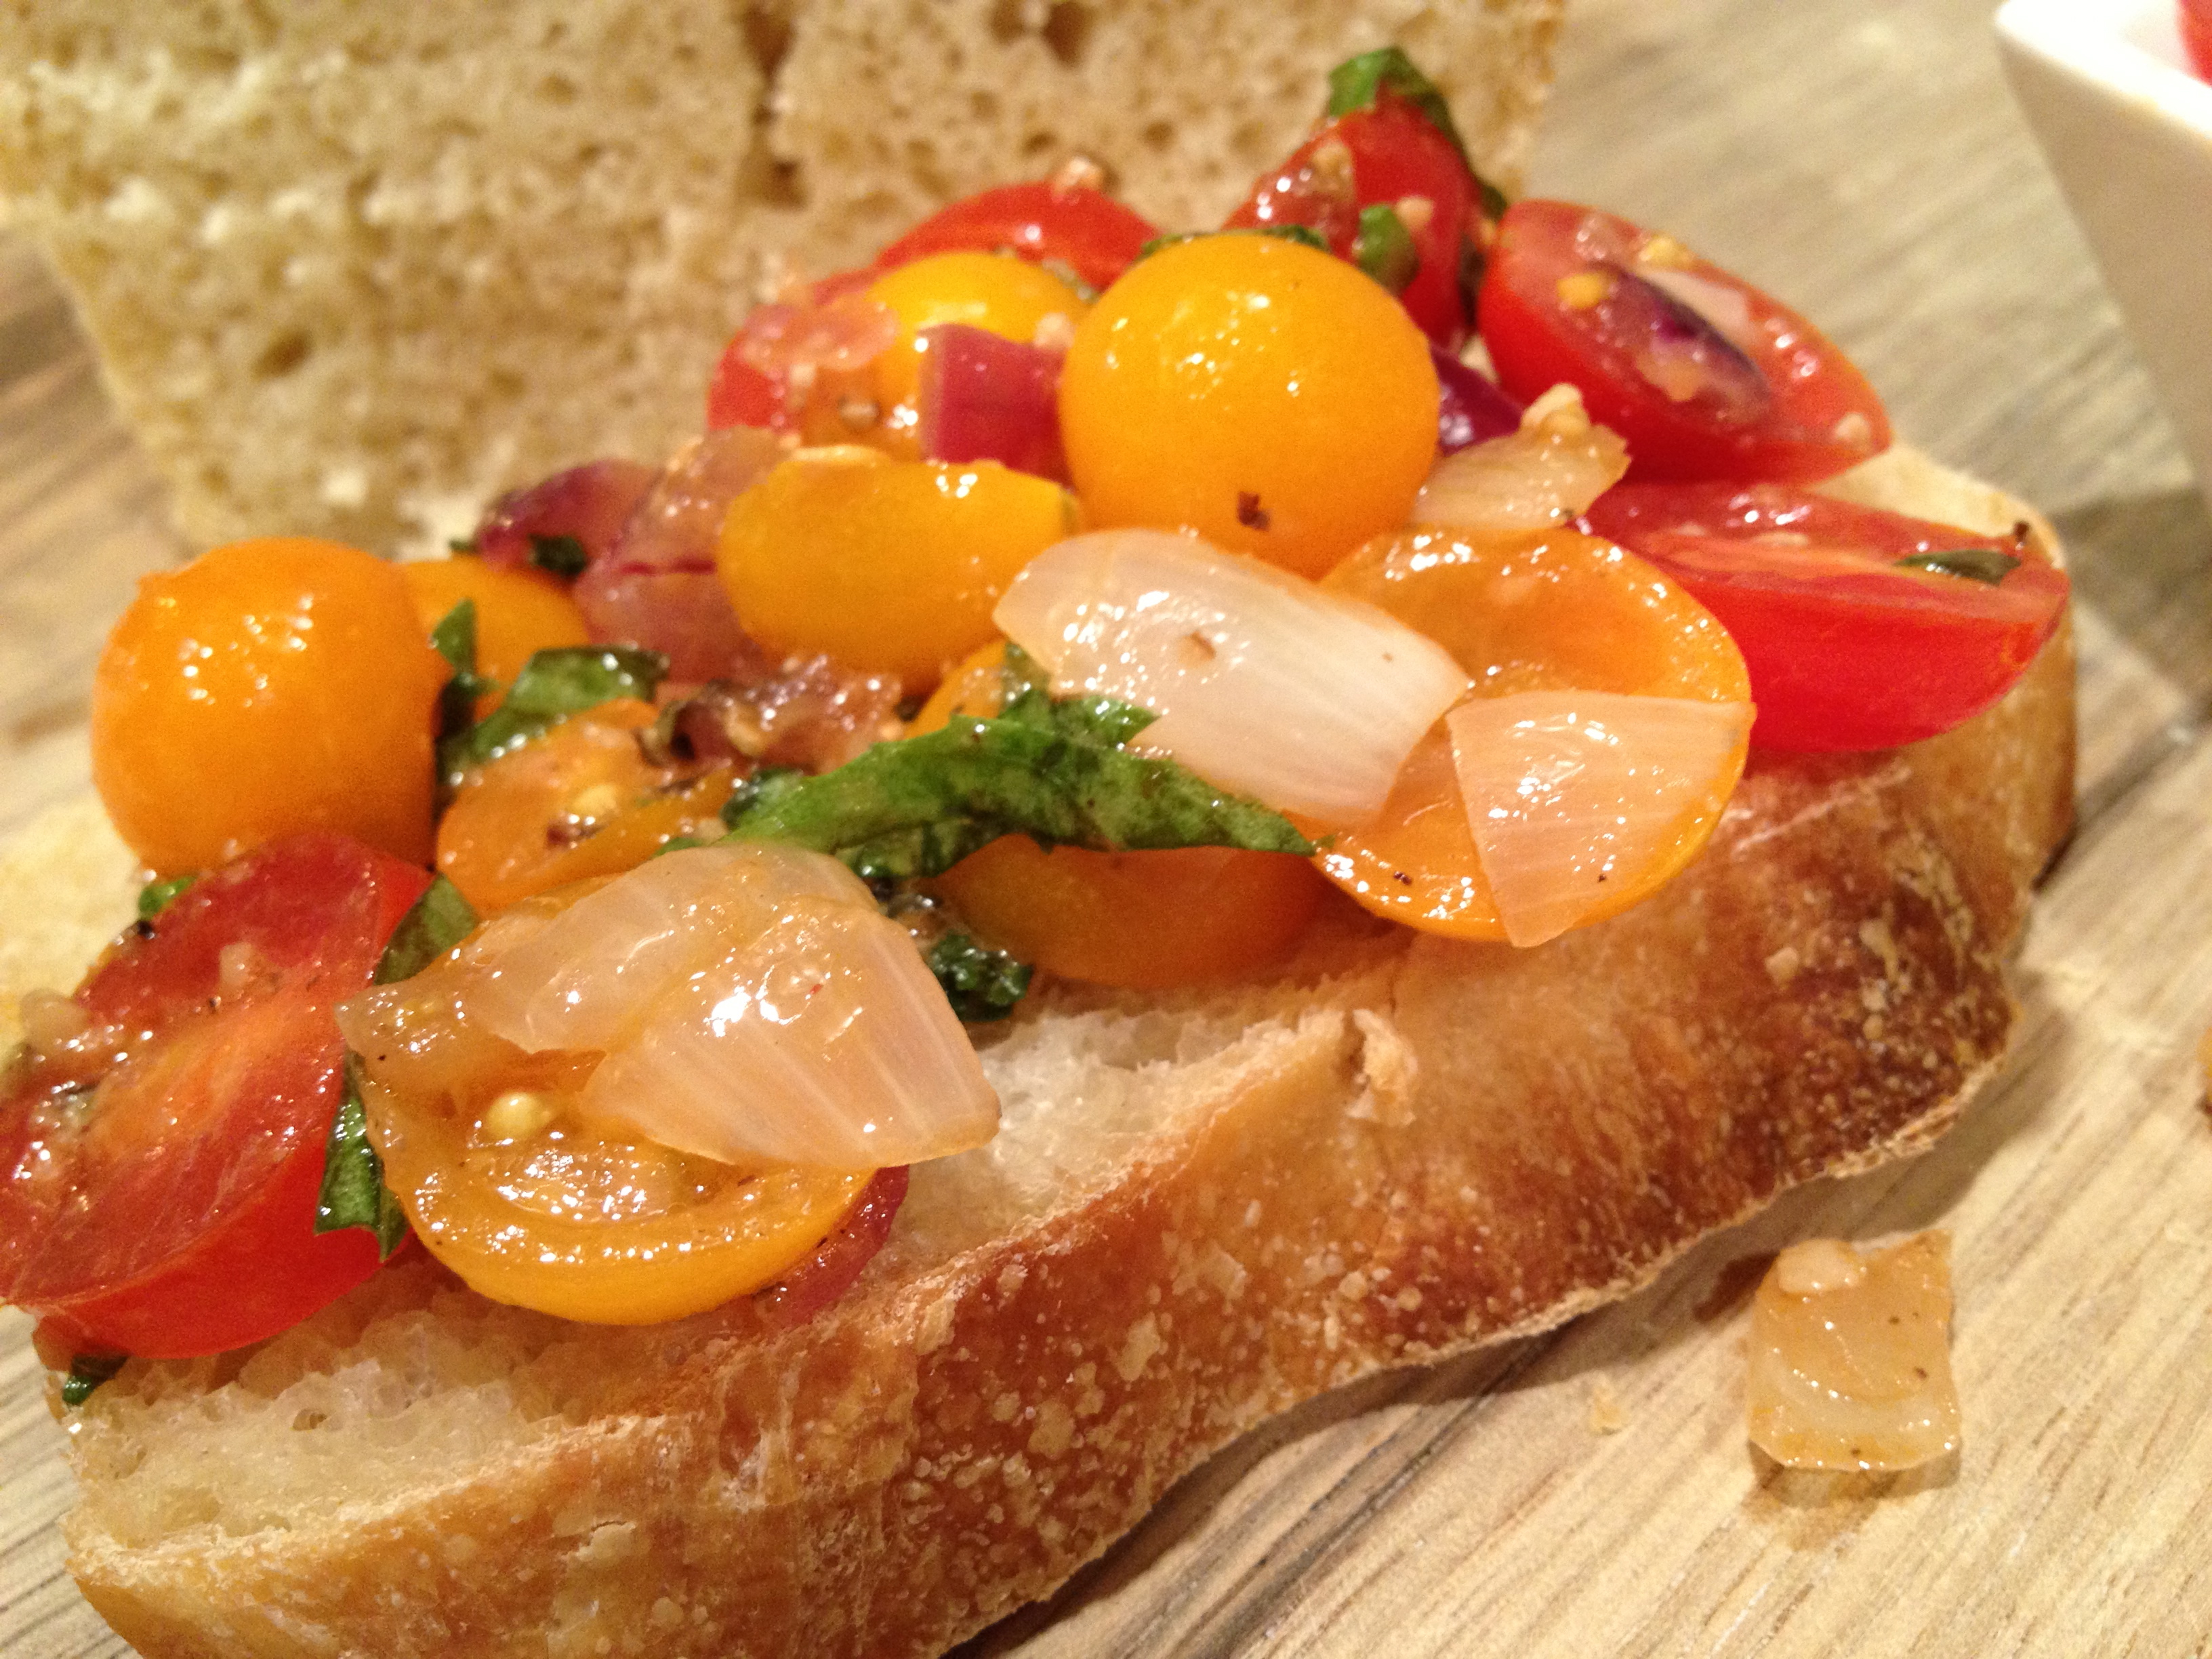
While pasta and pizza are the two dishes that will likely come to mind when you think of Italian cooking, there are SO many other amazing and unique recipes and preparation styles that grace us from that fantastic country. I don’t remember the first time that I had bruschetta, but I do remember the first time that I had my other half’s bruschetta. It was after one of our first road trips together, the sun was shining, we were in the honeymoon of early enamoration and the world was our oyster. Yep, I just made up a word variation for enamored! He “whipped” up his now famous bruschetta while I arranged some tapas on a plate then we grabbed a bottle of wine, our sunglasses, and headed up to the roof to eat alfresco. This is one of my favorite meals I’ve actually ever had because it combined so many of my all time favorite things: those I love, wine, tapas style eating, sunshine, eating outside and fresh foods.
This bruschetta has been requested MANY times and while he’s never used a recipe, it always has that taste of spending a summer day eating outside on the roof with someone you love. You’ll notice there are not measurements. In the true Italian form, this is a dish that is best mastered over multiple and personalized to the chef and guests tastes so you can experiment with the ratios on each of the ingredients and put your own spin on the taste and texture.
One thing I will note about this dish, is how little oil you need. Olive Oil is both delicious and good for you when used in moderation, but this spread needs very little olive oil which increases the flavor and allows you to focus on the texture of the herbs and tomatoes versus any exceeding amount of oil. The shallots, onion and garlic have their own natural oils and juices, and finding a balance between those natural oils and a minimal amount of EVOO to sauté in will be the key!
Fresh Garden Bruschetta
heirloom cherry tomatoes, washed and halved
basil, washed and chiffonaded
fresh cracked black pepper and sea salt, to taste
aged balsamic
EVOO, used sparingly
minced garlic
red onion, chopped
shallots, chopped
grated parmesan or mozzarella cheese
artisan bread slices
Wash and prepared each of the veggies as directed and slice up the artisan bread
In a medium bowl, mix the tomatoes, basil, cheese and a drizzle of balsamic, adding fresh cracked pepper and sea salt to taste
Heat a pan over medium-high heat, using the EVOO sparingly
Add onions and shallots and cook until they start to turn translucent
Add the garlic to the pan and reduce to medium low, cooking just a few minutes longer to mix flavors
Pour the hot mixture into the bowl, and gingerly toss all ingredients together
You can either serve this immediately or make it ahead of time, cover and refrigerate up to 3 hours
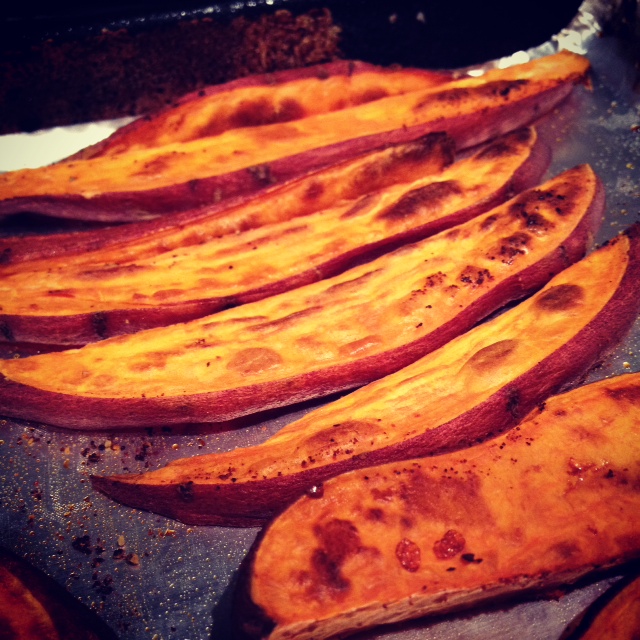
Believe it or not, I was a “garbage guts” when I was younger. My mother did a wonderful job of trying to get me to eat my veggies and not letting me leave the table until I’d consumed all my broccoli. But, if I had my wish I would have lived on chicken strips, fries dipped in BBQ or ranch, and any type of candy I could get my hands on. Oh, and a milkshake with LOTS of sprinkles. But no syrup drenched cherry, I did apparently have SOME culinary inclinations as a child. I think we can all agree that those are just gross!
My adult self shudders when I think of that “menu” and makes me want immediately consume a kale smoothie just in an attempt to balance out the years of chicken strip consumption! Even as adults we need a little comfort food. Pie, mashed potatoes, ice cream, onion rings, and, of course, french fries! Traditional french fries get a bad wrap for being…well…basically deep fried in oil which, let’s just call a “spud” a spud and admit that they’re is little to NO nutritional value of the potato left at that point. What if I told you that there was an alternative to “healify” fries and they were still delicious! So delicious, in fact, that I don’t even DIP MINE or miss my trusty BBQ or ranch.
Yes, my fry friends, it’s true! While you can do this with white potatoes, and add a little rosemary and garlic while you cook them, I prefer to do yam fries because I just simply like yams more. These are my go-to side dish when entertaining or just needing to add a carb to the meal. They’re delicious and super simple to make! You can also get “fancy” and experiment with different spices. Post in the comments what you’re favorite spices are!
Yam Fries
2 long skinny yams
EVOO
Smoked Paprika
Fresh Cracked Pepper
Preheat oven to 400 °F (200 °C). Depending on your oven, and how crispy you liked them, you can experiment with 450°F or even 500°F. Cover a baking sheet with non-stick foil and pre-heat the baking sheet (this helps to achieve crispier fries)
Wash and dry the yams, then cut them once lengthwise. Using a very sharp knife makes this easier. Place the halved yams face down on the cutting board, and cut in half again lengthwise and then slice the yams length wise in little strips to create the “fry” form.
Put the cut fries in a large bowl, drizzle with olive oil, smoked paprika and cracked pepper and toss them until all the fries are covered. You can also brush the olive oil on the fries if you prefer, using a basting brush.
Lay the fries out in a single layer a baking sheet lined with non-stick foil and cook forThe SimplyRecipes.com recipe had a helpful note I’ll try next time, one of their readers recommended laying them on a wire cooling rack on top of a baking sheet, so that the oven air circulates around the sweet potato pieces and you don’t have to flip them over .
Bake for 15- 20 minutes until lightly browned on one side, then flip and bake for an additional 15-20 minutes until they reach the desired browned crispness you desire.


 Let me start this story by giving a little background on the hardware featured in this particular post. I’d been eying food processors like a kid looks at the passing candy store window, or cat looks at a fish bowl. I WANTED a food processor for reasons I can’t quite explain. The strong urge to rice cauliflower isn’t something that normal people think of, but I’ve also never claimed nor do I want to be “normal”…not if it means giving up dreams like rice-ing cauliflower. But, this particular post is about nut butter so I shall continue. The story is, I got hooked on the stuff then went into budget mode and got the DIY itch at the same time and scoured the internet for almond butter recipes.