Spiced Cilantro Lime Wild-Caught Shrimp

IMG_2928Whether you like to cook or not, this is one of the most amazing, easy dishes you will ever learn to make.  It is SO simple and SO delicious that it’s almost absurd how easy it is. You can serve these amazing little shrimp as an appetizer or a cocktail party, tossed with pasta , served as an entree with a lovely caesar salad or roasted vegetables, mixed with toasted quinoa or jasmine rice…there are so many options! They pack a spicy, fresh, crisp, earthy, tasty punch all in one single bite of tasty, amazing shrimpy goodness.

IMG_2925

Let’s set the stage here. I LOVE seafood. One of many amazing perks of living in Seattle is the abundance of fresh, local seafood. Having a local variety so readily available I sometimes forget that everyone doesn’t have access to this fresh fare. Some people go through different food phases where their food world, or certain meals, can revolve around one ingredient. For a long time, that one ingredient for me was shrimp. I learned so many different ways to quick cook and consume shrimp but I didn’t look into where that shrimp was from and assumed that purchasing from Whole Foods meant that it was safe. While that might be true, I MUCH prefer to purchase organic and domestic and/or local version whenever possible. My friends over at AmericanShrimp.com asked me if I would be interested in writing a blog post that would feature American wild-caught shrimp and I jumped at the opportunity because I new exactly the recipe I wanted to try.

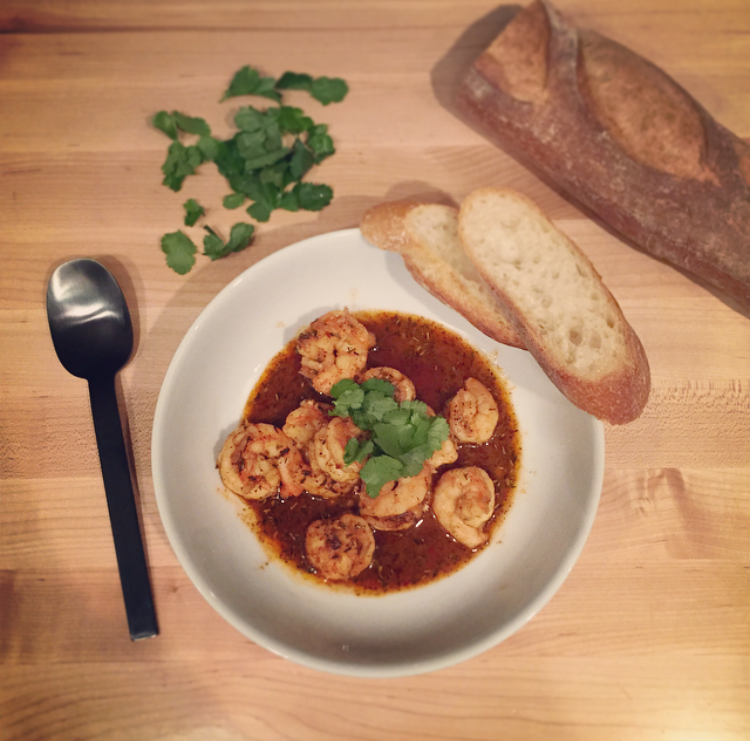
There is a local, renowned steak house in Seattle that has a seafood restaurant as well and they have something they call “Wicked Shrimp”. It is one of my favorite dishes in the entire city- a bowl of shrimp, perfectly sautéed with amazing herbs and spices that deliver both flavor and a spicy punch, with a nice helping of fresh cilantro on top and a side of toasted delicious bread. I had been dying to replicate this dish at home but never had the motivation, until now! As soon as I knew that fresh American wild-caught shrimp was on it’s way I knew that I had to try to make my own version of this amazing dish. Below is my take, and it was an immediate hit!

Spiced Cilantro Wild-Caught Shrimp

Spice Mix
1 tsp Cayenne Pepper
Black Pepper and Salt to taste
1 1/2 tsp Crushed Red Pepper
1 tsp Whole dried thyme
3 tsp Dried Crushed Rosemary
1/4 tsp Dried Oregano

Cilantro Shrimp Ingredients
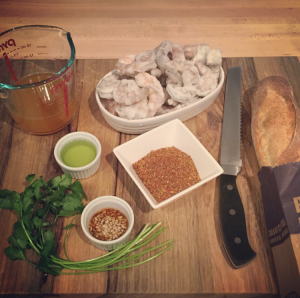
1 lb. American wild-caught shrimp– size 21/30
2oz Grapeseed Oil
1 1/2 tsp. minced garlic
1 1/2 tsp. Worcestershire
1 1/3 Tbs. Spice Mix
1/2 c Fish Stock
1/4 c. Beer Grilled Tuscan Bread Slices
Cilantro (for garnish)

Directions
Make the spice mix. This can also be sprinkled onto chicken and/or meat, eggs, mixed into salad dressing.

Heat the grapeseed oil in a medium sized pan on med-high heat. Add Wild American Shrimp and sauté for 2 minutes, or until the shrimp color has changed to a white and pink color.

Flip Prawns and stir in the garlic, Worcestershire and spice mix. Once you start to see the liquid caramelize, add the beer and  fish stock and cook for two more 2 minutes. Serve in a bowl or on a platter with grilled bread slices, on toothpicks as an appetizer or tossed with toasted quinoa or with pasta.

IMG_2930IMG_2929


unnamed


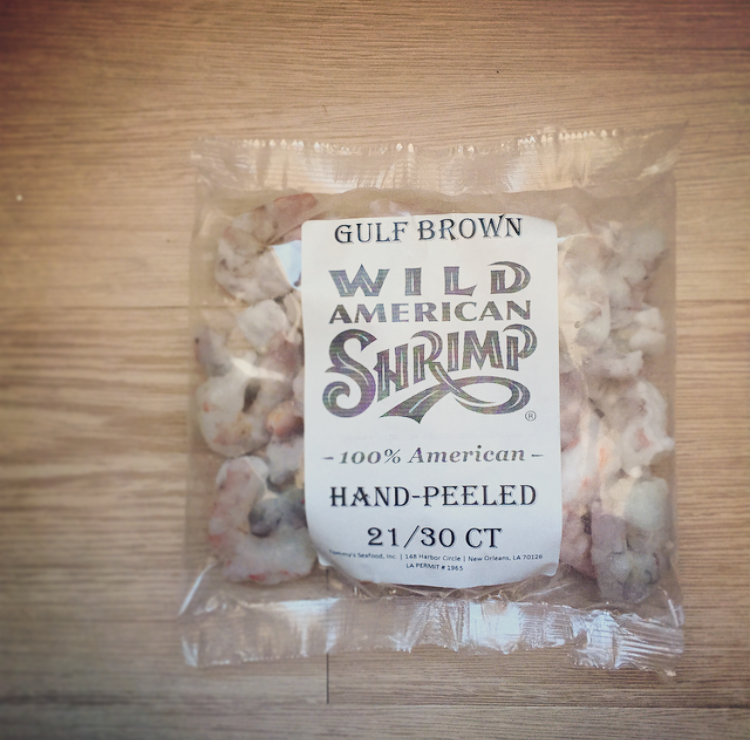
Thanks to the American Shrimp Processors Association for sponsoring my writing! When making the decision to cook with shrimp, be sure to check the sourcing. Shrimp purchased in a retailer should proudly state “wild-caught” or “Wild American Shrimp.” For a list of retailers, please visit www.americanshrimp.com.

Homemade Almond Milk

aomond milkAhh the weekend. Wonderful, sweet weekend. It’s 48 hours to unplug, relax, catch up, and generally not be in an office. This was the first full week back at work after the shortened work weeks through the holidays and I won’t lie, Monday and Tuesday I was a little ‘struggles’.  But Friday was here in no time and I was actually surprised how quickly the week flew by and left me at another Friday night. Phew, MADE IT!

Saturdays are my favorite. You can stay up late on Friday if you want because it’s not a school night, and you know when you wake up that there are 24 more hours where these came from just waiting for you to enjoy! Saturday’s have a pretty regular ritual. The morning starts with a trip to my AMAZING acupuncturist, followed by grocery shopping. Then I head home to focus on food prep and house cleaning. I wash and chop all the veggies and prepare as many meals as I can for the upcoming week. Every week there is a batch of homemade almond butter, a pot of toasted quinoa in the mix and every other week Saturday is Kombucha bottling day too. I’m going to try out the continuous brew method this next batch so stay tuned for the results!

Today I got sucked into reading one of my favorite healthy living sites, Wellness Mama, and saw her recipe for homemade almond milk. We go through about a gallon of almond milk per week and Whole Foods hasn’t been carrying the vanilla kind so we’ve been stuck with the ‘original’ flavor for months. I’m a DIY/Homemade fanatic and I can’t believe I haven’t tried my hand at making almond milk myself yet! It always seemed a little daunting when I’ve read about it before, needing nut bags, sprouting, blanching, it always just seemed easier to pick it up at the store. The recipe on Wellness Mama seemed attainable and I was well over due to give it a try.

I love how she explains the reason for soaking the almonds and even gives an idea for how to use the leftover almond pulp that remains after you squeeze the milk thorough cheese cloth. Done and done!

It didn’t come out as thick as the store-bought kind I like but I’ll just try a bit less water next time. I omitted the dates on the first batch and that is a MUST (also confirmed by the mister on a blind taste test of each version). Use high quality vanilla and start with a 1/2 teaspoon (NOT tablespoon like I did). All in all, the first batch was actually good which is a win since I would have taken ‘drinkable’ as a passing grade!

Homemade Almond Milk

2 cup raw organic sprouted almonds – soaked overnight
7 cups pure filtered water (not your soaking water)
1  teaspoons high-quality vanilla extract
5 large dates  (honey, stevia if you prefer)
Nut bag to strain (Recommended Nut Bag)
You can use cheese cloth, but it’s WAY more work!
1 tsp sea salt for soaking

Directions:

Soak almonds overnight (at least 8 hours, preferable 10-12) in pure water with 1 tsp sea salt. Wellness Mama says that this is an important step as it breaks down the phytic acid and enzyme inhibitors and cultures beneficial enzymes in the almonds. Basically, doing this helps your body to absorb the enzymes and nutrients in the almonds.

soak almondsRinse the almonds well and add to the blender.

Add in the 7  cups of filtered water and blend on high until the mixture looks smooth.  Work in half batches if your blender won’t fit the whole batch. You’ll see that it can get quite frothy so don’t fill your blender to capacity.

If using nut bag: secure bag around the top of a pitcher or 8 cup container and pour the mixture through the bag. Squeeze the bag and wring out as much almond milk as you can from the bag. You can retain the almond mixture and make almond flour if you want.

If using cheese cloth: secure the cheese cloth (with a rubber band or string) over the top of a canning jar or large pitcher and also get a medium-sized bowl and  a spoon for the almond mixture. Make dip in the cheese cloth dip deep into the container but make sure it’s still secure. Slowly pour the almond milk through a cheese cloth and use the back of the spoon to press down on the almond mixture to press the water out. Remove the rubber band and squeeze the last liquid from the remaining almond meal and set the meal aside.

IMG_1598

IMG_1599

IMG_1600

Pour the strained almond milk  back into blender and blend it again with whatever sweeteners you’d like… vanilla bean, dates, warmed honey etc.

Pour your homemade almond milk into a glass jar or pitcher with a lid and store in fridge for up to one week.

Recipe Notes

  • For the first batch, The vanilla I used was NOT high quality and you could totally taste it. That, and I put in 1/2 tbsp which might have been a bit excessive. Next time I’ll try with high quality vanilla. It seems like a waste to blend a vanilla bean just to strain it all out (they’re not cheap)
  • A few recipes call for 3 1/2 cups of filtered water versus 4 which would make a creamier texture
  • All of the other recipes called for dates to be added so I’ll have to remember that next time too since I didn’t add anything but the vanilla in
  • I poured a little of the milk into the blender and tried it with a date and it did add a little sweetness to the milk
  • Next time I’ll try blending the vanilla bean with the almonds and water, then straining the mixture and see how that works
  • Some recipes also suggest blending in a 1/4 tsp cinnamon or nutmeg
  • A nut bag might be easier than working with cheese cloth so I might try that too
Save the Pulp
Save the pulp of the almonds, put on cookie sheet and dehydrate in oven on lowest heat until completely dry. Run through blender or food processor to make almond flour, which can be used in recipes in place of flour.
I’ll be posting about this soon!

Krusteaz Gluten-Free Giveaway

January is the month of giveaways over here and it’s awesome! Score for YOU! Earlier this week I posted about my AstroTwins giveaway so if you haven’t had a chance to enter yet you still have a little bit of time before it’s over! This weeks giveaway is back to a food focus and we all have resolutions and goals that we set in January. If you resolution is to incorporate more Gluten-Free living into your diet are you in LUCK! I’ve partnered with Krusteaz to do a giveaway of the same prize pack that they sent me when I wrote my The Gluten-free Gobble Waffle recipe using the gluten-free buttermilk pancake mix! My entire family is still raving about those waffles and how amazingly delicious they were! Trust me, you’ll want to get in on this giveaway! You can click THIS link to learn more about the mixes, find recipes and a retailer near you.

Screen Shot 2015-01-04 at 6.59.44 PM

You can win this Krusteaz Prize:

  • Gluten-Free Buttermilk Pancake Mix
  • Gluten-Free Honey Cornbread Mix
  • Gluten-Free Double Chocolate Brownie Mix
  • Gluten-Free Blueberry Muffin Mix
  • Krusteaz Tote
  • Krusteaz Spatula

Enter Here:

It’s a New Year! {And a Giveaway from the AstroTwins!}

UntitledHappy New Year everyone!! Can you believe it’s already 2015!? January always seems to be a time of cleaning, organizing and planning. Trying to get caught up and even, heaven forbid, ahead of something!

We usually start each year with resolutions and goals of making this the “best year yet” and “live the life we want”. I’m not big into resolutions but I do like to take some time each January and focus on the twelve months that are ahead and be mindful about what I’d like to accomplish and how I’d like to live them. Mindfulness and balance have long been two of my words and you’ll see them creep up in the blog quite a bit this year. 

I love reading my horoscope each morning, and granted I do take what is says with a grain of salt, but I can’t help but be surprised at how often it’s spot on to what I’m learning, going through and working on in my own life. Let’s take a quick moment here and clarify that there is a HUGE difference between an experienced professionally written horoscope and something you find on a gum wrapper.

As your planning the 2015 that you’d like to live and thinking about how you’ll look back on this year and what you accomplished, wouldn’t it be nice to have a few tools in your back pocket to help navigate the year and learn how to use what’s ahead to your advantage? Well, then read on my friends because you have a chance to win an fantastic giveaway from the AstroTwins and you can still get 20% off the course even if you DON’T win! SCORE!

What is the “Best.Year.Ever” Giveaway?

The AstroTwins have designed a special 90-minute online workshop that will help you live your best year yet. They describe it by saying, “Tired of making New Year’s resolutions that never stick, and only make you feel like a failure? Let’s say goodbye to all of that!” Ummmm…. count me in!

That’s an excerpt from the course description of the Best Year Ever course from the AstroTwins. During this course you’ll learn how to use the stars and key dates this year to live the life you want. Who doesn’t want success in love, career, health, relationships, family, fun & personal growth!? The giveaway also includes the 2015 Planetary Planner. Each sign has a chapter the is divided into difference sections for love, money/career and health with key dates for the year!

Enter here:
a Rafflecopter giveaway

The AstroTwins have also extended all of my readers a special discount! Enter “2015” at checkout and you’ll receive 20% off this bundle!


The Gluten-free Gobble Waffle // Krusteaz Blogger Bake-Off

1The folks over at Krusteaz asked me to be part of their “Krusteaz Blogger Bake-Off” to promote their new line of Gluten-free boxed mixes. They sent me two boxes each of their four new gluten-free mixes and all I had to do was create a brand new recipe that’s never before been created. My reward, the joy and satisfaction of writing a new recipe and a chance at winning their grand prize of a Crate and Barrel Gift Card. Kitchen time, a great topic for a blog post, recipe writing… I’m IN! Just to keep you reading, this is the ultimate Thanksgiving leftovers recipe! Read on!

I took a few days to look over each of the boxes, researched the recipes that have already been created and submitted and then did what I usually do when I want to talk about recipes; I called my trusty recipe consultant (aka mum) and talked through a few ideas. I received two boxes of each mix below and there were two that caught my eye: the cornbread and the pancake mix. I went through a few recipe ideas and this one just came to me the day after Thanksgiving when I took a box of the pancake mix home to make brunch. We had two gluten-free guests so I figured what better time to test a gluten-free mix than with a full house AND a few gluten-free eaters sprinkled in! We took a poll and everyone preferred waffles to pancakes so we were off. I made three batches of waffles so we could test flavors and have some fun with the mix-ins.

IMG_0267The first batch was just plain waffles with the mix. In the second batch I mixed in some fresh homemade apple sauce and the third was the crème de la crème: the gobble waffle. Now, before I get too far into the gobble waffle I wanted to talk about the plain and the apple sauce waffles for a minute.  We made the plain waffles so we could test the taste and texture of the mix. I’m happy to report that all four men fully approved! If I hadn’t broadcast that they were gluten-free no one would have noticed! The plain one had a nice simple taste that was great with or without syrup. Delicious, tasty, crunchy on the outside and everything a waffle should be. The batch that had the homemade apple sauce added into the batter beat out the plain waffles by a landslide. The flavor of the cinnamon and pureed apples were a perfect addition to the tasty batter and were just amazing. It had the taste of white cake batter! But, this was all before the gobble!

What is the gobble waffle you might ask? Well, the gobble waffle is the ultimate Thanksgiving day left-overs brunch recipe. It combines a box of the tasty, simple, pantry-ready Krusteaz Gluten-Free Buttermilk Pancake Mix with some left over turkey, gluten-free stuffing and a bit of gravy and/or cranberry sauce in place of syrup. Just when you thought that left-overs couldn’t get any better, you discover something like the Gobble Waffle. It’s crunchy, tasty, thanksgiving goodness all in one brunchy bite.  My mum has used the Krusteaz pancake mix for YEARS but I have to admit that I was a little  skeptical about the gluten-free mix. They just have that association of being not quite “there” for taste and texture but both the cornbread and the pancake mix blew my socks off! My gluten-free waffles were specifically requested for Christmas leftover brunch so you know they’re good! Thanks for being my secret weapon Krusteaz!

You can click THIS link to learn more about the mixes, find recipes and a retailer near you. I’ll be stocking this amazing, tasty gluten-free mix in the pantry for SURE!

*Krusteaz Gluten-Free GIVEAWAY*
Krusteaz has agreed to partner on a giveaway! Stay tuned this week for details!!!

2

Gluten- Free Gobble Waffle
Prep time:  5 minutes  | Total Bake/Cook time: 10 minutes
Servings:  6-8 people    |Level of difficulty: easy

Ingredients
1 box of Krusteaz Gluten-Free Buttermilk Pancake Mix
2 cups cold water
2/3 cup almond milk
1 1/2 tbsp oil
4 egg whites
Leftover turkey
Leftover Gluten-free stuffing ( Recipe here using Krusteaz Gluten-Free Cornbread Mix)
Gluten-Free Gravy or cranberry sauce to use in place of syrup if desired

Directions

Get out your waffle iron and pre-heat it. Pour the dry mix into a bowl and mix in the cold water, almond milk, oil and egg whites. Break up the turkey into small pieces and add into the waffle mix. Add the left over gluten-free cornbread stuffing and mix. Pour onto pre-heated waffle iron and cook until golden brown.

Serve with heated gluten-free gravy or cranberry sauce!

Pecan Brittle

IMG_1066 Tis the season for joy, decorations, lots of food, family and giving.  Most people these days have a good sized Christmas shopping list to take care of. You’ve got your immediate family, significant other, siblings, nieces, nephews, co-workers, friends, neighbors, acquaintances….it’s likely quite a list! Then, there is always that person who got you something and you didn’t get them something but now you have to think quick because they’re handing you a present and you have no idea how to dig out of this one gracefully.

Well, what if I told you that there is an awesome one-size fits all option that will knock out a solid half of your Christmas list and it comes with a homemade touch? It can even be make last minute or say, Christmas eve day before you head to that evening party you don’t have a hostess gift for! What to get the guy who has everything? Food. Stocking stuffers for the kids? Food. Co-workers, neighbors, that person who got you a gift and you didn’t get them one? Food. Food is a universally accepted amazing gift that, when homemade, has a perfect thoughtful holiday gifting touch! 

I count my blessings this time of  year because I truly enjoy cooking and being in the kitchen and homemade goodies are always well received! I’ve always tried to make as many of my gifts as I can. Homemade notecards, scarves, loaves of bread, cookies in a jar. Well, this year mum and I decided to try a new recipe from a friend of hers that has used it the past few years. We made pecan brittle, or candied pecans, or whatever it is you’d like to officially call it. It’s a buttload of butter and sugar mixed together with pecans. It’s Christmas crack. It’s sugary, crunchy, melty, yummy, addictive and down right deviously delicious.  And yes, I did say a buttload. It was pretty fun actually, we spent a weekend making these addictive morsels, Cranberry Grand Marnier Cake Muffins and Canned 48 jars of Cranberry Jelly. It was a gift making extravaganza!

IMG_1063These little guys hit it out of the park. They were THE perfect gift that had the thoughtful, homemade touch but could be made in larger quantities to check multiple people off the list. It’s actually a pretty easy recipe, when you start getting into candy thermometers it’s out of my league and attention span. The only thing to note about this recipe, which we learned the hard way, was that you can’t just double it or make batch after batch without cleaning the pan. Because you’re basically making caramel if you try to make a new batch with residue from the previous recipe it just messes everything up. Don’t ask me how or why… I didn’t major in science but just take it from us and quickly wash the pan after each batch, okay?!

Candied Pecans// Pecan Brittle 

8 tablespoons butter (one stick)
1 cup sugar
3 cups of pecan halves

Directions
Line a baking skeet with parchment paper and set the baking sheet to the side of stove top.


We used a stainless stele copper-clad bottom 10-inch skillet but a cast iron skillet would have worked better. Heat your pan over medium low heat. A fork works best to stir the butter and sugar mixture, and fold in pecans.

Once pan is fully heated, add 3 tablespoons of the butter and stir until melted. Add the full 1 cup of sugar to the melted butter and continue to stir until the mixture is pale and thoroughly mixed (no butter chunks or large chunks of sugar). Constantly stir the mixture, which should be thickening, so you don’t burn the butter or the sugar.

IMG_1064

Add the 3 cups of pecan halves and fold into the mixture. Continue to cook over medium-low heat, stirring constantly.

IMG_1067

Watch for the mixture to bubble, and at that point it should start to turn a golden-brown color similar to toffee.

IMG_1065

This process takes about 6-9 minutes to see the toffee color. Be patient and make sure you cook the long enough so you don’t have clumps or sugar or butter.

You will start to see clarified butter separating from the mixture and this indicates that they’re done.

IMG_1068

Remove skillet from heat. Tilt the pan and spoon out the clarified butter (or tilt the pan and scoop out the mixture to the prepared parchment lined baking sheet. Using two forks, quickly separate the pecan halves and make sure they are all laying flat.   

Let the candied pecans cool completely. Break pecan mixture into small pieces and package or store in an airtight container.

IMG_1070

These are a nice snack but are also amazing to sprinkle in salads, add to roasted beets, used when baking seasonal bread or as part of a cheese plate. You could use them as a pancake, waffle or ice cream topping or even crush a few on top of cheese cake. Are there other ways that you use candied pecans or could think of to enjoy pecan brittle?

Gluten-Free Stuffing

FullSizeRenderThere is one part of Thanksgiving that I love, stuffing. I’m usually a hard core protein and veggies first gal but there is ONE day of the year that whole lifestyle gets turned upside down. This year is my lucky year, we get on both Thanksgiving and Christmas! But, there’s a little variation this year, we’re testing out gluten-free stuffing. We took my mum’s classic stuffing recipe and substituted the Mrs. Cubbison’s Corn Bread Stuffing for homemade gluten-free croutons.

I’d been baking through some of the gluten-free mixes that Krusteaz sent me as part of the Krusteaz Blogger Bake-Off and we had a half pan of the gluten-free corn bread and decided to adapt moms amazing classic stuffing recipe to be gluten-free.


Gluten-Free Stuffing
prep time:  45 min  | cook time: 1 hr 30-45 min

Gluten- Free Honey Cornbread and Muffin Mix
1 Cup almond milk
1/3 Cup olive Oil + some for crisping the crumbs
1 Egg
Poultry seasoning
1 lb. roll of gluten-free sausage
1 medium yellow onion, chopped
1/2 bunch finely chopped celery
1/2 stick of butter
1 sour green apple, finely chopped
1/2 c golden raisins
1/4 c brandy
2 3/4 gluten-free chicken broth

Steps 1- 5 you can make up to three days ahead of time and store in an airtight container in the fridge. For day-of assembly, start at step 6.

  1. Pre-heat oven to 450 degrees. To make the cornbread croutons, take the corn bread and cut into small chunks. Toss lightly with extra virgin olive oil and dust with poultry seasoning. Bake corn bread in pre-heated oven until crispy, 30-40 minutes.
  2. Soak the 1/2 c golden raisins soaked in the 1/4 c brandy plus the 3/4 c. of the chicken broth. (Save the other 2 cups of chicken broth for later in the recipe).
  3. Sauté onion in 1/2 stick of butter. Throw in celery and sauté until translucent. Throw in the chopped apple and let sauté for just a bit longer. Scoop the mixture onto a plate.
  4. In the same pan, add the sausage and cook until crispy. Drain off any fat, there might not be any but you can soak it up with a paper towel.
  5. Drain the raisins, saving the liquid, and add to the sausage in the pan. Add the onion celery mixture and simmer about 5 minutes. Then add the brandy and chicken broth from the raisins and an additional 2 cups of chicken broth.
  6. Pre-heat the oven to 350.
  7. In a large bowl add the sausage and veggie mixture and a box of the stuffing crumbs and fold until moist. Don’t over mix or crush the bread piece.
  8. Butter either a two quart or three quart glass baking dish and add the mixture. Add a few pieces of very thinly sliced butter to the top of the dish. Cook 45 minutes covered in pre-heated oven.
  9. Turn heat up to 415, remove lid and cook for an additional 15 minutes. The top will look a little burned but don’t worry, that’s the BEST part and it tastes AMAZING!

Mum’s Thanksgiving Cranberry Sauce

FullSizeRender (1)Has anyone else just had the realization that Christmas is just one short month away? You can’t miss the signs, decorations are at every turn, the music is in every store. We can’t deny it any longer folks, the holidays are here! Each year I have conversations with friends and family about how we all have so much “stuff” and how hard it is to shop for everyone on the Christmas list. Isn’t there a one stop shop for people that don’t require specific or multiple presents? Yes, it’s called anything homemade. As someone who is obsessed with homemade/DIY and  loves to cook I’ve tried to make the majority of my Christmas presents the past few years and it’s been fun! One year I made scarves for everyone, another year I hand stamped note cards, another year I did cookies in a jar. It gets a little tough around the holidays to devote time to making presents so it’s a great idea to get started thinking about projects like this in October but with the work schedule this year I’ve spent most weekends sleeping, cooking, cleaning or catching up on the ever growing to-do list.

Well, this weekend has been a much needed change of pace lounging in pajamas, sleeping in, leaving the house only to play in the snow, playing games and watching Christmas movies all day long and munching on leftovers. It’s been divine. It’s also given me a bit of time to write which is always relaxing. Our Thanksgiving feast this year was just off the charts amazing, and it was actually pretty manageable, as manageable as an 18 pound turkey and homemade pies can be. I’m usually a protein gal, hands down. First thing on my plate will always be an inhuman amount of whatever protein is served except one amazing day a year that we call Thanksgiving. When my mum’s amazing Thanksgiving stuffing and Cranberry sauce are on the table all bets are off. Turkey is only the transportation vessel for the amazing cranberry sauce to reach my mouth. I talk more about the amazing stuffing in my blog post here but this post is about the cranberry sauce so let’s stay focused.

You can throw it in some toasted quinoa with a slice of turkey for a paleo leftovers snack. Besides using it up in leftovers, there are so many things you can do with this sauce that don’t require turkey. It makes a great spread for a slice of toast, or use it as a compote on some pork chops. You can bake jam filled butter cookies. for a tasty snack. The options are endless!

Mum’s Thanksgiving Cranberry Sauce
Prep Time:      |Cook time:
This recipe is for a single batch, but we usually double it for Thanksgiving 

1 1lb bag of organic fresh cranberries
1 large orange, juiced with some zest
3/4 c organic sugar
1 tbsp Grand Marnier

Place all ingredients in a pot and cook over medium-low heat (you don’t want to burn the sugar) and simmer until you hear the cranberries popping. I like my cranberry sauce a little chunkier so I turn off the heat when about half the cranberries are still in tact but you can cook until all the cranberries are dissolved if you like!

Mom’s Thanksgiving Stuffing

FullSizeRenderThere are a few things that I look forward to each year at Thanksgiving: getting together with family and my mum’s stuffing. There are a few things I love about the holiday season, the red Christmas cup at Starbucks, twinkle lights going up on all the trees downtown, the hope of snow in the city, Christmas cheer and decorations, presents under the tree and stuffing. Yes, stuffing. If you haven’t had my mum’s stuffing at Thanksgiving you haven’t lived friends. Bold statement I know, but it’s true. My mum has used the same stuffing recipe for as long as I can remember and I’ve loved it for as long as I can remember. For a gal who’s doesn’t usually lose her mind over bread, butter or sausage I go crazy for my mum’s stuffing. Thanksgiving doesn’t feel the same without it. There is some magic that happens when you cook up some Jimmy Dean sausage (the regular flavor! None of the others taste as good, we’ve tried!) and throw it in a casserole dish with some chopped onion and celery apple and mix it with a box of  Mrs. Cubbison’s Corn Bread Stuffing. It’s magic folks, pure magic. Already being in the kitchen cooking is a HUGE advantage in this situation because then I get the snag a few bites of the mixed up goodness before going in the oven.

This year mum and I cooked up the Turkey day feast and we had a blast in the kitchen! She brined and cooked the bird and whipped up some gravy from scratch and made a batch of her ridiculously delicious cranberry sauce and some homemade cinnamon apple sauce. I was in charge of roasting up our veggies and making a Pumpkin and Pecan pie with crust from scratch. I didn’t have time to home roast a pumpkin like I usually do so a can of Libby’s pumpkin stepped in. It’s a great pinch hit if you don’t have time to roast your own pumpkins. The entire feast was incredibly tasty, but my heart belongs to the stuffing. I dream about this stuffing all year and for some reason never wrote down the recipe so this year I made it a point to get her recipes and write them down! The next few weeks will be sprinkled with her mum’s recipes for Thanksgiving feast!

If you have one oven like we do, you can make the day-of cooking a bit easier by making most of this recipe ahead of time and simply assembling and cooking in between turkey and your other side dishes.

Mom’s Famous Thanksgiving Stuffing
prep time: 3o min  | cook time: 1 hour

Mrs. Cubbison’s Corn Bread Stuffing, 1 12 oz box
1 lb. roll of Jimmy Dean regular flavored sausage
1 medium yellow onion, chopped
1/2 bunch finely chopped celery
1/2 stick of butter
1 sour green apple, finely chopped
1/2 c golden raisins
1/4 c brandy
2 3/4 chicken broth

Steps 1- 4 you can make up to three days ahead of time and store in an airtight container in the fridge. For day-of assembly, start at step 5.

  1. Soak the 1/2 c golden raisins soaked in the 1/4 c brandy plus the 3/4 c. of the chicken broth. (Save the other 2 cups of chicken broth for later in the recipe).
  2. Sauté onion in 1/2 stick of butter. Throw in celery and sauté until translucent. Throw in chopped apple and let sauté for just a bit longer. Scoop the mixture onto a plate.
  3. In the same pan, add the sausage and cook until crispy. Drain off any fat, there might not be any but you can soak it up with a paper towel.
  4. Drain the raisins, saving the liquid, and add to the sausage in the pan. Add the onion celery mixture and simmer about 5 minutes. Then add the brandy and chicken broth from the raisins and an additional 2 cups of chicken broth.
  5. Pre-heat the oven to 350.
  6. In a large bowl add the sausage and veggie mixture and a box of the stuffing crumbs and fold until moist. Don’t over mix or crush the bread piece.
  7. Butter a glass baking dish (you can use either a two quart or three quart glass baking dish) and add the mixture. Add a few pieces of very thinly sliced butter to the top of the dish. Cook 45 minutes covered in pre-heated oven.
  8. Turn heat up to 415, remove lid and cook for an additional 15 minutes. The top will look a little burned but don’t worry, that’s the BEST part and it tastes AMAZING!

DIY Turkey Frills

FullSizeRenderThanksgiving is in a matter of hours. Are you in denial too!? Okay, now back to the matter at hand. Turkey. Twenty pounds of turkey. Turkey that still needs to be brined. This year we decided that we’d stay put for the holidays so my dear side of the family gets us and the misters cuzzie who’s up to visit from Portland. Mum and I decided that we’ split Thanksgiving cooking so I’m on turkey, pie, gravy and side dish duty! Pie crust, pumpkin pie and pecan pie recipe are already posted  but stay tuned for the others!

No Thanksgiving turkey would be complete in presentation without the little turkey frills! Hey Google, thanks for the help! Below is a super simple Turkey Frill DIY, just remember to put them on for the presentation part and don’t cook them in the oven!

DIY Turkey Frills
1 sheet of white copy paper
scissors
tape