Blasted Broccoli

One of my favorite foods is broccoli. Studies show the health benefits of consuming broccoli include high amounts of vitamin C, which aids iron absorption in the body, folic acid and potassium as well as being fiber-rich. My favorite bar serves a dish called “Blasted Broccoli” and I sought to re-create this delicious favorite at home! I have been making this dish for a few years now have tried various methods of “greasing” these little florets; coating the cooking sheet with PAM or olive oil, tossing them in olive oil, brushing on olive oil with a an OXO Pastry Brush (if you don’t have one BUY IT!), trying to cook them with NO oil (BAD idea)… and they were always delicious but I could never quite get it PERFECT!

Blasted Broccoli

Ingredients

Directions

  1. Wash the broccoli and slice in half so there is a flat side and preheat oven to 400
  2. Lay down a sheet of Renyolds wrap non-stick Aluminum Foil
  3. Mix up a little ramekin of olive oil and minced garlic
  4. Lay broccoli out on cookie sheet  flat side down and lightly brush with the olive oil and garlic then season the tops with cracked pepper and salt to taste
  5. Cook in pre-heated oven for 10-12 minutes, flip over and cook until your desired level of crispy is achieved (for us it’s usually another 10 minutes)


Curry Coconut Turkey Veggie Soup

Curry Coconut Turkey Veggie Soup
Can’t WAIT to make this one! Got this recipe from the BFF and she’s an incredible cook! Once I make it I’ll upload a pic!

ingredients

  • Onion
  • Carrots
  • Celery
  • EVOO
  • 1lb Ground Turkey
  • Salt
  • Curry/cumin (to taste)
  • 2 qts Chix broth
  • 5tbsp Thai yellow curry sauce from TJ
  • Zucchini/mushrooms
  • 1/2 can coconut milk
  • Little more salt and some cayenne
  • 1/2-3/4 c fresh chopped cilantro

directions

  • Sauté onions, carrots and celery in EVOO until the carrots barely become soft
  • Add the turkey and brown in the same pot seasoning with salt, curry and cumin to taste
  • Add chicken broth the ingredients already in the pot
  • Add 5tbsp Yellow curry sauce from Trader Joes , chopped zucchini and mushrooms and 1/2 can of coconut milk with salt and cayenne to taste and simmer until veggies are cooked
  • Just before serving, mix in 1/2-3/4 c fresh chopped cilantro and let simmer for a few minutes

Joy the Baker (A woman and a cookbook)

joy the baker cookbook (Photo from her website)

I was SO excited to see that she was had on her calendar not one or two but THREE book signing’s in Seattle! How special are WE! Reading Joy blog feels like sitting down to coffee or opening open a bottle of wine and ruffling some delicious creation in the kitchen with a good friend. You’ll immediately be endeared to her fun-loving realism (Can’t we just say medium at Starbucks!?) and have the urge to take a bite out of every one of her photos. With the inspiration of cooking parents, Joy developed her baking skills with the most esteemed tasting committee a baker can have, their own taste buds and those of friends. Joy the Baker has been around since 2008 and is now producing her FIRST cookbook (Congrats!!), Joy the Baker Cookbook: 100 Simple and Comforting Recipes.

Any food blog whose Recipe” list starts with Booze is okay by me! And let’s be real… this excerpt from her latest post, “Coffee and Bacon Sandwiches” talking about the motivation and inspiration for her cookbook just proves that recipe addicted, food photographing, culinary bloggers are cut from the same thread:

“I know you eat popcorn for dinner.  I know you bake brownies for boys.  I know you’re just looking for an excuse to make biscuits for every meal of the day…. and I love you I love you I love you!!!”

Well, my version of popcorn was gourmet nacho’s with rice cheese BUT I was that girl, okay okay…and still am, that bakes the corresponding cookie for each holiday. I’m the girl who dreams of recipes in her sleep and finds every excuse to throw a dinner party. Bake Popovers is the first item on my  to do list and yes, I spend hours on Pintrest looking at food pictures and plotting about what I can cook for the next meal.  But Joy, we love you too!!!Can’t WAIT to get the book, have her sign it, and meet the woman behind one of my favorite blogs! Where do I add the count-down ticker until book signing day! There’s an app for that right?

Joy the Baker Cookbook: 100 Simple and Comforting Recipes View Product on Amazon.com

Chicken Marbella

My mum made this recipe while I was home a few weeks ago and I simply fell in love! The warm flavors filled the house and it was so easy to make, so I decided to try my hand and make it for my Oscars Party. It was a HIT!! This dish is great as an entree or an appetizer and is sure to impress your dinner guests! This recipe comes from The Silver Palate recipe book. Here are a few pictures to make you hungry!


Chicken Marbella

In a large bowl mix the following then marinate in fridge overnight:
2 1/2lbs Chicken (I used breasts only)
1 head of garlic, pureed or minced
1/4 c. dried oregano
Coarse Salt/Pepper to taste
1/2 c. red wine vinegar
1/2-1c. white wine
1/2 c. olive oil
1 c. pitted prunes
1/2 c. pitted Spanish green olives
1/2 c. capers (with a bit of juice)
6 bay leaves

To cook:
Preheat oven to 350F
Arrange chicken in single layer on shallow baking pan with marinade
Sprinkle with a bit of brown sugar
Bake 50 minutes basting with pan juices
Serve on platter with a few spoons of juice over the top and sprinkled with parsley

Vegan Coffee Cake

Vegan coffee cake

Recipe from: thecleaneatingmama.com

ingredients

  • For the crumb topping:
  • 1/3 cup melted non-dairy butter, such as Earth Balance
  • 1/2 cup turbinado sugar or brown sugar
  • 1 cup spelt flour
  • 1 1/2 teaspoon cinnamon
  • For the cake:
  • 1 1/2 cup spelt flour
  • 3/4 cup natural cane sugar, organic if possible
  • 2 1/2 teaspoon baking powder
  • 1/2 teasp salt
  • 1 flax egg (1 tablespoon flax meal + 3 tablespoons water)
  • 1/2 cup non-dairy milk of your choice
  • 1/8 cup apple sauce
  • 1 tablespoon pure vanilla extract

directions

  1. Preheat oven to 325 degrees.
  2. Prepare the crumb topping – melt butter, set aside to cool. In a medium bowl combine sugar, flour and cinnamon. Then add butter and mix until ingredients are fully wet. You will have globs of sugar mixture
  3. Prepare the cake – Combine flax and water first. Then in a medium bowl combine milk, apple sauce, vanilla and flax egg. Mix well. Then add dry ingredients. Mix until all flour has been combined, but be careful not to over mix.
  4. Pour batter into a 9 x 9 baking dish that has been lightly sprayed with cooking spray. Now evenly add your crumble to the top of the cake batter.
  5. Bake for 40 minutes. Check with a toothpick to make sure cake has fully cooked.

The Moscow Mule…with a Sherpa Twist!

We can’t remember where we first experienced this wonderful, refreshing and tasteful drink that has blessed our lives, but I hope that this post will inspire a first encounter for you!

Seeking to do something extra special for date night I decided that we needed to spend a fun night in, which was also better on our budget, and decided to make what turned out to be a most incredible dinner! Our menu was planned solely around the drinks like any cocktail menu should and after much debate and recipe searching I settled on writing a recipe for Cilantro Lime Skewers & “whinging” the compilation of some loaded Potato Skins (recipe here). We splurged and got the traditional Copper serving Mugs for the Mule’s because, life is short and really… is there really ANY other way to drink these!?

I mastered the kitchen side while I instructed my faithful sous chef to play bartender and he whipped us up a pair of wonderful drinks!! According to Wikipedia, “the cocktail was invented in 1941 John “Jack” Morgan, President of Cock ‘n’ Bull Products & an East Coast spirits and food distributor.”

The smell of the fresh squeezed lime and the aroma of mint overtook the kitchen and I couldn’t help by peek over his should and snap a few pictures (staged to perfection of course!) while he concocted our libations. They turned out marvelous and just when I thought we’d reached the utmost perfection after the third sip, my bartender grabbed my mug and added his own little twist to the drink: a splash of Sailor Jerry Rum. Well now, ladies and gentlemen, this was the game changer. This is now an ENTIRELY DIFFERENT DRINK! Okay, maybe not that dramatic of a change but it warranted a new name and we decided on the Summer Sherpa. There is a story behind this but I think I might loose you if I dive into it to much. For now, let’s just all grab a Summer Sherpa and talk about good times and great oldies! (And the hope of summer where we can be sipping these on the roof.. okay there’s half the story behind the name! 🙂

On a side note for ingredients, we LOVE the Crater Lake Vodka and Gin; it’s SO smooth! I would highly recommend that you stock your pantry with this wonderful Vodka, but truly any Vodka will work for this recipe. This go around was preparation for what will be many nights of enjoyment up on the roof this summer, sipping Moscow Mule’s out of our fancy copper cups!

Moscow Mule
Ingredients for single drink

Directions

  1. Squeeze lime into copper mug (and if you’d like you can drop in half lime

  2. Add 2 or 3 large ice cubes, then pour in the Crater Lake Vodka

  3. Fill with cold ginger beer (optional Sailor Jerry Rum added here) and garnish with a fresh lime and a few springs of mint

  4. Enjoy your wonderful drink!


Once you make the recipe, I’d love to see your pictures, hear your personalization flares, and read what menu’s you created to accompany this wonderfully refreshing drink!

Homemade Limoncello

In the midst of a frigid cold Seattle day, a slight break in the rain, and at least a few months of grey ahead I needed some hope for spring and summer. A small reminder that the sun will come out again and roof top BBQ’s and 10pm sunsets aren’t just a distant memory but a hopeful upcoming delight. One of the most delicious discoveries last summer was Limoncello. One of my girlfriends brought me a bottle of her batch as a housewarming gift and little did I know…it was DELICIOUS! I love citrus in cocktails and this wonderful libation changed my very life!

This recipe takes about 6 weeks but it’s WELL worth the wait! Feel free to experiment with other citrus; blood oranges, tangerines…the possibilities are endless! For this recipe I  did a batch of lemon and a small batch of grapefruit so I’ll keep you posted on how they turn out!

Update- the grapefruit turned out MARVELOUSLY! I doubled the citrus and halved the sugar so it’s most assuredly a mixer as opposed to the traditional aperitif but it’s still quite delicious!


A bit of History (from Wikipedia)

“Limoncello is an Italian lemon liqueur mainly produced in Southern Italy.It is traditionally served chilled as an after-dinner digestivo. Along the Amalfi Coast, it is usually served in small ceramic glasses themselves often chilled, the Amalfi coast being a center of both ceramics and limoncello production. This tradition has been carried into other parts of Italy.”

Rick Steves article on Limoncello cites that it’s the second-most-popular liqueur in Italy after Campari!

Notes:

  • Whatever volume you have for the first phase, you will need about double the space when you add the simple syrup so start with a LARGE container!
  • I’ve heard with all the lemon and simple syrup in the recipe, that you can use cheap vodka and run it through a Brita a few times. For the first go around I used the good stuff, since I didn’t want to mess it up but the next go around I might think about a little lower shelf alcohol.

Limoncello
Ingredients

2 lbs Meyer lemons
1 qt vodka (I used Sky)
6 c water
2 1/2 c sugar
Cambro restaurant style plastic bins
Norpro Natural Cheesecloth
Jars or Bottles for the final product
OXO Good Grips Citrus Squeezer
Microplane

Directions (Initial Step)

  • Zest lemons with Microplane, making sure that you don’t include any of the white pith, into the Cambro restaurant style plastic bins. Pour the alcohol into the bins and mix with the zest. Place bins in a dark place. Shake up the mixture once a week to assure that all the oils and alcohol are mixing together.


  • Once you’ve mixed up the Lemoncello, cut the citrus in half and juice into a separate bowl. If you don’t have one, purchase a OXO Good Grips Citrus Squeezer. This handy little tool will be your saving grace for the juicing part! Since the juice  makes hands slippery during this part, the grip on the  handles is a really nice feature while the ceramic types can slip around a little. Once you’ve juiced the citrus, dispose of the rinds and pour the fresh juice into ice cube trays to use in cooking and baking.


Directions (4-6 weeks later)

  1. On the 4th week shake up, check and see if the zest is white. This indicates that the oils have fully been extracted. If not, allow to steep 1-2 more weeks.
  2. Once the lemons are pale, strain the liquid through Norpro Natural Cheesecloth into a large bowl and discard the zest. On this step it’s helpful to have another set of hands or a large rubber band to adhere the cloth before pouring the liquid and the zest.
  3. In a saucepan over low heat, heat the water and sugar until the sugar is dissolved and the syrup is clear. Let cool to room temperature and mix into the strained alcohol.
  4. Pour into bottles that you wish to display the final product in.
  5. Place back in a dark cupboard and let steep for 1-2 more weeks. Then you’re done and ready to enjoy!!
  6. Limoncelllo can be stored in the fridge or freezer for weeks!


Weekend Breakfast: Potato Pancakes, Poached Eggs & Avocado Sauce

Potato Pancakes, Poached Egg, Avocado Sauce

Recipes for me serve as general guidelines for inspiration, so this meal is the result of a recipe for avocado sauce and a fridge of leftover ingredients from cilantro lime marinated chicken skewers and homemade potato skins.

It was super easy to make and, as I’ve mentioned in other posts, I LOVE cooking weekend breakfast and brunch! Today’s religious experience was so simple and flavorful! It even got the complement comment  “this is SO good! I feel like I’m on vacation! “… Now that makes a chef happy!

The crispy texture of the pancake mixed with the creamy avocado sauce and the runny egg is just to die for! The lime in the avocado sauce and the spices made for a very refreshing meal. I couldn’t believe how the flavors  and textures mixed. Don’t get me wrong, I knew it would be good but I was actually surprised at how incredibly delicious it was! I regret that I have only one stomach! You can play around with different spices and ingredients, and you might get extra points if you find a way to mix in some tequila! 🙂 Breakfast drink anyone!?

Potato Pancakes, Poached Eggs & Avocado Sauce
a rough step by step guide

Potato Pancake & Poached Eggs Ingredients
Potato
Milk (you can use regular or an alternative)
Cheddar Cheese, grated (regular and/or alternative)
Eggs
Fresh Salt & Cracked Pepper
Cilantro (to garnish, if desired)
Green Onions (to garnish, if desired)
Sour Cream (to garnish, if desired)

Avocado Sauce Ingredients
Avocado
1 lime
Fresh Salt & Cracked Pepper
Cayenne Pepper
Cumin
Garlic, minced
Cilantro

  1. Heat pan for potato pancakes. I swear by my Calphalon Crepe Pan! It heats evenly and the non-stick makes for quick and easy clean up!
  2. Mash together the potato, milk, salt & pepper to taste. Make sure to get it as smooth as you can without any potato lumps. While the potato pan is still heating, chop the green onion, cilantro and grate the cheese.
  3. To make the avocado sauce, mix together all listed ingredients to taste until smooth. Be mindful on the cumin, it’s a strong flavor and can easily overpower the flavors if you’re not careful!
  4. The potato pan should be hot by now, scoop in the potato and carefully flatten and shape into a circle. Cook until crispy on one side and flip. Add the cheese and allow it to melt. Once the cheese is fully melted, move to plate and smear avocado sauce on the top.
  5. Once you flip the pancakes, start the water for the eggs boiling and poach the eggs for 3 minutes. Have a small ramekin handy to drain the water from the eggs. I LOVE the CorningWare Ramekins, they’re so stylish and the perfect size for poached eggs. After 3 minutes, don’t let the eggs overcook, remove the egg with a slotted spoon and rest the spoon over the ramekin to allow the last drops of water to fall. If you don’t do this, the water will soak into the pancake and make it soggy.
  6. Place the poached egg on top of the avocado adorned pancake, and garnish with cilantro, green onion, sour cream, and spices as desired. You can add a little salsa if you wish, I wanted to bring out the flavor of the avocado sauce so we didn’t use it for this breakfast.


Simple Meat Free Fall Meals: Marinated Chickpeas, Quinoa and Winter Veggies

It’s that time of year again…the Pumpkin Spice latte posters are up, I’m wearing a sweater, the winter boots and scarves are within arm’s reach and the thoughts of curling up with a good book while something delicious bakes in the oven is starting to occupy my mind.

While I usually resent the impending cold and Seattle gloom, gearing up to daily dress in 27 layers like the little brother in A Christmas Story (“I can’t put my arms down!) I’m starting to feel differently this year. I’m starting to crave warm winter soups, squash dishes and wholesome comforting baked goods.

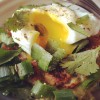
Nothing feels better on a cold day than a nice warm comforting meal. This is a delightful dish that is a meat free option. Chickpeas and quinoa are great sources of non-meat protein and are actually quite easy to cook with! The chickpeas can be marinated overnight or for as little as 15-30 minutes and the quinoa cooks up in less that 20 minutes, leaving you with a delicious, nutritious, simple to make, meat free meal. If you’re making the oven veggies using either cauliflower (as pictured here) or any other veggie (we love eggplant, asparagus, Brussels sprouts, winter squash or broccoli) that will take a bit longer so budget bout  30-45 minutes for that meal.

Spare the fresh kale, which can be substituted for spinach, arugula, beet greens, chard or skipped all together, the ingredients are all cupboard safe! Minimal effort which is just my style! Prepping ahead of time and cleaning dishes as you cook will make for a truly effortless cooking experience! We make a few variations depending on what spices we’re in the mood for, what we have in the fridge and how hungry we are so experiment with the flavors in the chickpea marinade, trying different broths and liquids on the quinoa and squash or spinach variations. I always love hearing what variations others come up with so post a comment with your personalized meal!

Try with some fresh roasted pumpkin too!

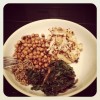
Marinated Chickpeas, wilted garlic kale with shallots, quinoa and roasted cauliflower

  • 1 can chickpeas, drained
  • ½ c quinoa
  • 1 c water
  • 1 bunch fresh kale leaves separated from the stalk and chopped
  • 1 medium shallot
  • minced garlic
  • 1 head of cauliflower
  • spices I usually open the cabinet and mix up spices depending on how I’m feeling but in this meal I typically use garlic, dried rosemary, salt, pepper, parsley
  • Balsamic and EVOO
  • White Wine- I NEVER cook with a wine I wouldn’t drink so choose whichever you’d like. Anything from a Chardonnay to a Riesling works. I usually use Pinot Grigio or a nice flavorful table white.

Marinate the chickpeas in spices, white wine and a few dashes of balsamic. I like to marinate them overnight but you can soak them for as little as 15 – 30 minutes. Wash and pat the kale dry. Cut off the stalk and chop the leaves, then chop the shallots.

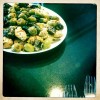
Pre-heat the oven to 450 and cut the cauliflower florets, toss in olive oil and salt/pepper to taste. Lay foil down on a baking sheet and spread the cauliflower out to roast. Depending on how crispy you desire, roasting can 20-40 minutes. Half way through cooking use a spatula (they can get a bit floppy before they’re crispy) and flip them over so they roast equally on each side.

Heat small pot on the stove and toast the quinoa for 2 minutes. Stir the quinoa around so it doesn’t burn, which will happen very quickly if you don’t watch it. Once toasted, remove and rinse then return to pot and add 1 cup water. Ratio is ½ cup quinoa for 1 cup water so if you wish to make more just keep the ratio and you’ll be good! Bring to a boil (a minute or two) then kill the heat, cover and let sit for 15 minutes then fluff with a fork and you’re ready!

After you start your quinoa boiling with the water, heat a sauté pan. Remove the chickpeas from the marinade, I use a slotted spoon to do so, and toast on medium-high until the exterior starts to brown, usually about 10 minutes. Every few minutes shake the pan a bit to move the chickpeas around so they brown evenly. Once they’re done, remove and sauté the onion and garlic in a pan until the onion starts to become translucent then add the kale and cook until wilted.

All the different dishes should be ready about the same time so you’re ready to pour yourself a nice glass of wine and dish up a delicious meal!


Do you Know yourself?

“What is necessary to change a person is to change his awareness of himself.”
— Abraham H. Maslow

Stop. Look. Listen.

Step back from life and be alert of situations around you. Be aware of yourself, your responses, your thoughts and perceptions. Learn about who you are. Change what you feel needs to change to make you a better person and help you become the person that you wish to be. Keep your eyes on the prize…you’ll get there!